
Menu management
Building your menu — categories, items, variants, modifiers, combos, offers and digital menu boards.
The menu is what your customers order from, and what your kitchen cooks from. It covers item types, categories, named menus, individual dishes and their sizes, combos, promotional offers, and the digital screens that can display them.
What it is
Menu management is the set of screens where you build your restaurant's catalog. It goes from the broadest classification — vegetarian or non-vegetarian — all the way down to a single dish, its sizes, and the deals built on top of it.
Who uses it
- Brand and outlet managers build and maintain the menu — items, categories, combos, offers and display boards.
- Waiters and other till staff only ever browse the menu, to pick dishes while taking an order. They never see an Add, Edit, or Delete button anywhere in this section.
- Item Types — the vegetarian/non-vegetarian style classification — is the one part of the menu kept for brand-level administrators only. No outlet-level role can open that screen at all. This has been confirmed by testing it live.
- Customers see the finished result — on the till screen the waiter uses, on a wall-mounted display board, or on a printed/PDF menu card.
Where it lives — the Menu section of the sidebar, with its own sub-pages for Menus, Items, Categories, Combos, Offers, Displays and Item Types.
Current status — live. Every screen described below is a real, working page. This was confirmed by checking the actual screens directly, not just assumed from their menu labels.
How it works
Building the menu, step by step
The broadest classification — vegetarian, non-vegetarian, beverage, and so on. Set once for the whole brand, by a brand admin, so every outlet in the chain classifies dishes the same way.
Starters, mains, desserts, drinks. How the menu is grouped for the customer, set per outlet.
A menu is a named, publishable collection — a breakfast menu, a weekend menu, a bar menu. Items belong to one or more menus, so the same dish can appear on more than one without being duplicated.
The dishes themselves — name, description, price, images, preparation time, the kitchen station that prepares it. Kitchen stations are set up separately, on Kitchen stations — create them there first if none exist yet for this outlet.
Sizes or versions of one item: half or full, small / medium / large. Each variant carries its own price.
Choices the customer makes — extra cheese, no onions, spice level. Modifiers are their own screen — see Modifiers and options.
Several items sold together as a deal, optionally letting the guest swap what's included.
The Menus screen
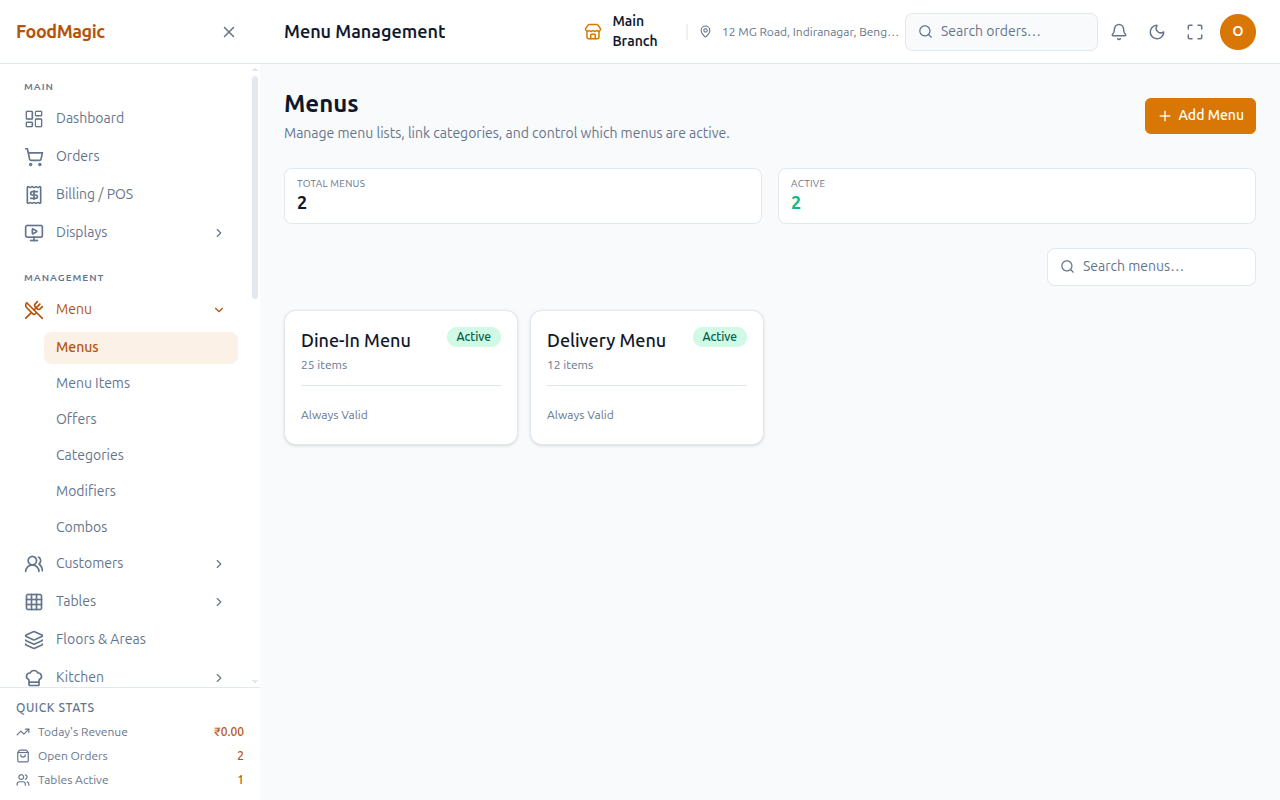
The sidebar's Menus link takes you here first — a simple list of your named menus (Breakfast, Weekend, Bar). Each one can optionally have a start and end date, and each is marked either published or unpublished.
Add Menu opens a form for the menu's name, a web-friendly short name (filled in automatically from the name if you leave it blank), whether it's published, an optional date range for when it's valid, and any extra notes. The name has to be unique across the whole brand — categories and item codes only need to be unique within one outlet, but a menu name doesn't. Use this before assigning items to a new collection, like a seasonal menu or a lunch-only menu. Adding a menu needs the same permission as adding a menu item (see How it is secured below).
Search menus… filters the list by name as you type.
It's normal for two menus to have different numbers of items — that's not a mistake. A delivery menu, for example, can leave off dishes that don't travel well, while the dine-in menu carries the full range.
Items in detail
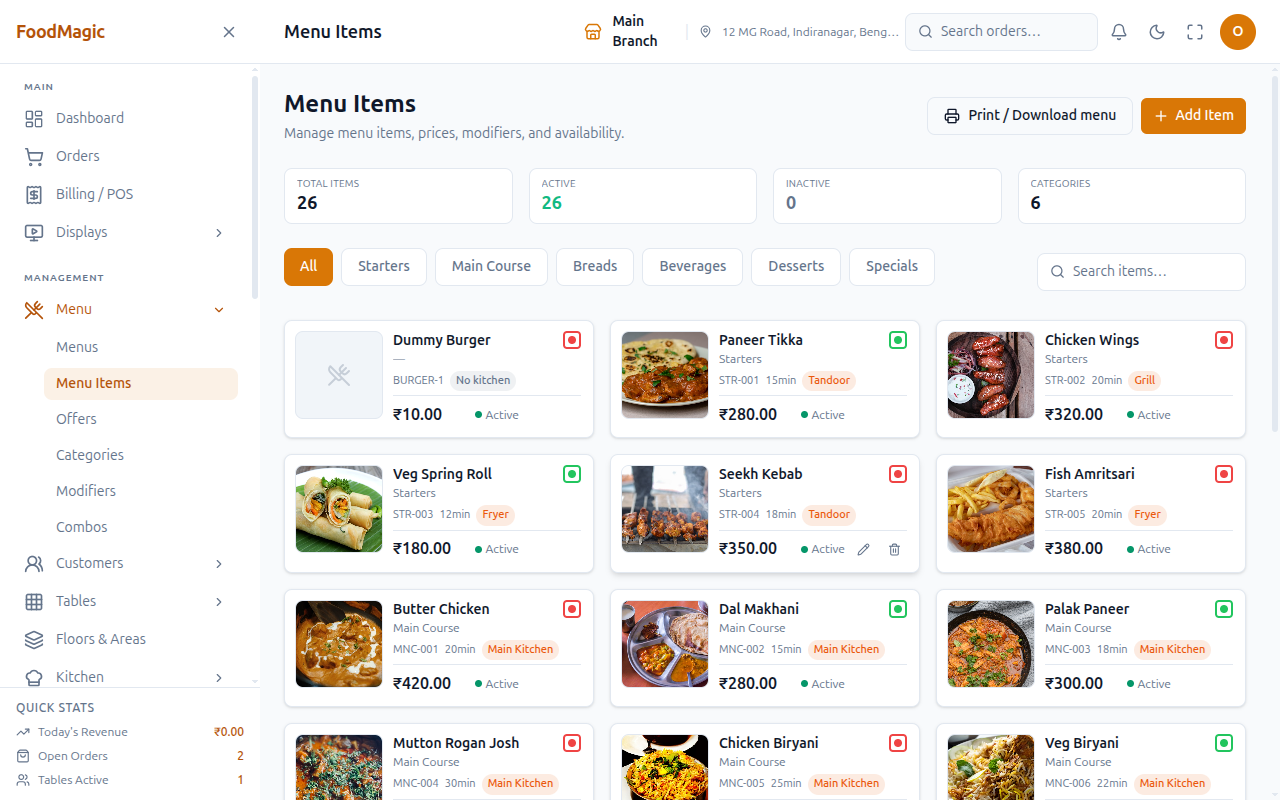
Beyond the basics, a menu item can carry several images, which you can add or remove one at a time. It can also be printed on its own, using a dedicated print view.
Item codes only have to be unique within one outlet, not across the whole brand. Two branches can use the same code for their own dish. When you delete an item, its code becomes free again, so you won't get stuck with a "code already used" error for a dish that no longer exists.
On the Items screen, Add Item opens the item form — name, description, price, category, item type, prep time, item code, images, tax class, and variants. This is where you add a new dish to the menu. Waiters never see this button. The screen is read-only for anyone without permission to create items — this was confirmed by walking through the waiter role directly.
Category filter chips — All, Starters, Main Course, Breads, Beverages, Desserts, Specials, in this outlet's case — filter the item list that's already loaded on screen. These chips are built from whatever categories this outlet actually has, not a fixed list.
Search items… filters the same loaded list by item name — the fastest way to find one dish in a large menu without paging through categories.
You can also find a menu item from anywhere in the app, using the Search anything… box in the top header — alongside Orders, Customers, Tables, and Staff. See Orders → Finding an order for how that search box works.
Print / Download menu opens the dedicated print screen described below in a new tab, for producing a paper or PDF menu for the front of house.
Printing the menu
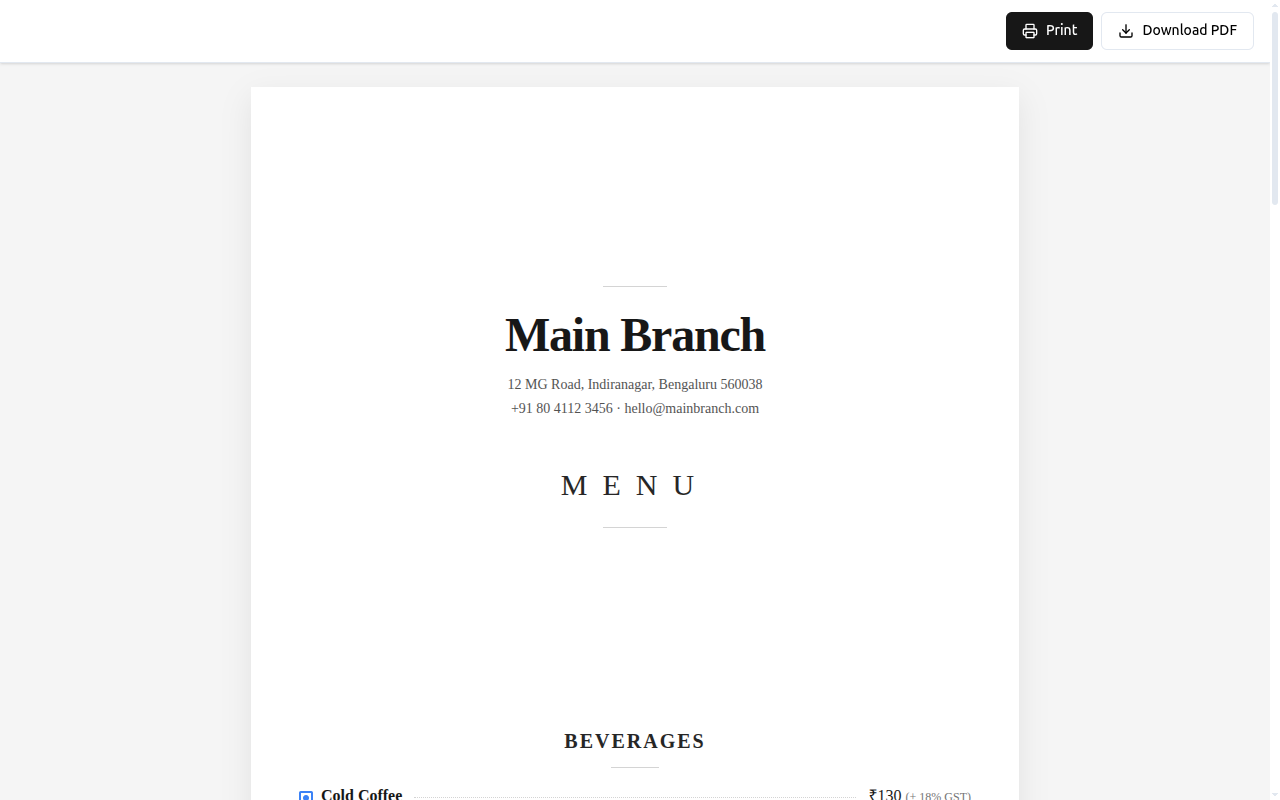
This is a standalone page, without the usual dashboard menus and sidebar. It gathers all active items, along with their categories, tax classes, and variants, plus the outlet's name, address, and logo — then lays it all out as a printable booklet.
Print uses your browser's own print function directly. Nothing is generated elsewhere, so what you see on screen is exactly what comes out on paper.
Download PDF turns that same on-screen booklet into an A4 PDF, entirely in your browser. Use this when you want to email or archive the menu instead of printing a physical copy.
Confirmed: if a Brand Super Admin opens the print page directly, the page itself loads, but the booklet stays completely empty, because the items behind it fail to load. See How it is secured below for why.
Categories
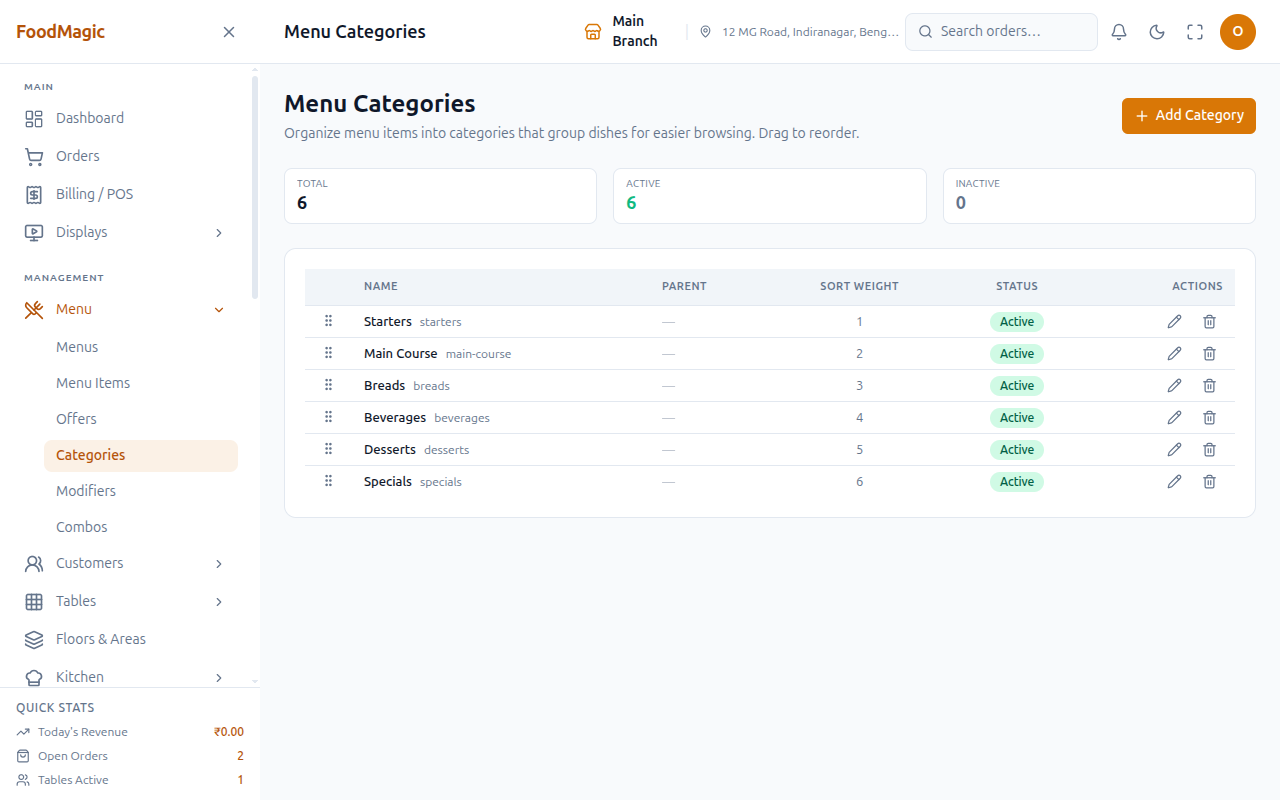
A category can nest one level deep — a category inside a category. It has a sort order that controls where it appears, and a visibility setting for each ordering channel (dine-in, takeaway, delivery). So a category can exist without showing up on every ordering channel.
Live columns: Name, Parent, Sort Weight, Status, Actions.
Add Category opens a form for the name (which has to be unique among the outlet's active categories), a parent category if you're nesting it, its sort order, whether it's active, and visibility for each channel. Use this when you're restructuring how the menu is grouped, or adding a new section — a Specials category for a seasonal push, for example.
A category cannot be deleted while it still has menu items sitting in it — move or remove the items first.
Item variants
There's no separate screen for variants. They're managed directly on the item's own form — half or full, small, medium, or large, each with its own price. Viewing, adding, editing, and removing variants follow the same permission rules as menu items in general.
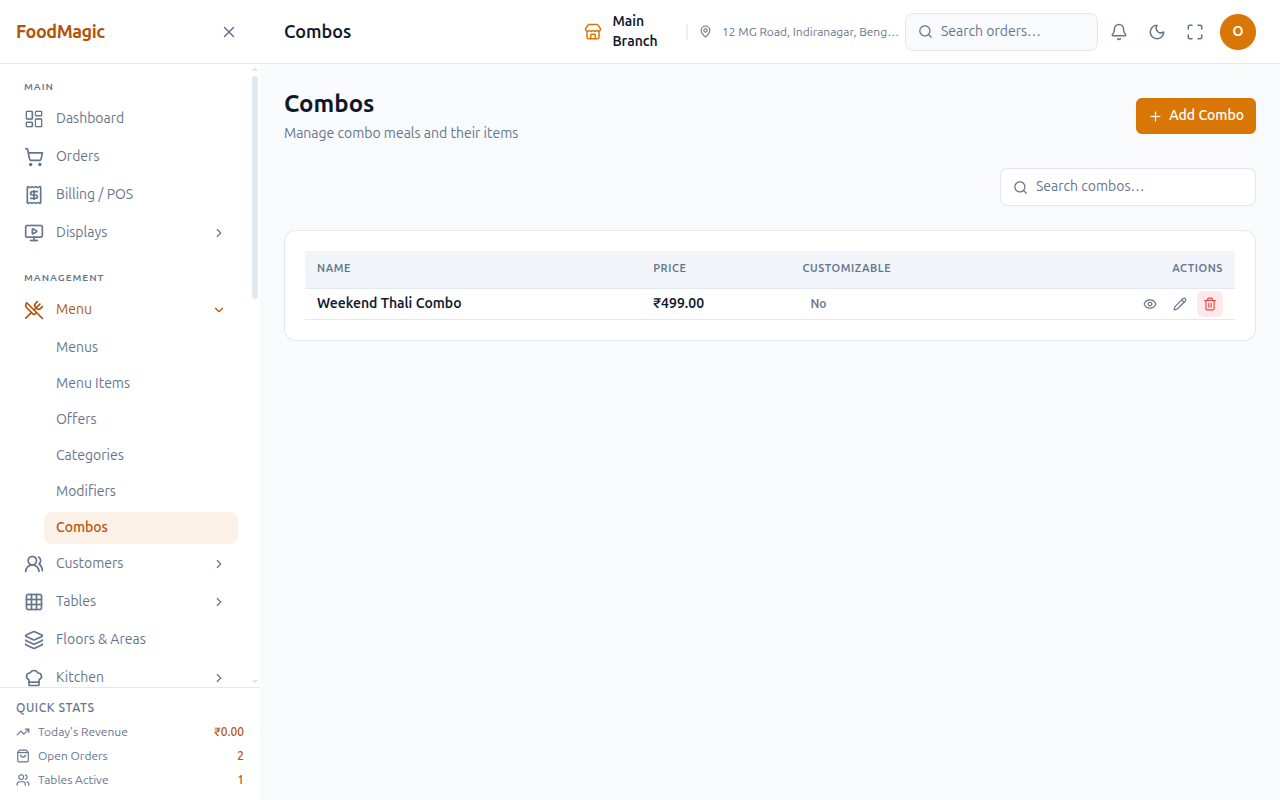
Combos
Several items sold together, optionally with the customer allowed to swap what's in it.
Live columns: Name, Price, Customizable, Actions, plus a Search combos… filter.
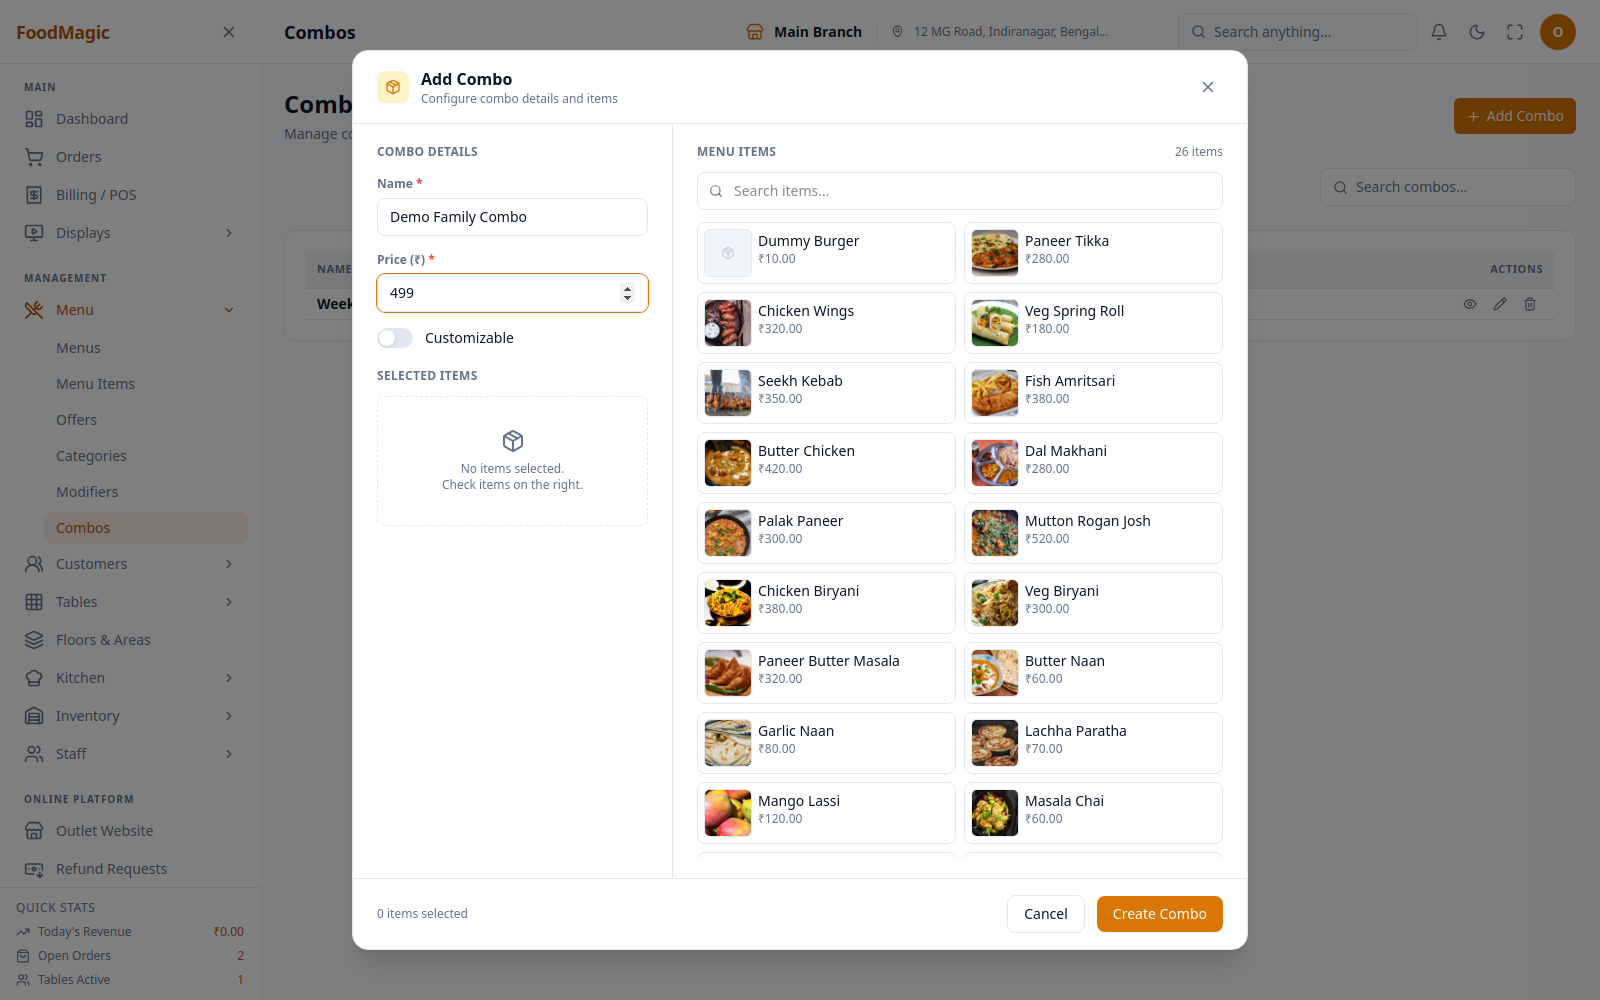
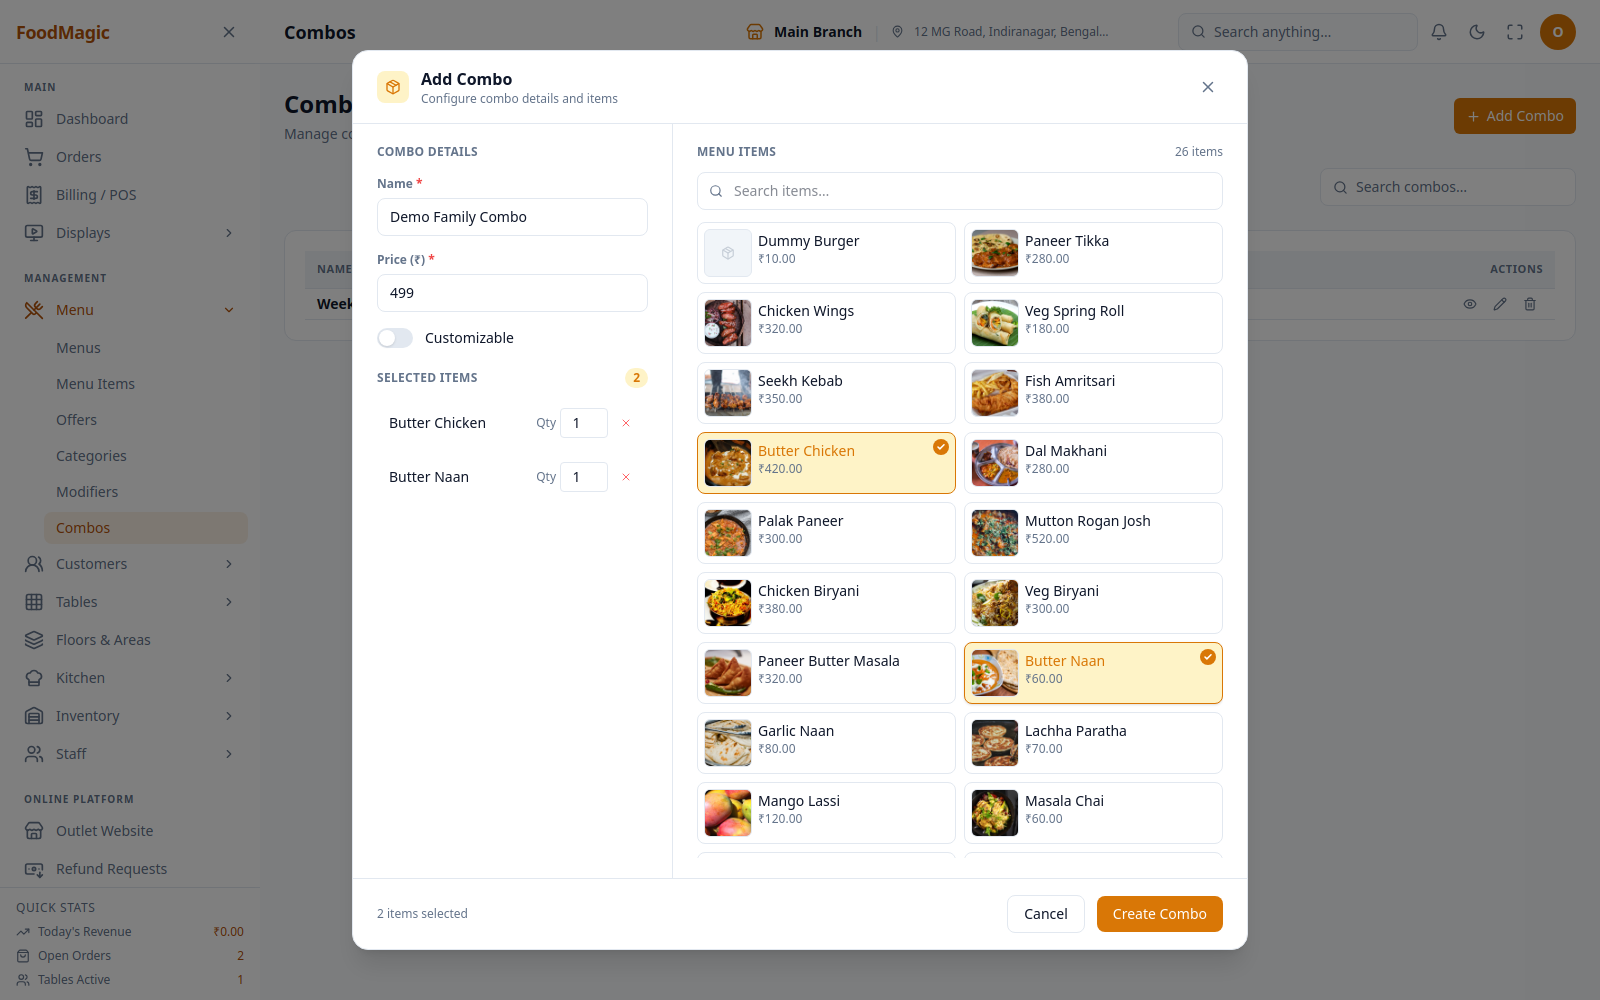
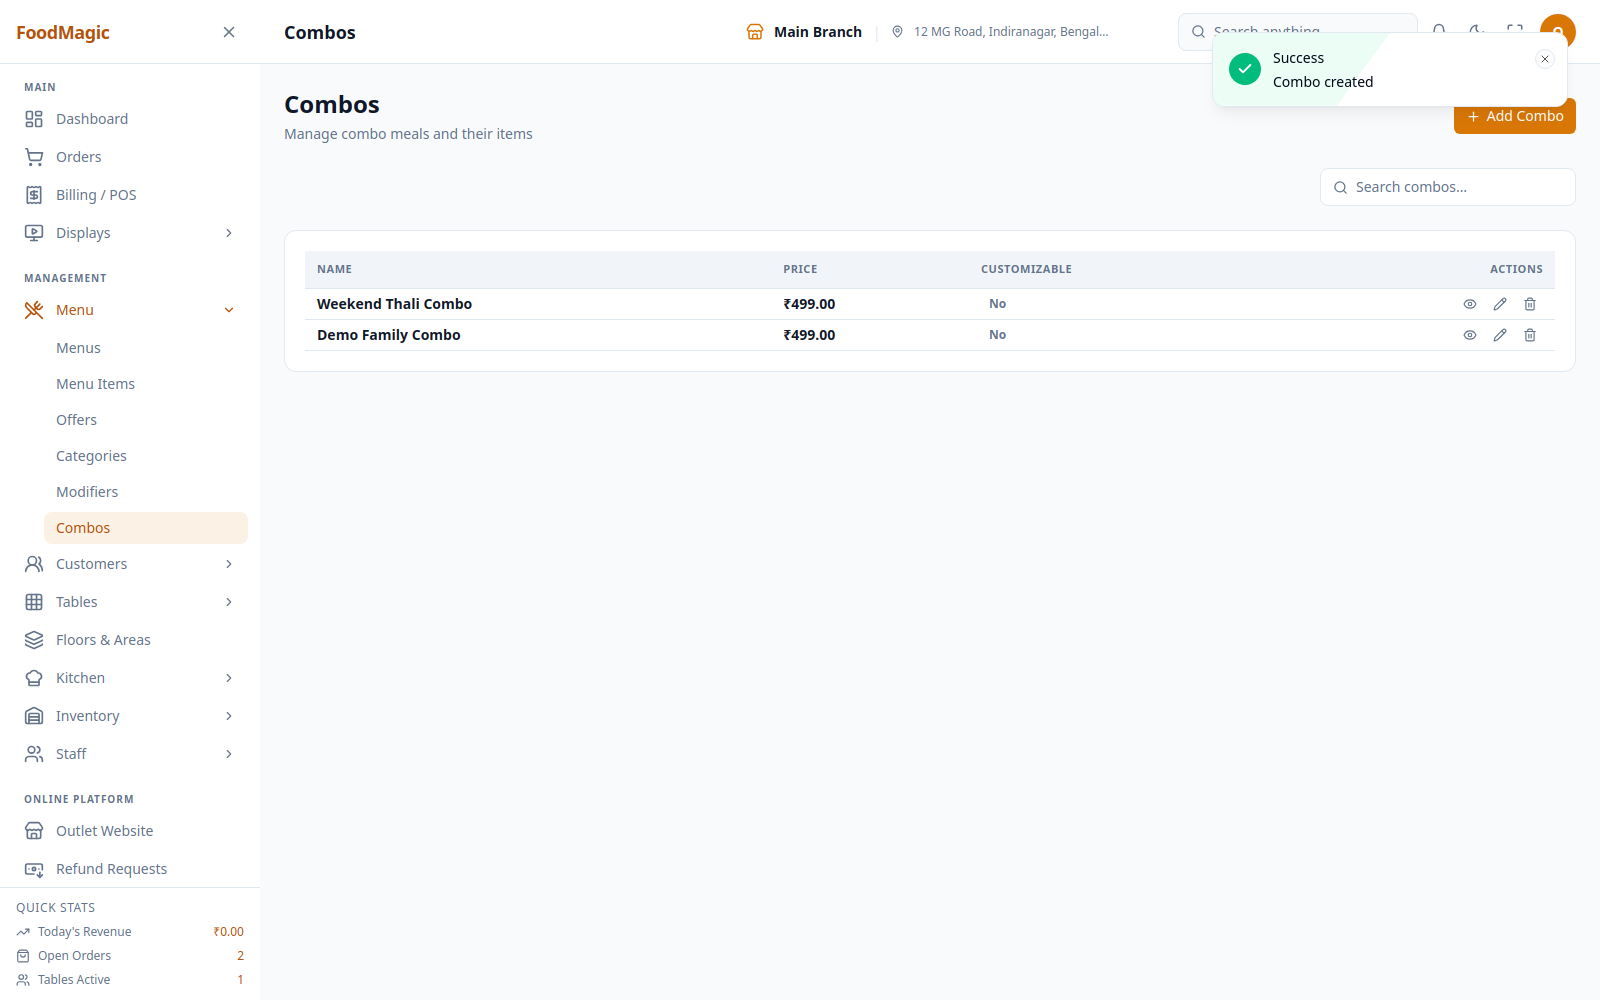
Add Combo opens a form for the combo's own name and price, and whether it's customizable — meaning the guest can swap one included item for another instead of taking the fixed set. Then you add each item it includes, with a quantity. Use this to bundle dishes into a deal, like a thali or a meal set.
Search combos… filters the loaded combo list by name.
The two-column Add Combo form — combo details and selected items on the left, a searchable grid of every menu item on the right.
Clicking an item card on the right adds it to Selected Items on the left, with its own quantity field and a remove (×) button. Click it again to deselect.
Offers
Offers are customer-facing promotions attached to a specific item or one of its variants — either a special price or a discount.
| Area | What it covers |
|---|---|
| Offers | All current offers, one or many |
| Campaigns | Group offers together and choose what each applies to |
Offers are not the same as discount rules. An offer is a price change on a dish, shown to the customer while they browse. A discount rule is applied to a whole bill at the till, and lives in Pricing.
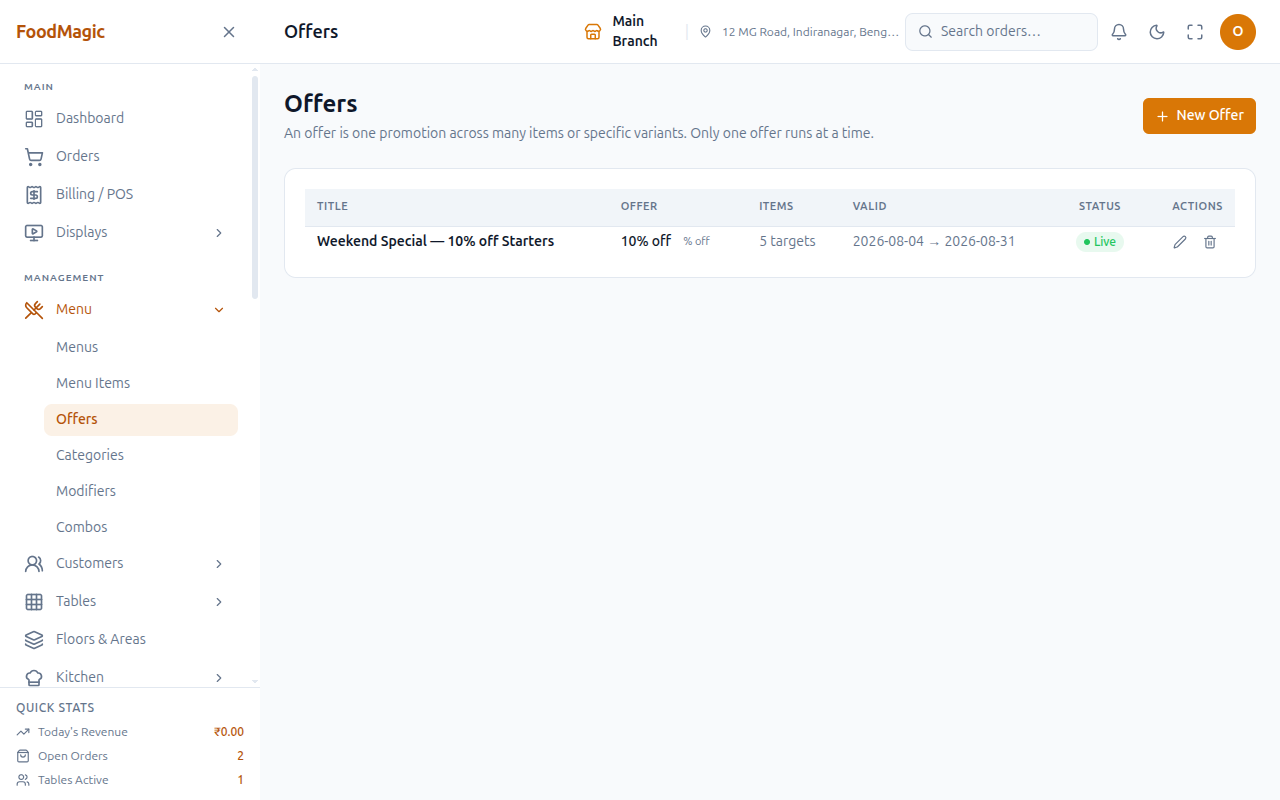
Live columns on the Offers screen: Title, Offer, Items, Valid, Status, Actions.
Behind the scenes, an "Offer" you create on this screen is actually built using the campaign system — creating one also creates a campaign, and attaches your chosen items and variants to it. This is purely an internal detail. What you see and manage on screen is just a normal offer attached to the items you picked.
New Offer opens a form for the offer type — percentage off, a flat amount off, or a special price — the value, a date range for when it's valid, and which items or variants it applies to. Use this to run a time-limited promotion on one or more dishes.
Edit / Delete — Edit reopens the same form, already filled in with the offer's current details. Delete removes it completely. Use these to adjust a promotion partway through, or to end it before its scheduled end date.
Only one offer can run at a time — this is stated right on the screen. Creating a second offer doesn't stack it on top of the first. Plan your promotions to run one after another, not at the same time.
Digital menu boards ("Displays")
Food Magic can drive screens in your restaurant.
| Area | What it covers |
|---|---|
| Displays | Create and manage boards |
| Board items | Choose what each board shows |
| Public board feed | What the screen itself fetches — no login needed |
The screen's own feed can be reached without logging in, on purpose — a screen mounted on a wall has nobody to sign into it, so it pulls its content from a public address instead. It's the only part of the menu system that works without logging in.
The sidebar calls this Offer Display, and that's exactly what the admin screen restricts it to.
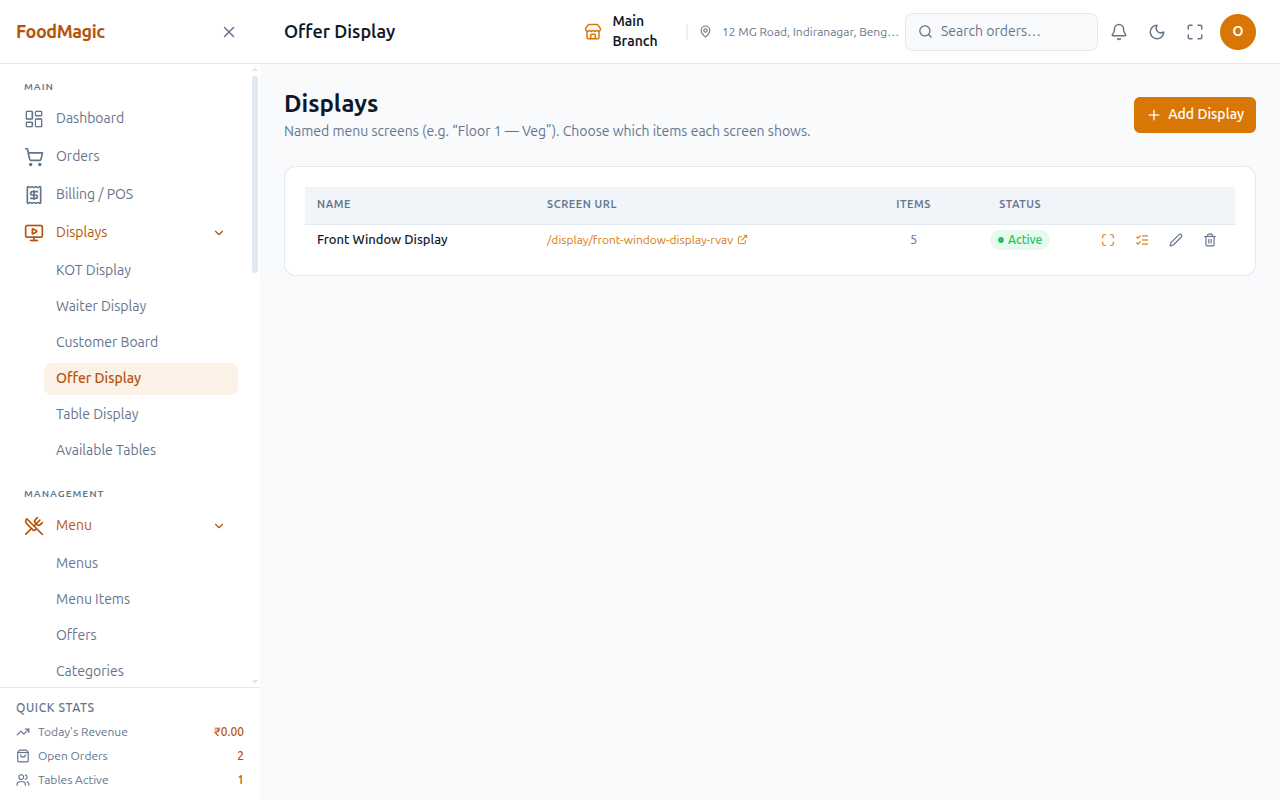
Add Display creates a named board — its name, whether it's active, and its display order. A web-friendly identifier is generated automatically from the name, if you don't set one yourself. Use this when setting up a new screen — a window display, or a TV in the bar area.
Item picker — whether you open it right after creating a display, or from the list icon on an existing one — only ever shows items that currently have an active offer. There's no way to add a plain item without an offer from this picker. Selecting items and saving updates what that specific board shows.
That offer-only restriction only exists in this picker screen, not in the save action underneath it. It's a choice built into this particular screen, not something enforced everywhere else.
Open fullscreen (the maximize icon) hands the board over to actually run on a wall-mounted screen. It puts the browser into fullscreen mode and switches to the public, no-login view described above.
Item types
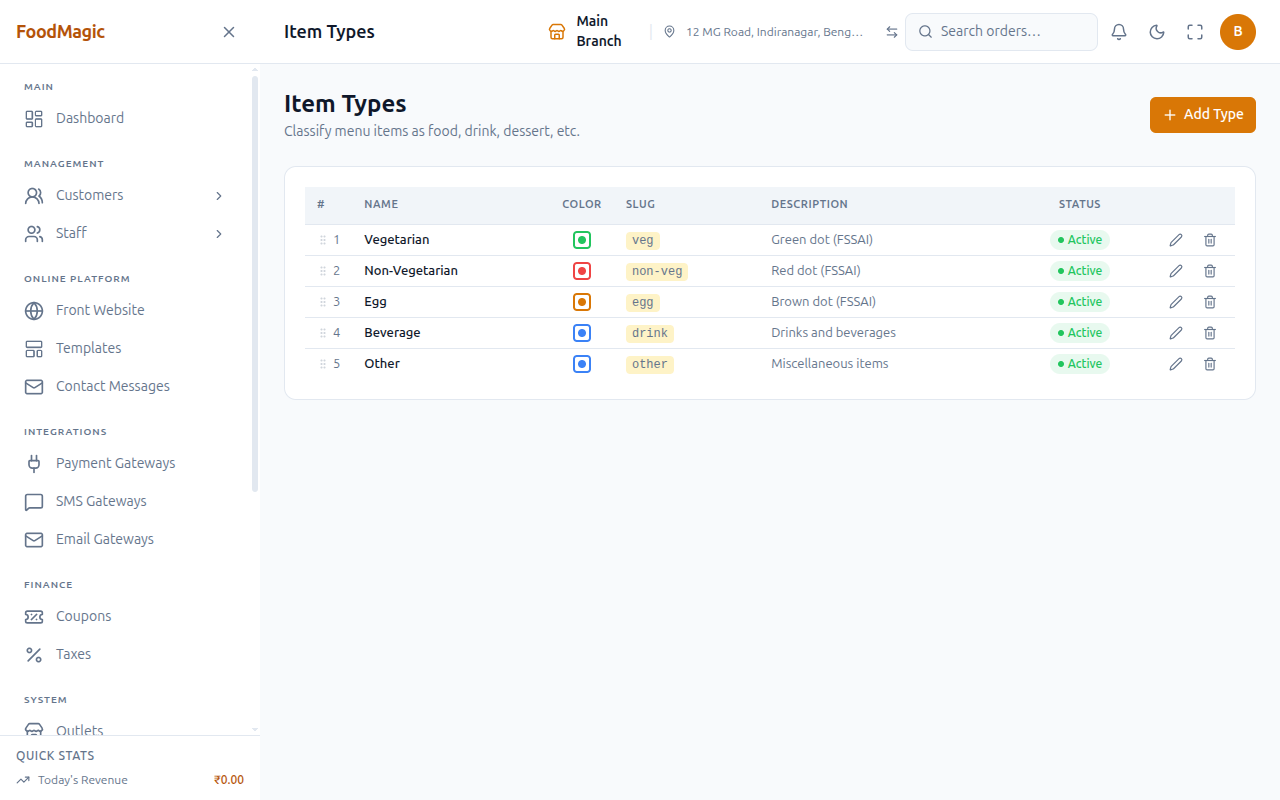
This is a brand-wide classification — vegetarian, non-vegetarian, beverage — and each one has a name, a colour swatch (shown on item cards and in reports), a web-friendly identifier, a description, a display order, and an active flag.
Live columns: #, Name, Color, Slug, Description, Status.
This is the one Menu screen where who can see it and who can manage it are genuinely different — see How it is secured below. This has been confirmed live: the screen sends both an Outlet Owner and a Waiter straight back to the dashboard. Only a Brand Super Admin can get in.
Add Type opens a form for the name, identifier, colour, description, display order, and active flag. Use this when you want to introduce a new classification for the whole brand to use consistently — for example, splitting "Vegetarian" into "Veg" and "Vegan".
Delete — a type that's still being used on any menu item can't be deleted. It has to be free of items before you can retire it.
The starting set you get by default is Vegetarian, Non-Vegetarian, Egg, Beverage, and Other. The first three have a specific colour on purpose — green for Vegetarian, red for Non-Vegetarian, brown for Egg — matching the FSSAI food-marking scheme that Indian menus are required to show. For these three, the colour is a legal requirement, not just a styling choice.
How it is secured
Screen access — every Menu screen can only be reached by a role that's been given the matching checkbox on the Roles & Permissions screen. Anyone without it who tries to open the page directly gets sent straight back to the dashboard.
- Browsing the menu — seeing dishes, prices, and availability — is a single checkbox, "View menu (overview & item list)". Every outlet role holds it, including the Waiter, which is what lets a waiter see the menu while taking an order.
- Adding, editing, deleting, and printing items each have their own separate checkbox — "Create menu items", "Update menu items", "Delete menu items", and "Print / download menu card". This lets an admin, for example, allow someone to edit items without also letting them delete one.
- Combos — viewing the combo list only needs the same "View menu" checkbox, so a waiter can see combos on the till. Building or changing a combo needs its own "Manage combo meals" checkbox.
- Offers and campaigns — viewing is a "View item offers" checkbox; creating, editing and removing needs a separate "Manage item offers" checkbox.
- Display boards — the same split: "View menu displays" to see them, "Manage menu displays" to build or change one.
- Item types is the one screen locked to brand-level administrators only. There's a dedicated "Manage item types" checkbox, and just to look at the screen, you need that same brand-level checkbox — not the ordinary "View menu" one. In practice, an outlet-level user never even reaches this screen. This was confirmed live: both an Outlet Owner and a Waiter get redirected straight back to the dashboard, and only a Brand Super Admin gets in.
Role access
- The Waiter role holds only the "View menu" checkbox. They can see the menu to take an order, but they can't add, edit, delete, print, or manage anything on it. This was confirmed live — the Items screen loads for the Waiter with no Add Item button, and no category-management screens reachable from the sidebar.
- The Outlet Owner / outlet-superadmin role holds every menu checkbox except "Manage item types," which is brand-only.
- The brand Super Admin role automatically holds every brand-level checkbox — including "Manage item types" — plus a set of cross-outlet checkboxes for day-to-day oversight. But it doesn't automatically pick up every outlet-level checkbox too (see the Print warning below for where this causes a problem).
A real inconsistency worth knowing about, on Categories. The Categories screen has its own checkbox on Roles & Permissions — "Manage menu categories" — and it looks like it should control who can add, edit or delete a category. It doesn't. What actually gets checked behind the scenes are the item checkboxes ("Create/Update/Delete menu items") instead. This means:
- Someone who can create menu items can also create categories, even if the category checkbox isn't ticked.
- Someone given only the category checkbox could still be blocked when they try to save.
Meanwhile, reading the category list has no permission check at all, beyond simply being logged in — any signed-in staff account can see it, whatever their role.
The Print screen is the one place a permission mismatch shows up as a broken page, instead of just a simple redirect. A Brand Super Admin can open the print/download screen directly, and the page itself loads for that account, because its access check is deliberately relaxed. But the actual menu data behind it is protected by the ordinary "View menu" checkbox — and because that's an outlet-level checkbox, not a brand one, a platform-level account doesn't automatically hold it. Every other Menu screen (Menus, Items, Offers, Displays, Categories, Modifiers, Combos) blocks the same account outright, before it even tries to load any data, so this mismatch never shows up there. Print is the one exception, where the door opens onto an empty room.
Restaurant-to-restaurant separation
- Item types are strictly tied to the brand that created them — one brand never sees or edits another brand's classifications.
- Named menus, categories, items, combos, offers and display boards are all tied to a single outlet, so one branch's menu can't leak into another branch's screen.
A gap found while checking item variants (sizes). Unlike everything else on the menu, a dish's sizes and variants have no protection stopping one restaurant from seeing another's. Every screen in the product only ever asks for the variants of one specific dish at a time, so this hasn't caused a visible problem for anyone using the app. But there's nothing underneath stopping a request for "every variant across the whole platform" from working, if one were ever made without picking a single dish first — which would return sizes belonging to every restaurant on Food Magic, not just the one asking. This is noted here as a finding from reviewing how the system is built, not something anyone has actually seen happen while using the product.
What the forms check before saving
- Item name: required, at least 2 characters.
- Price: required, must be more than zero.
- Item code (SKU): optional, but if you give one, it can't repeat within the same outlet among items that haven't been deleted.
- Prep time: optional, between 0 minutes and 24 hours.
- The kitchen station a dish is assigned to must already exist for that outlet — you can't send a new dish to a kitchen section that hasn't been set up.
- A new item must be attached to at least one named menu.
- Category name: required, must be unique among the outlet's currently active categories.
- Item type name and identifier: required; the identifier must be unique within the brand; the colour must be a valid colour code.
What gets recorded
Adding, editing, or deleting a menu item or a category gets written to the outlet's Audit Log — who did it, when, and what changed. Combos, offers, display boards, item types, named menus, and item variants are not currently recorded there. If one of those is changed or deleted, there's no record of it anywhere. It hasn't been confirmed whether that's intentional or just missing.
Related pages
- Modifiers and options — the choices (extra cheese, spice level) attached to a menu item.
- Orders and the POS — how a menu item becomes an order line.
- How tax works — every menu item picks a tax class from the brand's tax catalog.
- Roles & Permissions — where every checkbox named above is granted to a role.