
Adding a supplier
Setting up a vendor — contact details, payment terms, credit limit, and the ingredients they supply.
A supplier is a vendor you buy ingredients from. Set one up properly and you can raise a purchase order against them in a couple of clicks, with the payables reports working out on their own.
What it is
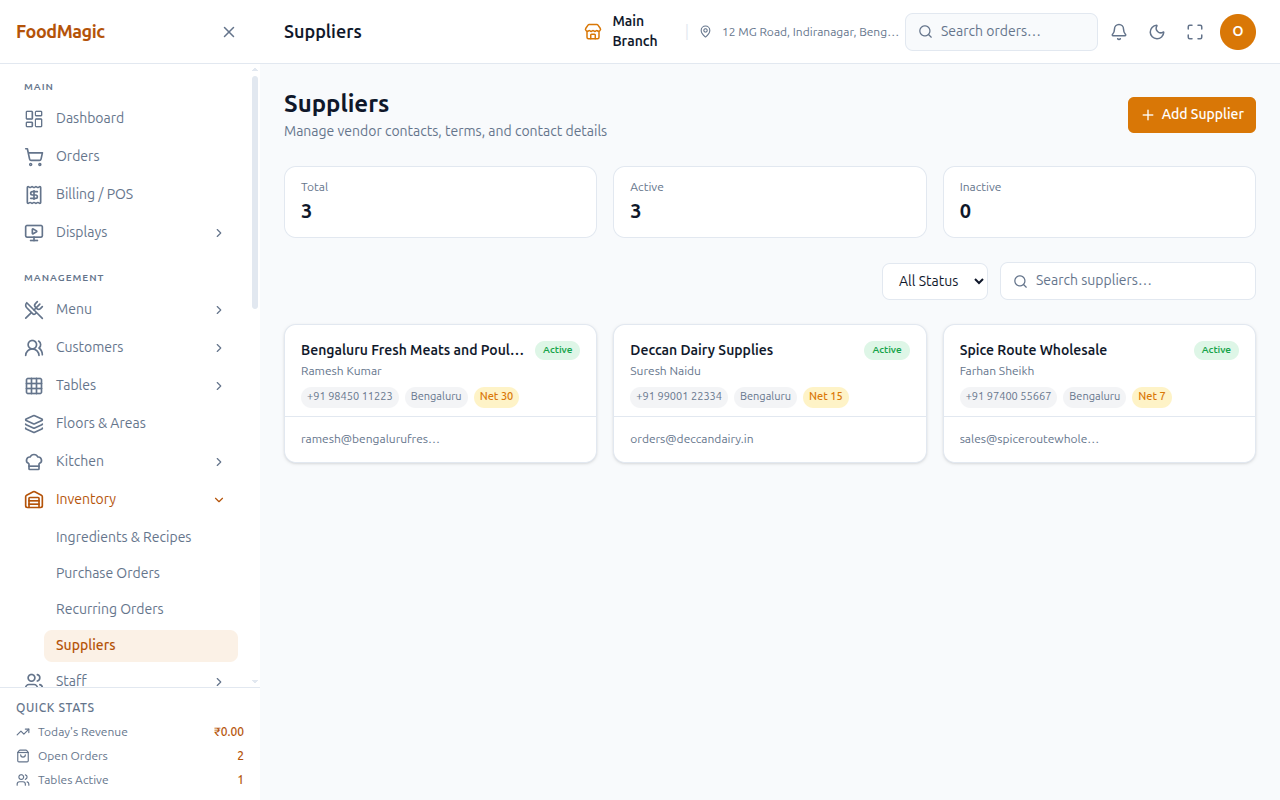
The Suppliers screen is an outlet's vendor directory: who you buy from, how to reach them, what terms you've agreed, and which ingredients each one provides. It also keeps a running account — a ledger — of what you owe each vendor and what you've paid them.
Outlet staff responsible for purchasing use this screen, typically the outlet owner or admin.
You'll find it under Inventory → Suppliers in the main app.
This screen is live for setup, the ledger, and payments. One tab (Performance) is a placeholder with no data behind it yet — see below.
How it works
Before you start
Add your ingredients first. The supplier form lets you tick which ingredients that vendor supplies, but you can only tick ones that already exist. If you set up suppliers before ingredients, you'll have to come back and edit every one of them later.
Adding a supplier, step by step
Go to Inventory → Suppliers and choose Add Supplier. The form — New Supplier — has six sections.
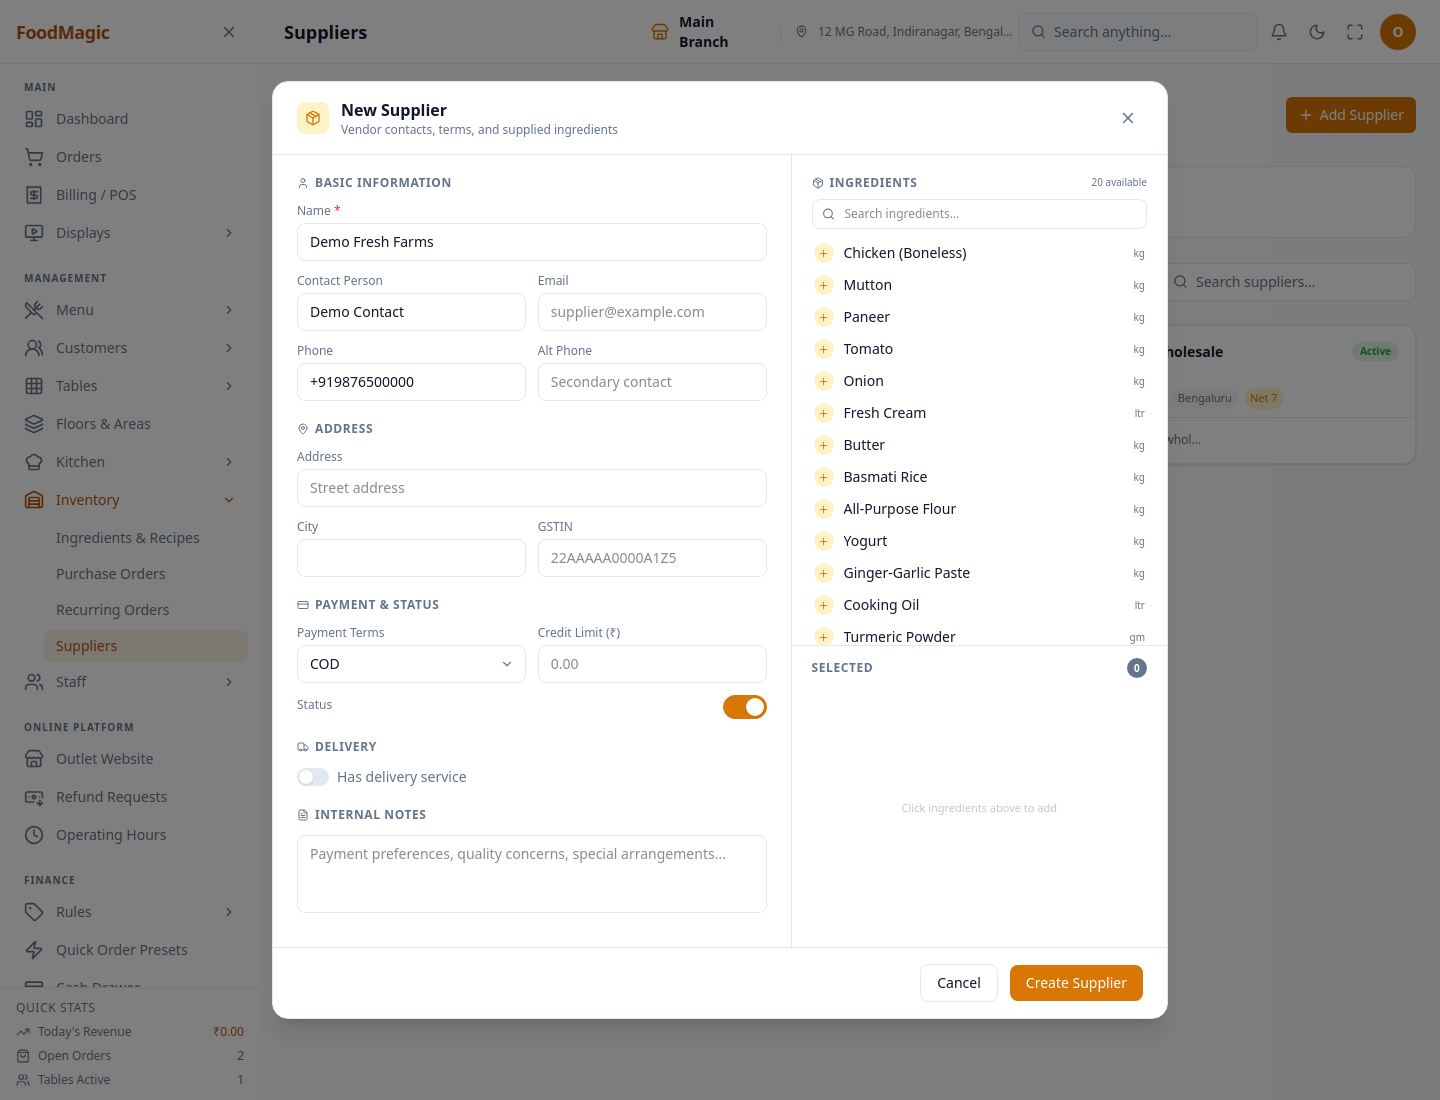
Name is the only required field — the trading name, for example Mumbai Fresh Produce. Then Contact Person, Email, Phone, and an Alt Phone for a second number. It's worth filling these in — this is who you'll call when a delivery is late.
Address, City, and GSTIN — the vendor's GST registration number, which you'll need on their invoices to claim input tax credit.
Choose one: COD, Net 7, Net 15, Net 30, Net 60, or Prepaid. This decides when a bill is actually due, and it drives the payables reports.
How much you're allowed to owe this supplier at any one time, in rupees. Leave it at zero if there's no such arrangement. It shows up again on the supplier's own page as Available Credit (see below).
Status marks the supplier active or inactive. Has delivery service is a toggle that, when switched on, reveals Delivery Person, Delivery Phone, and a free-text Delivery Schedule (e.g. "Mon, Wed, Fri").
Free text for anything your team should know — payment preferences, quality concerns, special arrangements. The supplier never sees this.
A searchable list of every ingredient you have, each with its unit. Click the ones this supplier provides — a Selected count keeps track.
Saves the vendor.
"Has delivery service" doesn't set anything on a purchase order automatically — it's just a badge shown on the supplier's card and detail page. What does carry over is the supplier's saved Delivery Person name and phone: when you pick this supplier while raising a purchase order, those two fields fill in automatically as the delivery contact. But the order's own Delivery / Collection choice always defaults to Delivery no matter what this toggle says, so you still need to set that yourself on the order.
Add Supplier opens the six-section form described above, with the form on the left and an ingredient picker on the right. Saving submits the supplier's details and the ingredients you picked together in one go.
Do this once for each vendor you buy from more than once — see Ordering from a vendor you have not set up for the one-off alternative.
Edit and delete (the pencil and trash icons on each card) — clicking anywhere on a supplier's card, not just the pencil, opens the same form pre-filled, for anyone who can manage suppliers. Without that permission, the card simply isn't clickable. The trash icon deletes the supplier after a confirmation naming them. Use these to correct contact details or terms, or to retire a vendor — though marking them inactive, as noted below, is usually the better choice.
Why linking ingredients matters
Linking is what turns a supplier record into something useful. Once an ingredient is linked, raising a purchase order against that vendor becomes a matter of picking from their list instead of searching everything you buy. It also makes a question like "who else sells saffron?" easy to answer.
Payment terms in practice
| Term | What it means |
|---|---|
| Prepaid | Pay before they ship |
| COD | Pay on delivery |
| Net 7 / 15 / 30 / 60 | Pay within that many days of the invoice |
Payment terms and credit limit are the two fields people skip, and both cost money later. Without terms, nothing can tell you what's overdue. Without a credit limit, nothing warns you that you owe one vendor more than you agreed to.
Finding suppliers later
The Suppliers screen shows Total, Active, and Inactive counts, a status filter (All Status / Active / Inactive), and a search box that matches name or contact person.
Mark a supplier inactive rather than deleting them when you stop buying from them. Past purchase orders keep their history, and you can reactivate the supplier later if you go back to them.
The supplier detail page
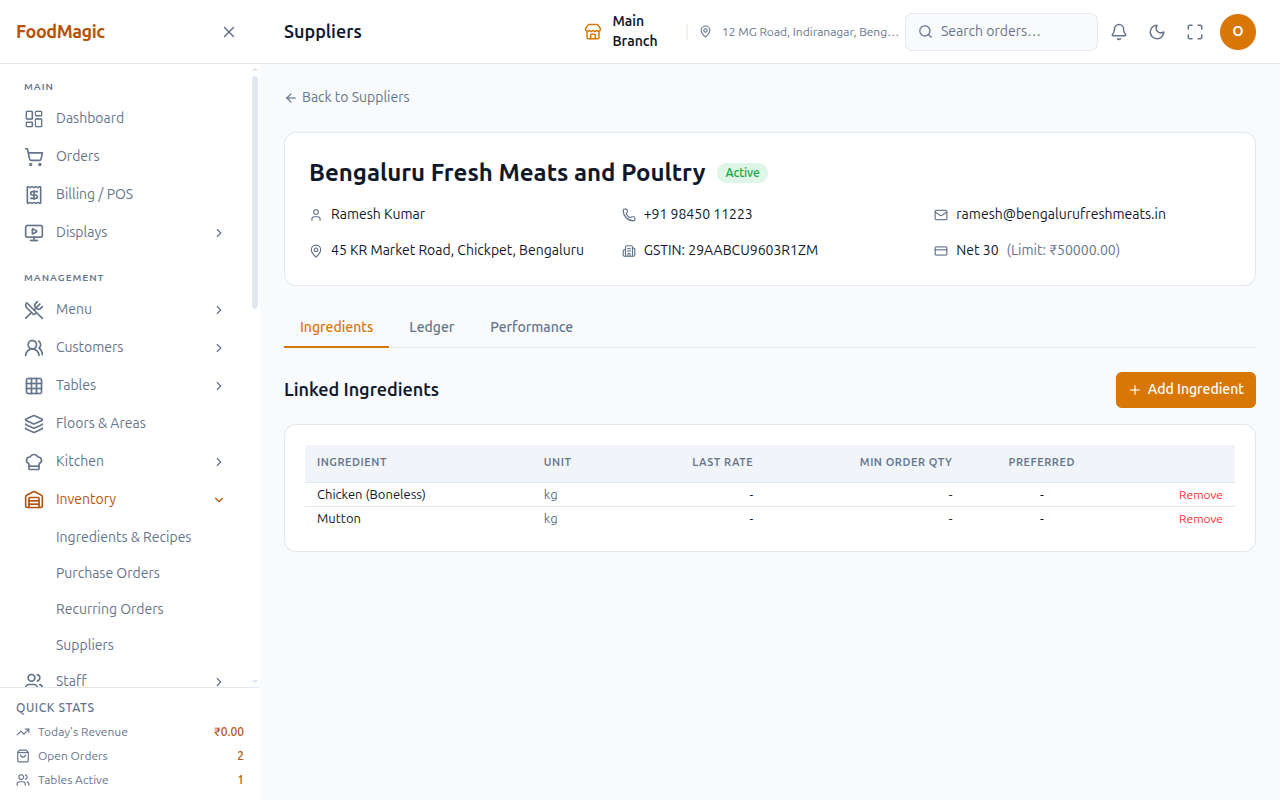
Clicking through to a supplier shows a header card of their contact details, then three tabs: Ingredients, Ledger, and Performance.
The Ingredients tab lists every ingredient linked to this supplier — Ingredient, Unit, Last Rate, Min Order Qty, and a star for Preferred — with a plain Remove link on each row. Add Ingredient opens a form right on the page: a dropdown of every ingredient not yet linked, a Last Rate and Min Order Qty field, and a Preferred checkbox. Use this to keep the supplier's catalogue current as prices or minimum order quantities change, or as you start or stop buying an item from them.
The Ledger tab is a running account of what you owe this supplier: Date, Type (a purchase order received, shown as a debit, or a payment, shown as a credit), PO number, Debit, Credit, and a running Balance — plus three summary boxes below the table: Total Outstanding, Credit Limit, and Available Credit (credit limit minus outstanding, never shown as a negative number). The table itself has a search box (matching PO number, vendor name, or payment method/reference), a date-range filter, sortable column headers, and an Export button — all of it real, server-side pagination, so the summary boxes always reflect the supplier's whole history even while the table itself is scoped to a search term or date window. Record Payment opens a form for Amount, a Payment Method dropdown (Cash, UPI, Bank Transfer, Cheque, Credit Note), an optional Payment Reference, a Paid At date, and Notes. Check this before it comes up in conversation with the vendor, and log a payment the moment you make it rather than waiting until month end.
There are also brand- and outlet-wide "who you owe" views across every supplier at once, built into the system but not currently shown on any screen in the app. They seem to be built for a future screen or report that doesn't exist yet.
The Performance tab isn't built yet. It exists and you can click it, but all it shows is a single placeholder line: "Supplier performance metrics coming soon."
Where suppliers show up
| Report | Shows |
|---|---|
| Supplier Purchase Report | What you spend with each vendor over a period |
| Supplier Payables | What you still owe each vendor |
| Wastage / Returns | What you sent back, and why |
How it is secured
An owner grants each staff member one of the rights that govern this area, from the Roles & Permissions screen. For Suppliers specifically:
| What the role can do | Grants |
|---|---|
| Manage suppliers | See the Suppliers list, open a supplier's detail page, add/edit/delete a supplier, link or unlink their ingredients, and record a payment on their ledger |
There's no separate "view-only" right for Suppliers. Unlike the rest of Inventory, the Suppliers screen and every supplier's detail page — including their ledger — are gated behind the same "Manage suppliers" right that also lets you add, edit, delete a supplier, and record a payment. So someone who can see the vendor list can also change it and move money on the ledger. There's no way today to give someone read-only access to the supplier directory or their payment history without also giving them full edit rights.
The built-in Outlet Admin role has this right by default. Waiter and Delivery Rider do not — Suppliers doesn't appear on their sidebar. Like the rest of Inventory, the brand owner account has no built-in access to any outlet's Suppliers screen; someone has to grant it through a role, the same as any other staff member.
Suppliers are tied to the outlet that created them, so one branch cannot see or edit another branch's vendor list, ledger, or payment history.
Two things tied to a supplier aren't walled off by outlet the same way. A supplier's payment records and their purchase-order returns aren't individually tagged to an outlet — they're only reachable through the supplier or purchase order they belong to, which are themselves tied to an outlet. This comes from checking the code, not from testing it live with two outlets side by side — flagged here as a gap worth closing rather than a confirmed leak in production.
A supplier needs a name, which must be unique within the outlet — so you can't accidentally create "Mumbai Fresh Produce" twice. Phone numbers, if entered, must look like real phone numbers. Payment terms must be one of the six listed options, and the credit limit can't be negative. A payment needs a supplier, a positive amount, a payment method from the fixed list, and a paid-at date.
Supplier payments and ledger entries are not currently written to the system's separate audit log — you can only see them through the ledger view itself.
Related pages
- Ingredients, stock and recipes — set these up first; a supplier can only be linked to ingredients that already exist.
- Raising a purchase order — where a linked supplier actually gets used, and where their ledger's debit entries come from.