
Settings reference
Every settings screen in Food Magic — what it controls, who can open it, and whether it applies to the whole brand or one outlet.
Food Magic's settings aren't all in one place, and that's on purpose. Each setting lives at the level where that decision belongs.
Before changing anything, check the Level column below. A brand-level change affects every outlet at once.
What it is
A set of settings screens spread across three levels — brand, outlet, and a small technical corner — plus two screens that belong to whoever is signed in, not to any particular role.
Two of the screens below are both described as "brand-wide," and people mix them up often enough that it's worth clearing this up first.
Brand Settings and System Settings are not the same tool
- Brand Settings is a single, purpose-built screen. Every field on it has a specific job — regional defaults, payment policy, kitchen rules, table auto-free behaviour, the loyalty programme, notification style, sound — and there is exactly one Brand Settings record for the whole brand. Every outlet under that brand automatically follows it. Changing it is a deliberate action where you save everything at once.
- System Settings isn't a purpose-built screen at all. It's a raw list of individual configuration entries — a key, a value, a description — kept as a fallback for a setting that doesn't have a proper home yet. Unlike Brand Settings, it isn't tied to one brand: the list of entries is shared across the whole installation, and each entry can optionally be pinned to a single outlet — but nothing on the screen checks whether the outlet picked is actually one the person editing it is responsible for.
If you're trying to change how the brand trades — currency, loyalty, notification behaviour — that's Brand Settings. Only reach for System Settings when told to, for a one-off value that has no dedicated screen of its own. It has no safety checks, which is exactly why it's covered in detail further down this page.
All settings screens at a glance
| Screen | Level | Who can open it |
|---|---|---|
| Brand Settings | Brand | Super Admin |
| Platform Modules | Brand | Super Admin |
| Front Website | Brand | Super Admin |
| Templates | Brand | Super Admin |
| Payment Gateways | Brand | Super Admin |
| SMS Gateways | Brand | Super Admin |
| Email Gateways | Brand | Super Admin |
| Outlet Settings | Outlet | Outlet Superadmin |
| My Outlet Modules | Outlet | Outlet Superadmin |
| Outlet Storefront | Outlet | Outlet Superadmin |
| Backup Settings | Outlet | Outlet Superadmin |
| System Settings | Technical | Super Admin |
| My Profile | Personal | Anyone signed in |
| Change Password | Personal | Anyone signed in |
How it works
Brand-level settings
Set once. Applies to every outlet.
Brand Settings
How the brand trades, everywhere. Grouped on screen into three sections — Regional, Operations, and Loyalty Program — with exactly one Brand Settings record for the whole brand. Every outlet under that brand automatically follows it.
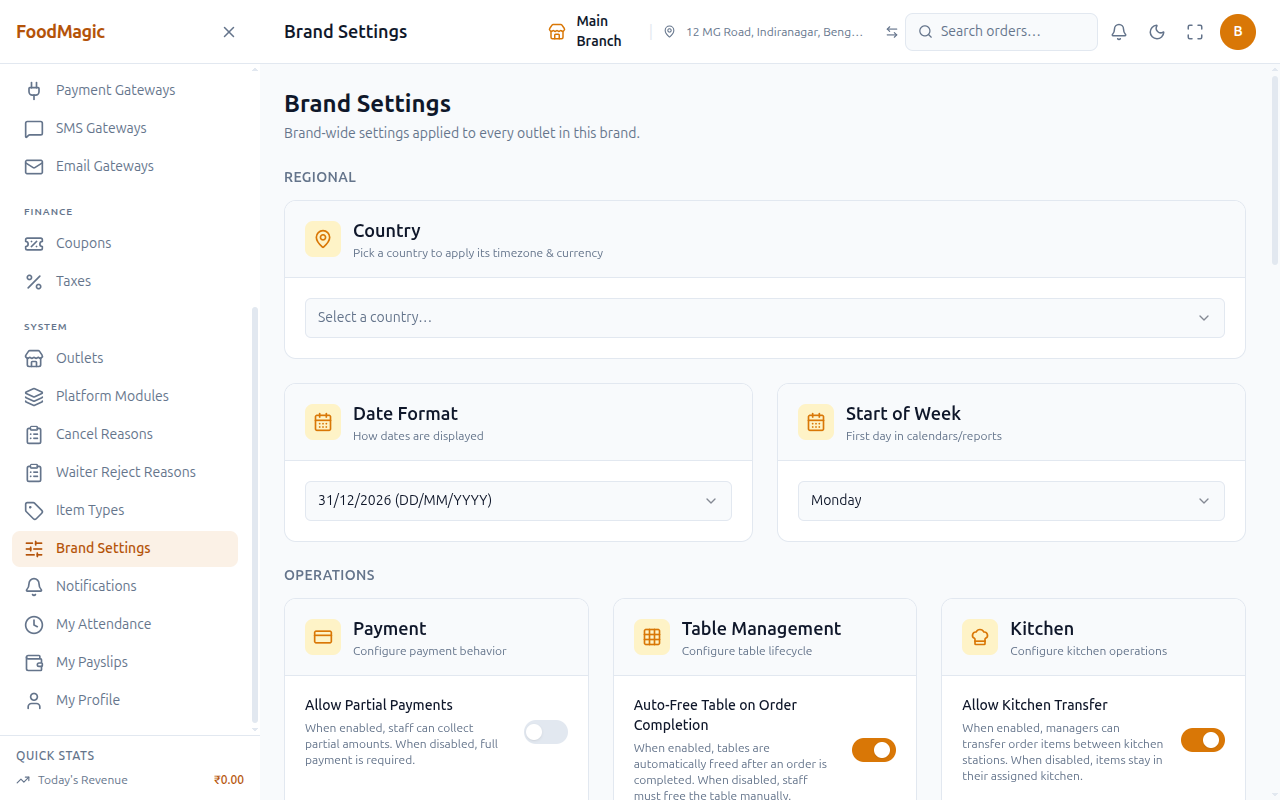
This screen saves with a single Save bar, rather than saving each field the moment you touch it. Nothing is written until you confirm, and Discard puts every field back the way it was.
Brand Settings — deep dive
Regional
Country — a searchable list of countries. Picking one fills in the timezone, currency, and currency symbol for you, as part of the same save — all three stay individually editable afterwards, but the picker exists so you can set all three correctly in one action instead of three separate lookups. Use it when setting up a brand for the first time, or correcting the regional basics after opening in a new country. Choosing a different country later doesn't retroactively change figures already recorded (past orders, reports) — it changes what new activity uses going forward.
Date Format — a dropdown of four date layouts — 31/12/2026, 12/31/2026, 2026-12-31, 31-Dec-2026 — shown with a live preview instead of a raw format code. Match this to whatever convention your staff and reports should follow (day/month/year outside the US, month/day/year inside it).
Start of Week — a three-way choice — Monday, Sunday, or Saturday — for the first day shown in calendars and week-based reports across the whole brand.
Operations
Payment — one switch: Allow Partial Payments. On, staff can take less than the full bill at the till and settle the rest later. Off, a bill has to be paid in full in one go.
Table Management — one switch: Auto-Free Table on Order Completion. On, a table goes back to available the moment its order is marked complete. Off, staff have to free the table themselves — useful if a table sometimes needs a manual reset (cleaning, a reprint) before the next party sits down.
Kitchen — one switch: Allow Kitchen Transfer. On, a manager can move an order item from one kitchen station to another after it's already been sent. Off, an item stays at whichever station it was first assigned to.
Display Boards — Refresh Interval (Seconds), how often the table and kitchen display boards re-fetch live data, as a plain number field. The minimum is 5 seconds; the factory default is 15. A lower number keeps boards more current at the cost of more frequent requests; there's no upper limit enforced in the field itself, so an unreasonably high value just makes a board feel stale.
Order Notifications — a master switch turns the "a new order arrived" alert (shown on the Orders page) on or off. Two more controls then tune how it behaves: Notification Style (Modal — a blocking dialog that must be acknowledged — or Toast — a small corner alert that dismisses itself) and Notification Tune (a dropdown of built-in sounds, or "No tune" for silence). A speaker icon next to the tune dropdown plays the selected sound right away, so you can preview it before saving. Choose Modal for a quiet back office that must never miss an order, and Toast for a busy front-of-house where a blocking dialog would just get in the way.
A second block just below repeats the same style and tune choice for Waiter Order Notifications — two separate alerts ("order assigned to me" and "order ready to serve"), each with its own tune, so a waiter can tell the two apart by ear across a noisy floor without having to look at the screen. Style is shared between the two waiter alerts; only the tune differs — the "Ready Tune" is meant to be picked as a different sound from the "Assigned Tune."
Add to Cart Sound — separate from the notification tunes above; this one plays on the billing (POS) screen, not the Orders page. A single switch, Play sound on add-to-cart, turns it on or off; when on, an Add-to-Cart Sound dropdown picks which sound plays each time a cashier rings up an item, defaulting to a built-in "Blip." The speaker icon previews the selected sound the same way the notification tunes do.
Loyalty Program
Loyalty & Store Credit — a master switch, Enable loyalty program. Off, customers earn no points anywhere — storefront and POS both hide every loyalty control — and the fields below are disabled (greyed out, kept as-is) rather than cleared. On, five more fields tune the programme:
- Earn amount — how much of the currency a customer has to spend to earn 1 point (for example, ₹100 spent = 1 point). Must be a positive number.
- Conversion amount — a two-part ratio, points on one side and a currency amount on the other (for example, 100 points = ₹50 store credit). The points side must be a whole number of at least 1; the currency side must be a positive amount.
- Minimum points to convert — the smallest point balance a customer is allowed to convert in one go, so a customer can't cash out one or two points at a time. A whole number, at least 1.
- POS code attempts — how many wrong tries staff get before a store-credit redemption code expires at the till. A whole number from 1 to 10.
- POS OTP verification — Type code (secure) means staff have to type in the code the customer received by phone or email, and never see it themselves. Show on screen displays the code on the till after "Send code," so staff can match it by eye against what the customer shows them — faster at a busy counter, but weaker, since staff can read the code directly. Type code is the recommended setting; Show on screen trades security for speed on purpose, and is only worth it at high-volume outlets where typing a 4-digit code for every redemption slows the line down.
Every control on this page saves together with a single Save action — there's no saving field by field. Anyone signed in at the outlet can see the current settings, since billing, the kitchen display, and the live boards all depend on these values to work — but changing them is restricted to brand admins. Only writing is locked down.
Platform Modules
Switches whole areas of the product on or off for the brand. Turning a module off hides it everywhere, at every outlet.
Use this to keep the system limited to what the business actually uses — there's no reason for a takeaway-only brand to carry table management in its menu.
As confirmed on a working install, the screen is grouped into six categories:
| Group | Modules |
|---|---|
| Operations | Orders, Billing, Tables, Areas & Floors, POS, KOT Printing, Storefront, Devices |
| Catalog | Menu, Modifiers, Pricing, Taxes, Ingredients |
| People | Customers, Users & Staff (core), Payroll, Leave Requests |
| Places | Brands (core), Outlets (core) |
| Finance | Reports, Payments |
| Admin | System (core), Settings, and two further admin modules |
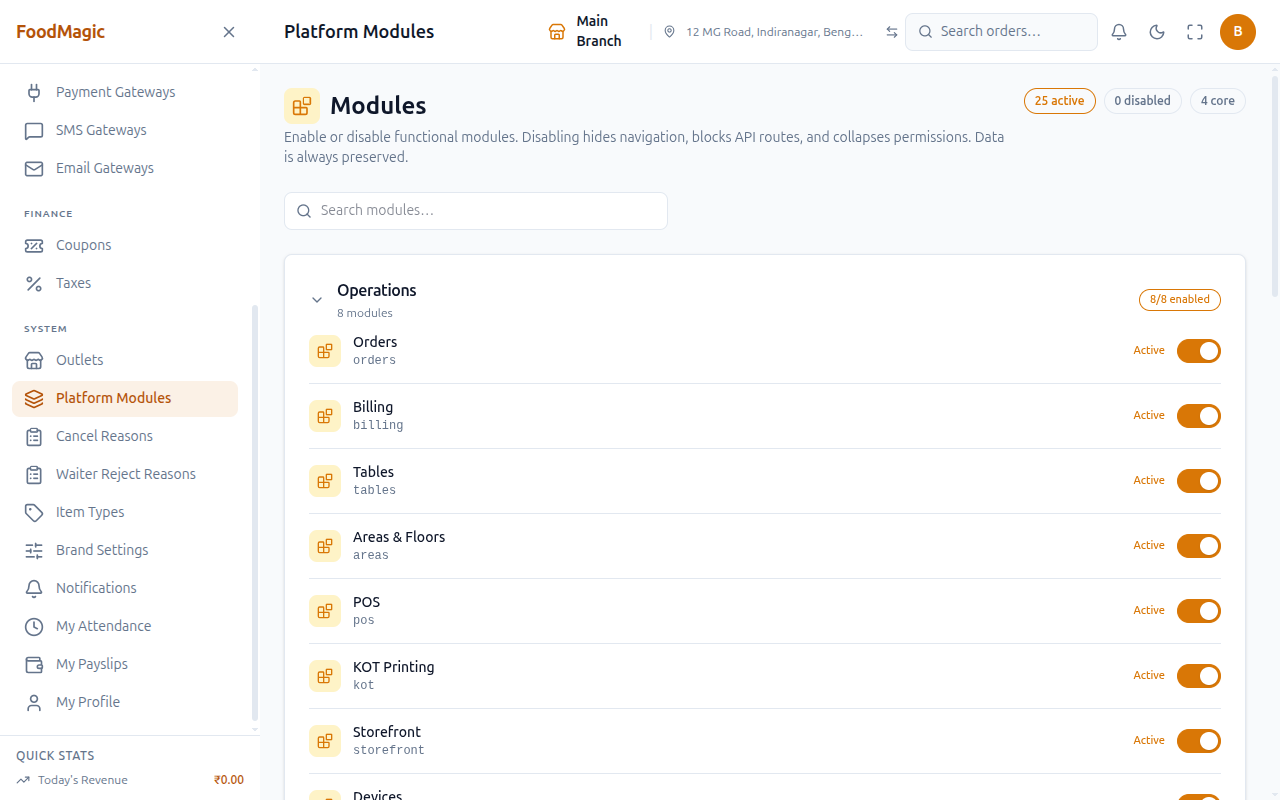
This screen listed 25 entries on the install checked, more than the 21 underlying feature areas the backend is actually built from (see the module reference). This gap isn't a mistake — entries like KOT Printing, Devices, Payments, Settings, and Reports are features you can switch on or off independently here, without each one needing its own separate backend area.
Front Website
More people can view this than can save changes to it — saving is kept for brand admins.
A master Storefront is Live / Disabled switch (its own action, and it asks you to confirm either way) sits above four tabs:
- Login & Identity — allowed login methods (email and password, mobile and password, mobile OTP), OTP length, how long an OTP stays valid, minimum password length
- Payments & Checkout — which payment methods customers may use, the checkout minimum, delivery fee, COD handling fee, and the free-delivery threshold
- Cancellation Policy — the cutoff for the cancel button at each order stage (online vs cash-on-delivery), an auto-refund switch, and a refund-percentage schedule for each stage
- Branding & Display — logo URL, geocoding API key, toggles for showing public ratings, ingredients, and rider details, and a brand-wide Ordering Mode (View only / Order) switch
See Managing your front website for a full breakdown of every control on each tab.
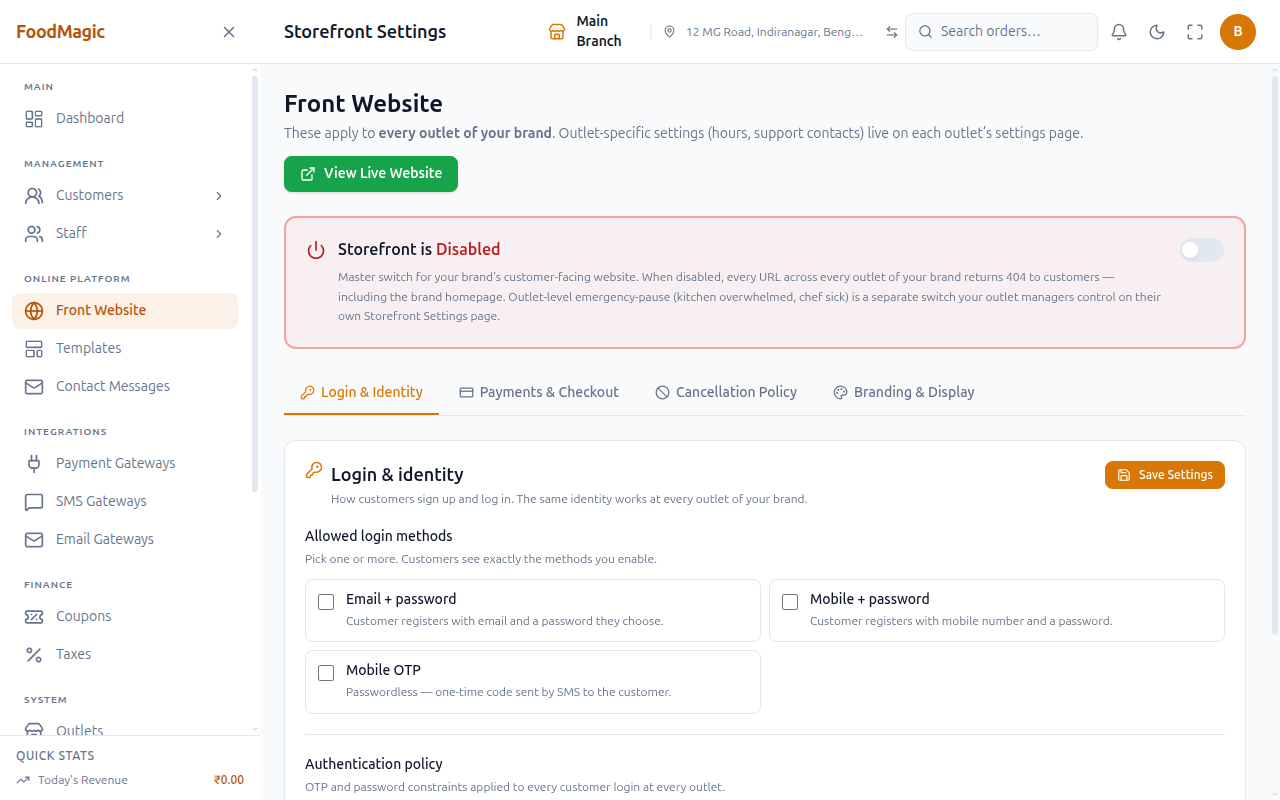
Payment methods and the cancellation policy live here, at brand level — not on the outlet storefront screen. A single outlet can't accept a payment method the brand hasn't already enabled.
Templates
The same brand-admin access controls both looking at the template gallery and editing a template on its own editor screen (home layout, colours, activation, section text).
The list screen is a pure gallery of template cards — it never saves anything itself. Clicking a card opens that template's own editor screen, where you pick a home-page layout, adjust three brand colours, edit section text through the pencil "Edit text" icon, and press Activate & Save (or just Save, if it's already active). See Choosing and customizing a theme for a full button-by-button walkthrough.
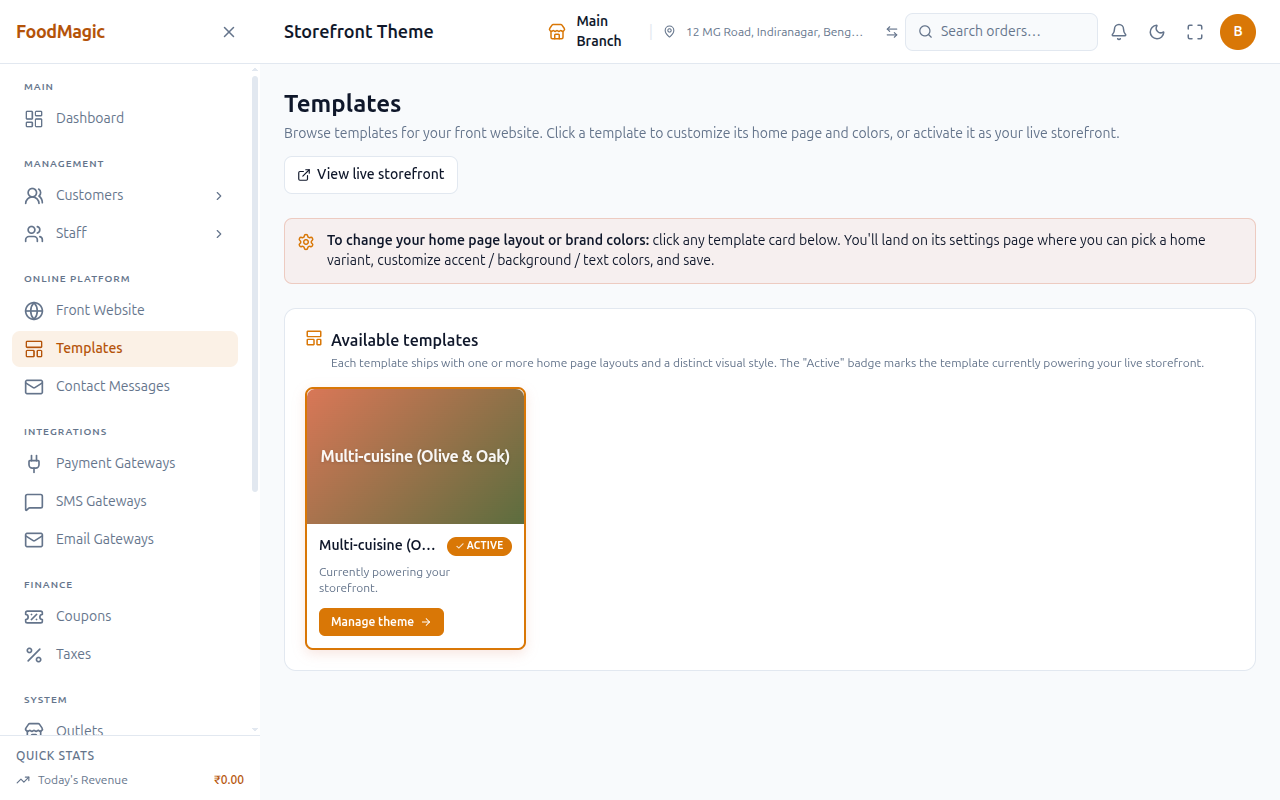
Even just viewing a template's saved colour choices needs the same access as changing brand storefront settings — there's no lighter, view-only version of this screen. This was confirmed by testing with a view-only account, which couldn't open a template's editor at all.
Payment Gateways
Viewing the list of connected processors needs less access than adding, editing, or removing one — see the note below.
Connects the brand to a payment processor. Supported providers: Stripe, Razorpay, PayU, Cashfree. The Payment, SMS, and Email gateway screens all share the same design, so the buttons described below work the same way on all three — only the list of providers and the credential fields differ. Add, Edit, Delete, and Set as default all need the same level of access.
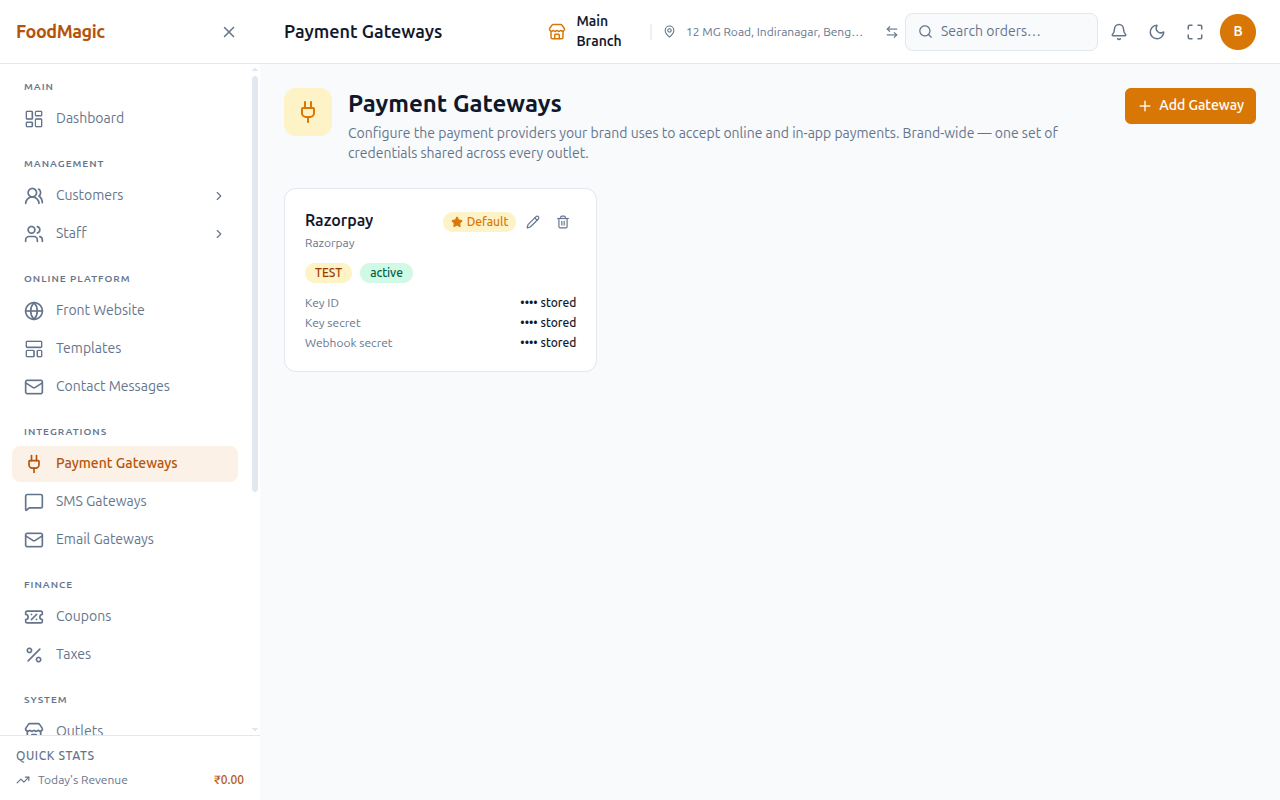
Before you start: have an account with your chosen processor (Stripe, Razorpay, PayU, or Cashfree) ready, along with its API key and secret from that processor's own dashboard. You'll paste those into the dialog below.
Add Gateway
On the Payment Gateways screen, click Add Gateway. A two-column dialog opens.
Providers are listed on the left. Clicking one selects it and fills in the Display name for you, unless you've already changed that field away from the last provider's label.
On the right: Display name, Mode (Test sandbox or Live production), Active and Default switches, Processing fees (a percentage plus a flat amount, kept for reference only — it isn't automatically added to the bill), then that provider's own credential fields, entered as password boxes.
Save the dialog to connect the processor. Use this same flow to add a second processor later — a live Razorpay alongside a test Stripe for staging, for example.
Edit (pencil icon)
Opens the same dialog, but the provider can't be changed once it's set. Credential fields show as "•••• stored" and stay untouched unless you type a new value — leaving one blank keeps the existing secret rather than clearing it.
Delete (trash icon)
A confirmation message warns that the stored credentials will be removed, then deletes the gateway entirely.
Set as default (star icon)
Only shows on gateways that aren't already the default. One click makes that gateway the one used first whenever more than one is active — no confirmation needed.
Show / hide credential (eye icon, in the dialog)
Switches a stored or newly typed secret between masked and plain text, entirely on your screen — it doesn't contact the server either way.
Viewing the list of connected gateways needs less access than managing them, so a read-only finance role can see what's connected without being able to change anything. The list never shows an actual credential value — only whether a field already has one stored.
SMS Gateways
Who sends the brand's text messages. Five providers are supported: MSG91, Twilio, Gupshup, AWS SNS, Plivo.
MSG91 also needs a DLT template ID, which Indian phone carriers require before they'll deliver a transactional text message.
Add, Edit, Delete, and Set default all work exactly as described above for Payment Gateways, with the same split between lighter view-only access and separate access needed to make changes.
See Email & SMS setup for the fields each provider needs.
Email Gateways
Who sends the brand's email. Eight providers are supported: SMTP (Gmail / Outlook / Custom), SendGrid, Zoho Mail, Amazon SES, Mailgun, Postmark, Brevo (Sendinblue), and SparkPost.
Add, Edit, Delete, and Set default follow the same pattern again — lighter view-only access, and separate access needed to make changes.
See Email & SMS setup for the fields each provider needs.
Outlet-level settings
Set separately at each branch. One outlet's choice never affects another.
Outlet Settings
Dashboard appearance and theme only. This screen used to hold a lot more — the day-to-day toggles moved up to Brand Settings, and email setup moved to the brand-level Email Gateways screen. What's left here, and what genuinely belongs to an outlet owner, is how their own dashboard looks: a Dark Mode switch, plus a choice of seven colour themes — confirmed on a live install as Aurum, Lavender, Evergreen, Plum, Grove, Marble, and Terra.
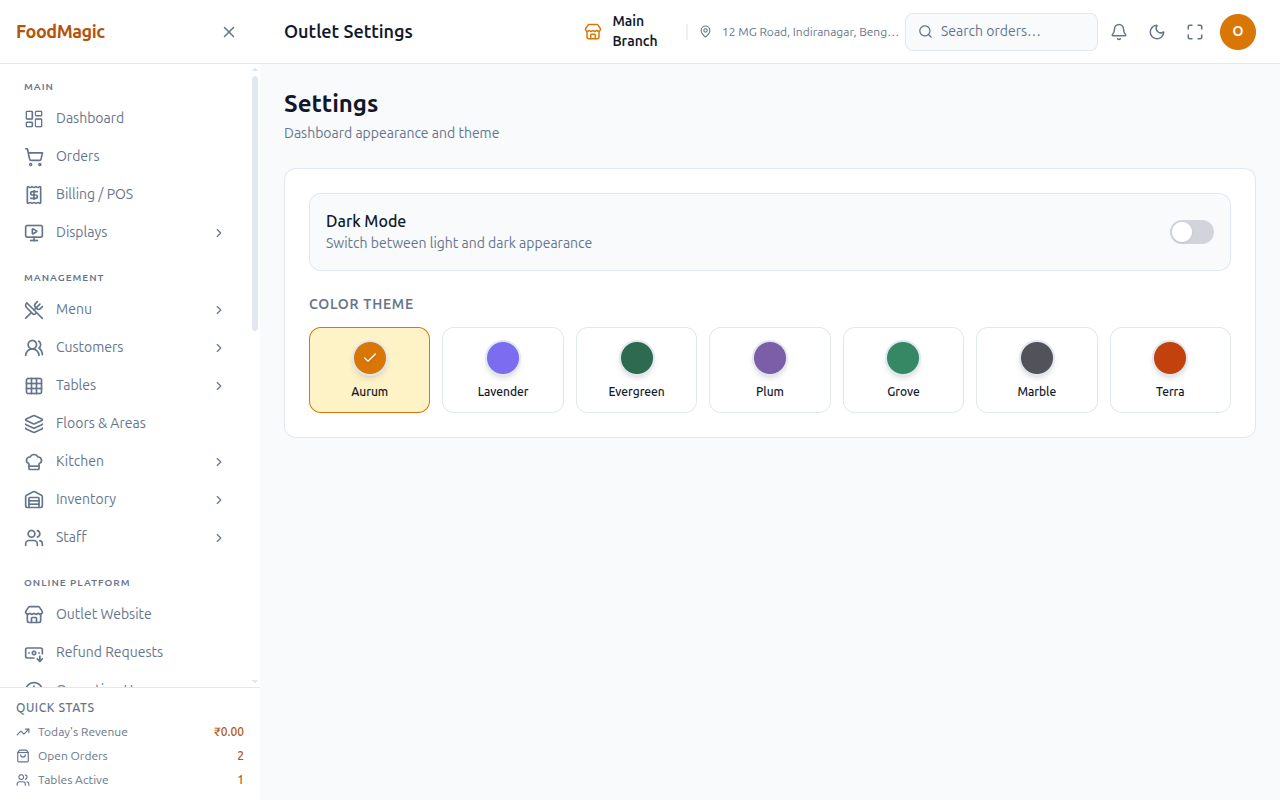
If you're looking for opening hours, delivery charges, or online-ordering switches, those are on Outlet Storefront, not here.
My Outlet Modules
Lets one outlet turn off a module it doesn't use, within what the brand has already allowed. An outlet can switch something off, but it can't switch on something the brand has already turned off.
Outlet Storefront
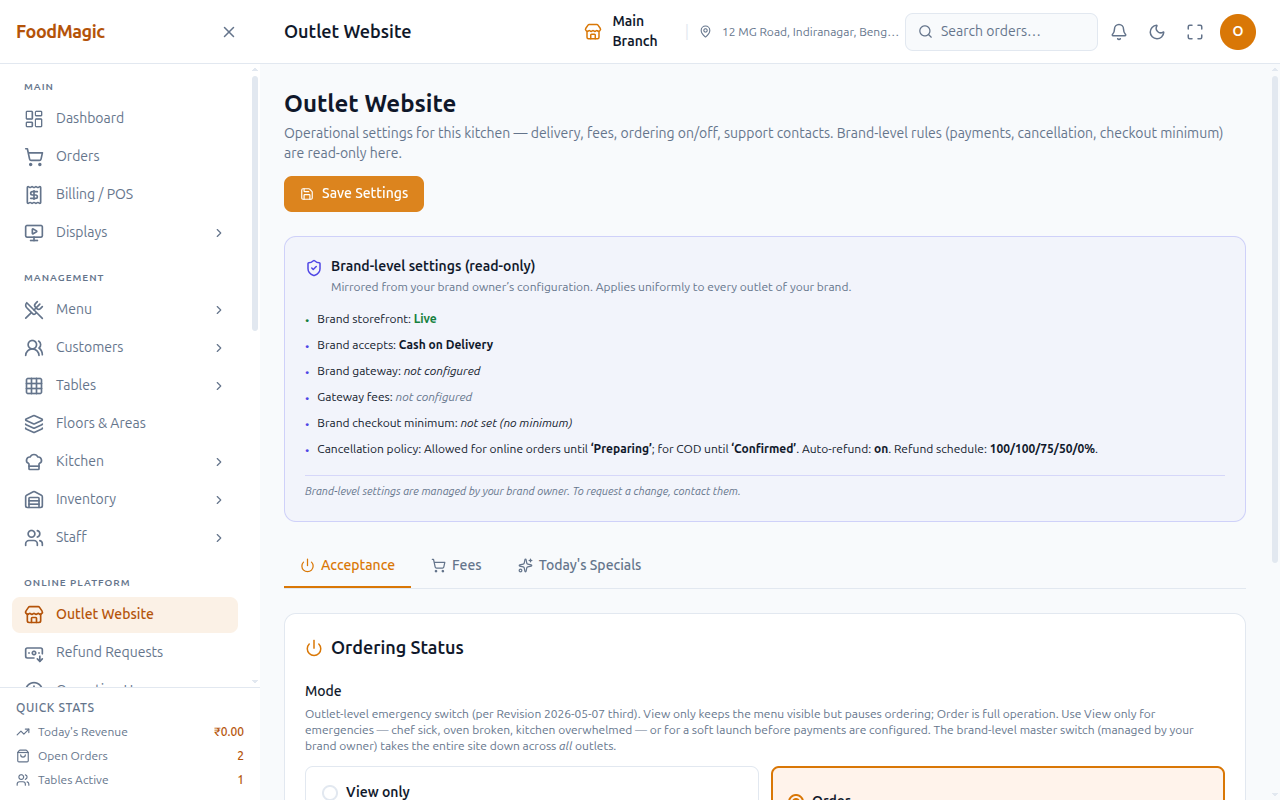
Also shown in the sidebar and page heading as Outlet Website. More people can view this screen than can save changes to it — saving is kept for outlet management. Three tabs:
- Acceptance — this outlet's own Ordering Status (View only / Order — an emergency pause that works independently of the brand's switches), plus Support Contact (the phone number and email shown to this branch's customers)
- Fees — read-only: the delivery fee, COD handling fee, and the online gateway's processing rate, all pulled from the brand's Front Website settings, plus a live ₹500 sample-order preview. There's nothing to edit on this tab — fee amounts moved to brand level on 2026-06-09
- Today's Specials — random or hand-picked featured items for this branch, which can be reordered, capped at 50 picks when picked by hand
This is the day-to-day half of the storefront. The brand sets the rules (payment methods, cancellation policy, fee amounts, branding); the outlet decides whether it's open right now, its support contact, and what it's promoting today. See Outlet-level: is this branch open, and what does it charge? for the full breakdown.
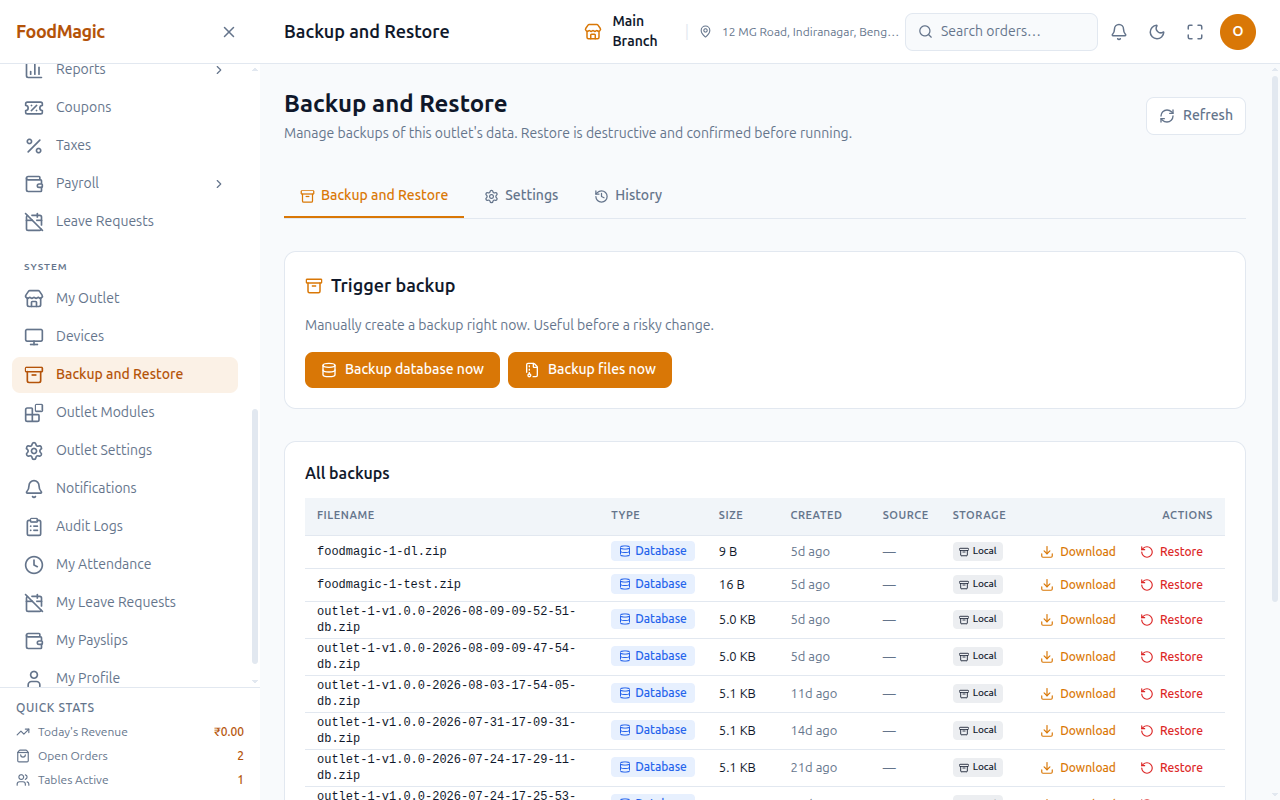
Backup Settings
How and where this outlet's data is backed up, and how to restore from a previous backup.
Technical and personal
System Settings
A raw key-and-value editor for the underlying configuration list. Each entry has a key, a value, and a description. A value can be marked encrypted, which hides it behind a show/hide switch, and a value can also be stored as JSON.
This is a direct editor with no safety checks — it writes configuration entries straight into the system. Use the purpose-built screens above instead, unless you specifically know which entry you need to change.
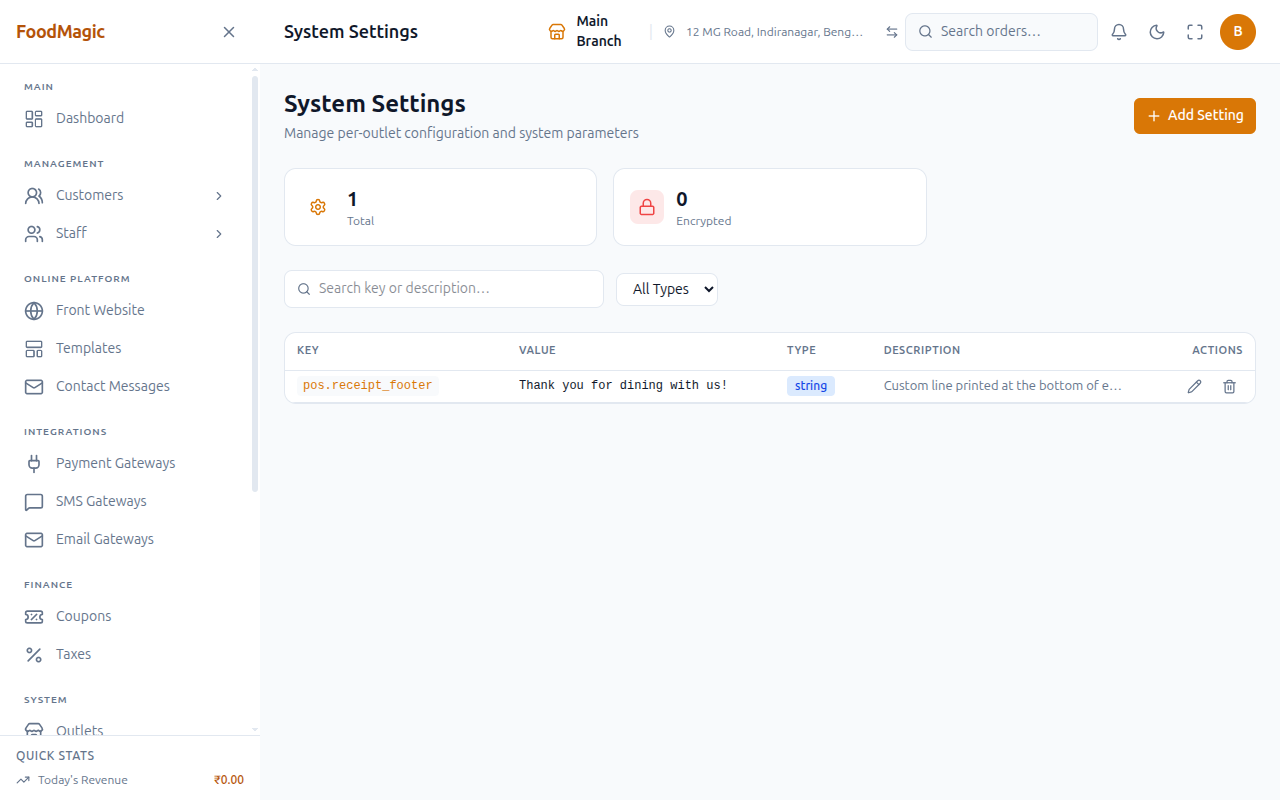
This screen has no link in the sidebar at all, for any role — confirmed by checking the sidebar's own setup. It's only reachable by typing the address directly, which fits its "break glass, emergency only" nature: nothing in the product points a normal user toward it.
Add Setting
Opens a dialog for a Setting Key (free text — for example, a custom line to print at the bottom of every receipt — locked once the entry exists), a Value Type (string, number, boolean, or json — the Value field changes to match: a dropdown for boolean, a text area with JSON checking for json, a plain box otherwise), a Description, an Outlet picker (leave it blank for a shared, install-wide entry, or pick one to limit it to a single outlet), and an Encrypted switch.
Use this to store a raw configuration value that doesn't have its own dedicated settings screen — a fallback for anything the purpose-built screens don't cover yet.
Edit (pencil icon)
Opens the same dialog, but the key can't be changed — an existing setting can't be renamed. An encrypted value's field starts blank with a "leave blank to keep current value" hint, the same approach used on the gateway screens.
Show / hide value (eye icon, encrypted rows only)
A per-row switch that toggles an entry marked Encrypted between masked dots and plain text on this screen.
This is just a display toggle, not real encryption. Marking a value "Encrypted" hides it behind dots on this screen and leaves its edit box blank — but the real value is already sent to your screen the moment the list loads, whether or not you've clicked the eye icon. The toggle only decides whether it's shown on screen, not whether it was ever sent to your browser. Anyone who can open System Settings at all already has every value available to them. Don't treat this as a way to keep something like an API key away from a co-worker who can also reach this screen — it only stops someone glancing at your monitor, nothing more.
Delete (trash icon)
A confirmation message, then the entry is removed for good — there's no trash folder and no way to bring a deleted entry back.
Search and Type filter
A search box (matches the key or description) and a Value Type dropdown (All Types / String / Number / Boolean / Json) — both search the server fresh as you type or change them, rather than filtering a list already loaded on your screen. A Clear button appears once either filter is active.
Every action on this page — including just looking at it — needs the same access. Unlike Payment, SMS, and Email Gateways, there's no lighter view-only version of System Settings: it's full access or none at all.
My Profile and Change Password
The only two screens with no permission needed at all — every signed-in person reaches their own profile and can change their own password, including waiters and delivery staff.
My Profile mirrors the same Basic Info, Address, Documents, and Employment tabs used on a staff record (see Staff overview → Add User) — it's the self-service view of that same record, minus the Pay Config and Roles tabs, which stay admin-only.
Which screen do I want?
| I want to… | Go to | Level |
|---|---|---|
| Stop taking online orders at one branch | Outlet Storefront | Outlet |
| Change which cards customers can pay with | Front Website | Brand |
| Connect Razorpay | Payment Gateways | Brand |
| Change the delivery fee at one branch | Outlet Storefront | Outlet |
| Change the free-delivery minimum | Front Website | Brand |
| Turn the loyalty programme on | Brand Settings | Brand |
| Allow partial payments | Brand Settings | Brand |
| Hide a feature we never use | Platform Modules | Brand |
| Hide a feature at one branch only | My Outlet Modules | Outlet |
| Change the dashboard theme | Outlet Settings | Outlet |
| Change how the public site looks | Templates | Brand |
| Send SMS to customers | SMS Gateways | Brand |
| Store a one-off value with no screen of its own | System Settings | Technical |
| Change my own password | Change Password | Personal |
How it is secured
The permission behind each screen
Every settings screen above is locked behind a specific permission, each shown by its plain-English name on the Roles & Permissions screen when someone builds or edits a role:
- Manage brand settings is needed to save any change on Brand Settings. Viewing the current brand settings needs no special permission at all — any signed-in staff member at that outlet can see them, because billing, the kitchen display, and the live boards all read these values to work correctly. Only saving is restricted.
- Manage system settings is needed for every action on System Settings, including just opening the list. There's no lighter view-only version here — it's the same permission whether you're looking or changing something.
- Every other screen carries its own permission in the same style (for example, Manage outlet settings for the outlet-level screens). By default, only the Super Admin role is set up with the brand-level ones, and only the Outlet Superadmin role with the outlet-level ones.
Role access
Only the Super Admin role is meant to reach Brand Settings, Platform Modules, Front Website, Templates, and the three gateway screens — this matches the brand-level design described on Who can do what. Only the Outlet Superadmin role is meant to reach the outlet-level screens. My Profile and Change Password need no permission at all — every signed-in person, including a waiter or a delivery rider, can reach their own.
Tenancy scoping
- Brand Settings is strictly one record per brand. It's always looked up against the brand of whoever is signed in, so one brand can never see or change another brand's settings.
- System Settings is not scoped to a brand at all. The whole list of entries is shared across the installation, rather than kept separate per brand. In everyday use this rarely matters, because only Super Admins are meant to hold the permission that opens this screen, and each one already looks after their own brand's outlets — but there's no technical wall here the way there is on every purpose-built screen. An entry meant for one outlet, or one brand, isn't fenced off from being seen or edited by anyone else who can reach this screen.
Validation
- On Brand Settings, every field is checked before saving — currency and date-format choices must be one of the supported options, the start of week must be Monday, Sunday, or Saturday, and numeric loyalty fields can't go negative. The Save bar won't submit an invalid combination.
- On System Settings, the Setting Key can't be changed once an entry exists — you can only remove it and add it again under a new key. The Value Type you pick controls what's accepted: a boolean entry only takes on or off, and a JSON entry is checked to make sure it's valid JSON before it's allowed to save, so a broken value can't be written by mistake.
Audit trail
Neither screen writes to the Audit Logs area. Saving a change on either one only updates a "last changed by / last changed at" stamp on the record itself — there's no history of what a value used to be, and, as noted above, deleting a System Settings entry removes it for good, with nothing to bring it back afterward.
Taken together: an incorrect or harmful change to either Brand Settings or System Settings leaves no trace of what the previous value was, and a deleted System Settings entry can't be restored. Treat both screens with the same care you'd give any change to how the business actually runs, because there is no undo.
Related pages
The four roles, and where brand-level work ends and outlet-level work begins.