
Raising a purchase order
Ordering stock from a supplier — including ordering from a vendor you have not set up, receiving it, and returning it.
A purchase order is your record of what you asked a supplier to send. It's what you later reconcile against their invoice, and it feeds the purchase and payables reports.
What it is
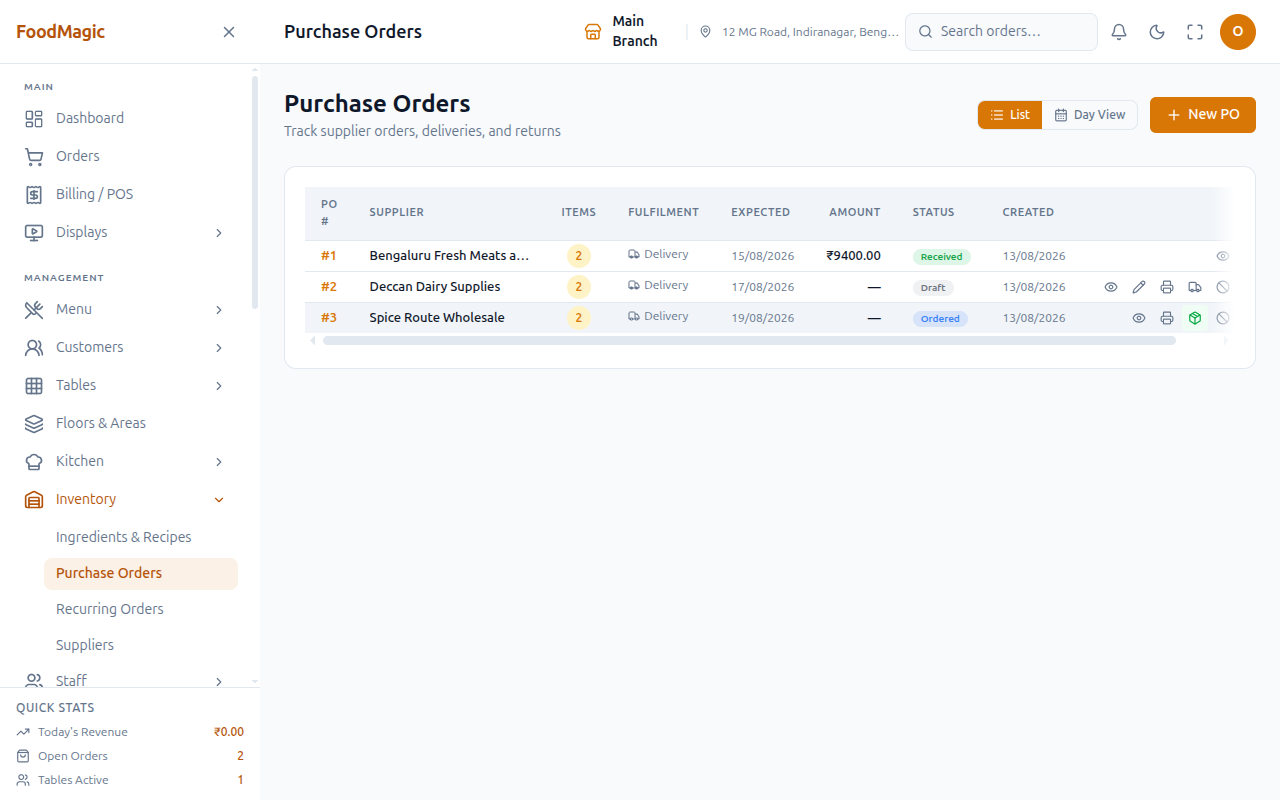
The Purchase Orders screen is where an outlet orders stock from a supplier, tracks whether it's arrived, and records what actually came in against what was asked for.
Outlet staff responsible for purchasing use this, typically the outlet owner or admin.
You'll find it under Inventory → Purchase Orders, with a companion Recurring Orders screen for standing orders.
This screen is live, including receiving, returns, and recurring templates.
A purchase order moves through four statuses: draft, then ordered, then received — or cancelled at either of the first two stages. What you can do to an order depends on which stage it's in.
How it works
Raising one, step by step
Go to Inventory → Purchase Orders and choose New PO.
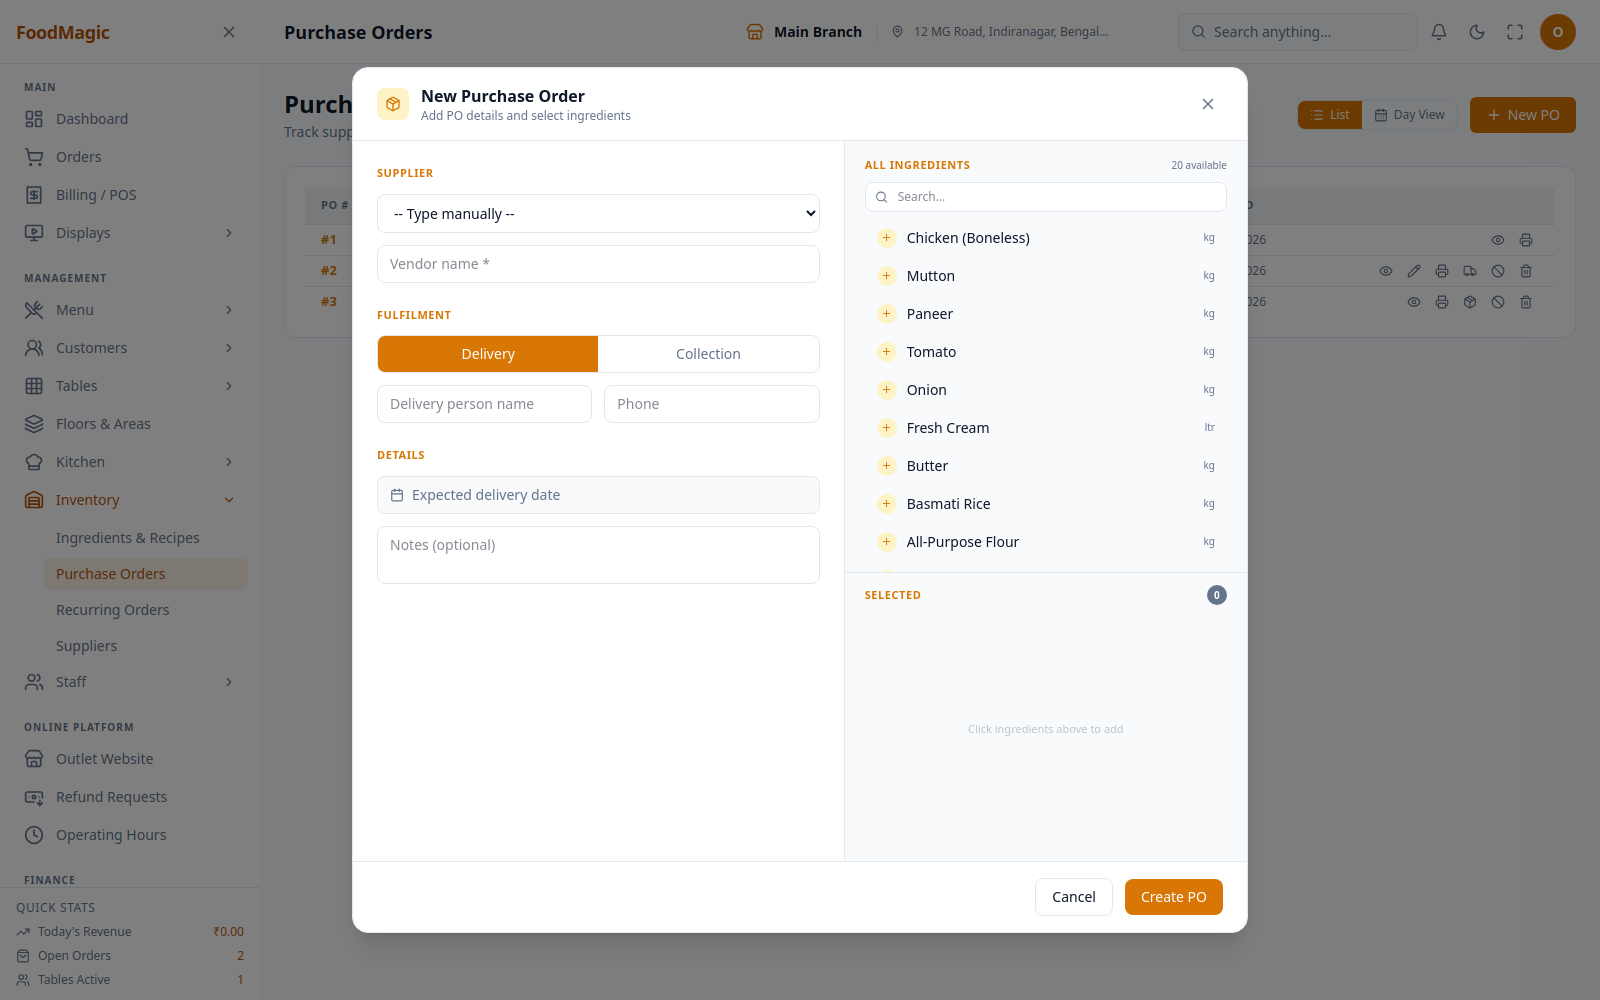
Pick from your supplier list, or choose Type manually to order from a vendor you haven't set up.
Vendor name is required. You can also add a delivery person's name and phone.
Delivery (they bring it) or Collection (you go get it). Delivery is the default no matter what the chosen supplier's own delivery setting says.
Whatever you agreed with the supplier. This is what makes a late delivery visible.
A searchable list of everything you buy, each with its unit. Click to add; a Selected count tracks what's on the order.
Optional free text for anything specific to this order.
Saves the order as a draft, with no rate on any line yet. Rates get entered when the order is received, not when it's raised (see Receiving items below).
Use this whenever stock needs replenishing — usually after checking Low Stock on the Ingredients tab.
Creating a purchase order needs a stronger permission than just viewing the list.
Ordering from a vendor you have not set up
You don't have to create a supplier first. Type manually lets you raise a purchase order against any vendor name — useful for a one-off purchase, or an emergency top-up from whoever happens to be open.
That convenience has a cost. A manually typed vendor has no payment terms, no credit limit, and no linked ingredients, so nothing tracks what you owe them. If you end up buying from someone more than once, set them up properly as a supplier.
The purchase orders list
Each row shows the PO number, supplier, item count, fulfilment (with a truck or person icon), expected date, amount, status (draft/ordered/ received/cancelled, colour-coded), created date, and a row of action icons. A search box (matching PO number, vendor name, or supplier name), sortable column headers, an Export button, and real pagination sit above the table — the same toolbar pattern used across the rest of the app's list screens.
Every row always shows View details and Print PO (a formatted print preview). The rest depend on the order's status, and all of them need the same purchase-order-management permission:
| Icon | Shows when | Action |
|---|---|---|
| Pencil (Edit PO) | draft |
Opens the detail page in edit mode |
| Truck (Mark as ordered) | draft |
Moves the order to ordered |
| Package (Receive items) | ordered |
Opens the detail page in receive mode |
| Ban (Cancel PO) | draft or ordered |
Moves the order to cancelled |
| Trash (Delete PO) | anything except received |
Removes the order after a confirmation |
A received order can never be deleted from this row, only viewed — deleting it would silently undo the stock it already added.
Two ways to view orders
| View | Use it for |
|---|---|
| List | Everything, most recent first |
| Day View | What's expected on a given day |
A List / Day View toggle sits next to New PO in the header. Day View takes a date (today, by default) and groups that day's orders by supplier, showing each order's line items and a Supplier Total, with a Day Total at the bottom. Check this one each morning — it answers "what's supposed to arrive today?" rather than "what have we ordered?"
The purchase order detail page
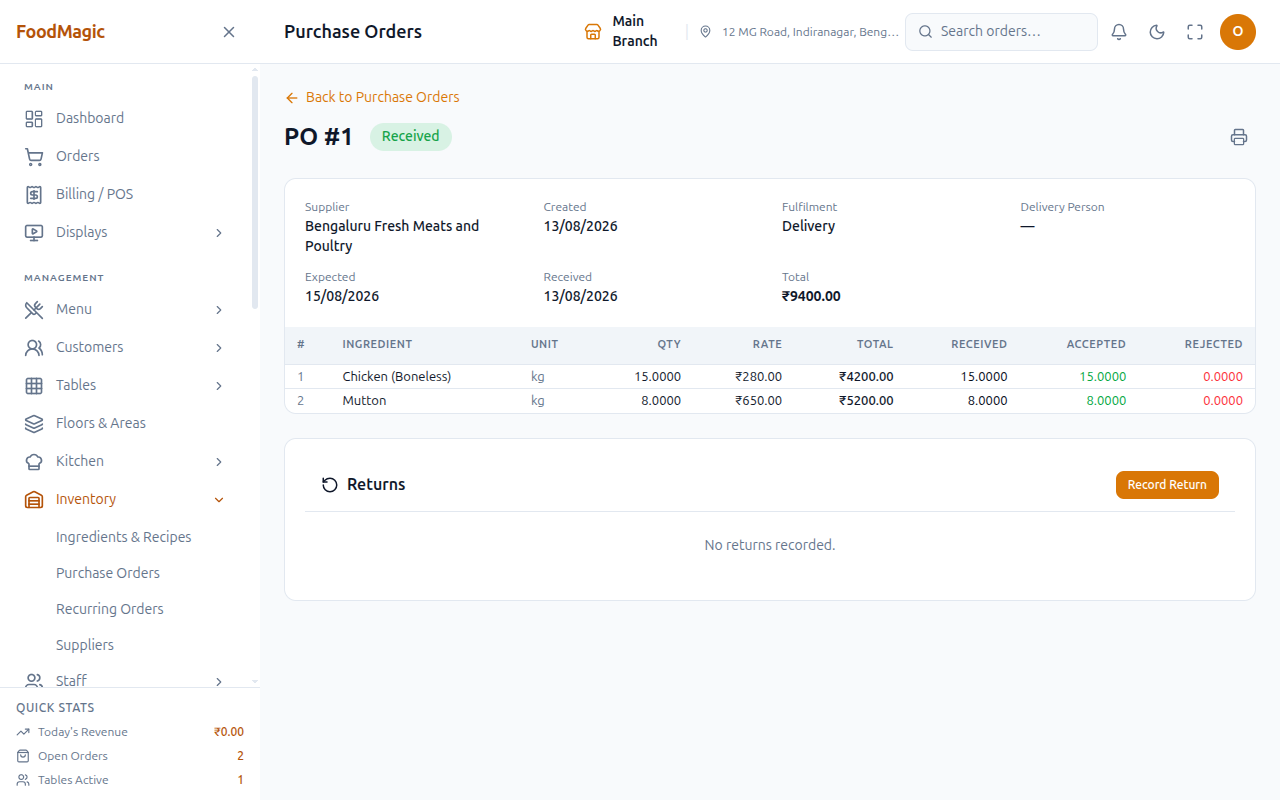
This shows the order's supplier, dates, fulfilment, and delivery contact
(editable inline via a pencil icon, unless the order is already
received or cancelled), then its line items. The header actions match
the list row: Print, and — for anyone who can manage purchase orders
— Mark as ordered (draft), Receive (ordered), or Cancel
(draft/ordered).
Receiving items
Clicking Receive on an ordered PO shows a Receive Items table:
one row per line, each with the ordered quantity, an editable Rate,
an editable Received Qty (which fills in Accepted = Received and
Rejected = 0 automatically as you type), a Note field, and a per-row
Skip / Undo toggle for a line that didn't show up at all. A
Receive All button fills every line to its full ordered quantity in
one click. Confirm Receive needs a rate and a received quantity on
every line that hasn't been skipped.
Do this the moment the delivery actually arrives — this is what turns a paper promise into real stock and a real cost. Behind the scenes, the accepted and rejected quantities on each line must always add up to what was actually received, and the received quantity can never be more than what was ordered. Any skipped line is removed from the order before the rest is received.
Receiving does more than change the order's status. For every accepted unit, it automatically adds stock, which shows up in the same Stock Log covered in Ingredients, stock and recipes. There's no separate step to "add the stock" afterward — receiving is the stock-adding step. This is currently the main way stock levels actually go up in the system.
Line items table
Before receiving, you see: number, ingredient, unit, quantity. Once the
order is received, five more columns appear — Rate, Total, Received,
Accepted (in green), and Rejected (in red) — with a Total row at the
bottom.
Returns
Once an order is received, a Returns section appears below the
line items: a table of Ingredient, Qty, Reason, Notes, Refund Status, and
Date, with a Record Return button.
The form only offers ingredients that were actually on this order, with a quantity capped at whatever's been accepted so far minus what's already been returned for that ingredient. You also choose a Reason (Bad Quality, Wrong Item, Damaged, Expired, Excess, Other) and can add optional notes. The cap is shown live in the form and checked again when you submit.
Use this whenever stock arrives damaged, wrong, expired, or simply more than you ordered, and it needs to go back to the supplier.
Returns here mean supplier returns, not kitchen waste. The Wastage / Returns report covers stock sent back to a vendor. A dish burnt on the pass, or produce that spoiled in your own store, isn't recorded anywhere — there's no kitchen wastage feature.
Recording a return automatically reduces stock for the returned quantity — the stock the order added on receipt gets taken back out the moment the return is logged, before any refund actually happens. Refund status — pending, refunded, credit note, replaced, or waived — can in principle be updated afterward, but no button in the app currently does this. The Returns table shows the refund status as read-only, with no way to edit it anywhere on the page.
Recurring orders
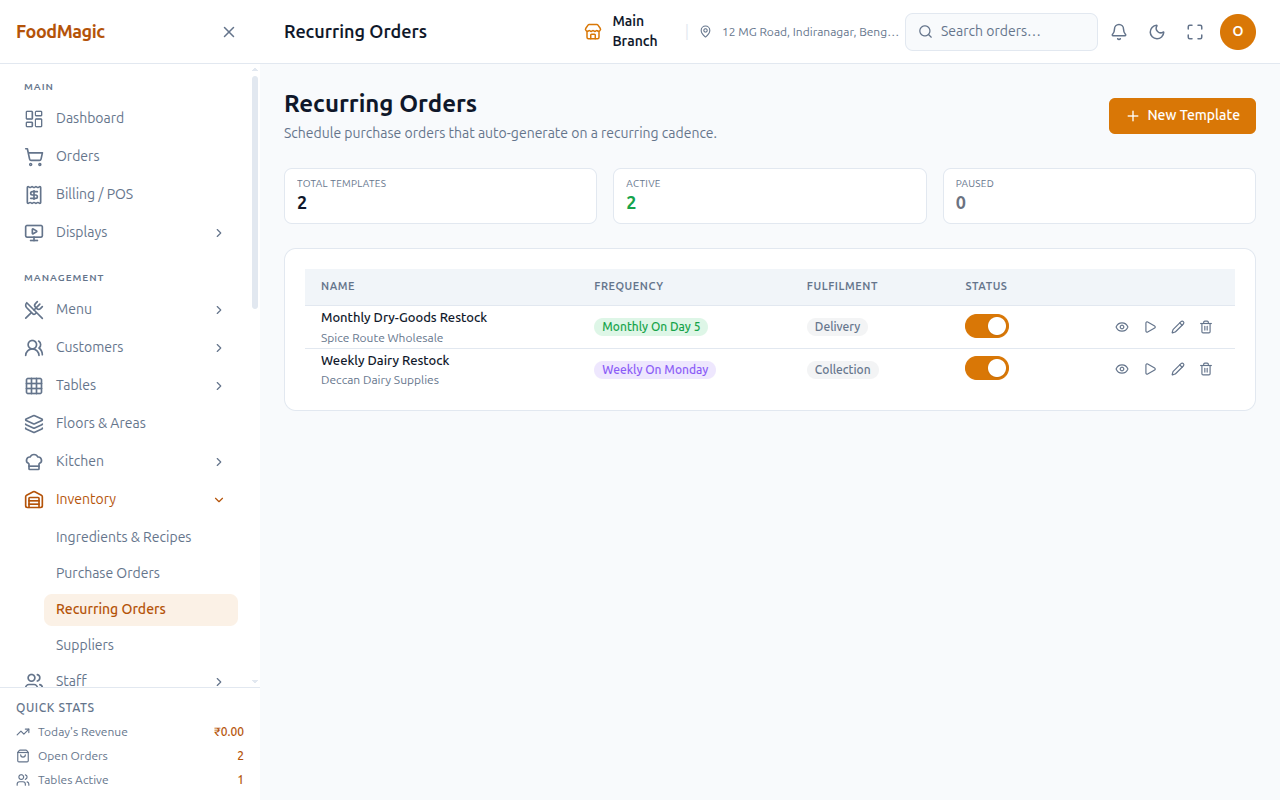
For stock you buy on a regular cycle, a template generates a fresh draft purchase order on a schedule — daily, weekly, every two weeks on a chosen day, or monthly on a chosen day — instead of you rebuilding the same order by hand every time.
| Figure | Meaning |
|---|---|
| Total Templates | Recurring orders set up |
| Active | Currently generating |
| Paused | Set up, but not generating |
Each row shows the template's name (with the supplier underneath), frequency (a coloured badge — blue daily, purple weekly, orange every two weeks, green monthly — reading e.g. "weekly on Wednesday"), fulfilment, a status toggle, and row actions. Like the Purchase Orders list, this table has its own search box, sortable columns, an Export button, and real pagination.
New Template uses the same two-panel layout as New PO: a template name, a required supplier (unlike a manual order, a recurring template can't be raised against a typed-in vendor), a Frequency selector that reveals a Day of Week or Day of Month field as needed, a Delivery/Collection toggle, and an ingredient picker with a quantity per line and an optional rate. The rate is deliberately optional here, since many prices — vegetables, for instance — change daily and are only known once the order is actually received.
Use this for any standing order — the produce delivery that comes every Monday and Thursday, the monthly dry-goods restock.
| Icon | Action |
|---|---|
| Eye (View line items) | Opens a read-only view of the template's ingredients, quantity, rate, and an estimated total |
| Play (Generate PO now) | After a confirmation, generates an order immediately instead of waiting for the schedule |
| Pencil (Edit) | Same form as New Template, pre-filled |
| Trash (Delete) | Removes the template after a confirmation |
| Status toggle | Pauses or activates the template in place |
Generating an order creates a new draft from the template's lines, which then goes through the ordinary draft → ordered → received flow like any other order.
A paused template keeps its settings. Pause it rather than deleting it when a seasonal item stops, so you can restart it later without rebuilding it from scratch.
The full purchasing cycle
flowchart LR
    A[Supplier<br/>set up] --> B[Purchase order<br/>raised — draft]
    B --> B2[Marked<br/>ordered]
    B2 --> C[Received —<br/>stock added]
    C --> D[Ingredients<br/>in stock]
    C --> F[Return<br/>if rejected —<br/>stock removed again]
    G[Recurring template] -.generates.-> B
How it is secured
An owner grants each staff member one of two rights that cover this whole area, from the Roles & Permissions screen:
| What the role can do | Grants |
|---|---|
| View purchase orders | See the purchase order list, day view, an order's detail page (including its returns), and the recurring-orders list — read-only |
| Manage purchase orders | Everything above, plus create, edit, cancel, delete, and receive an order; add or remove its lines; record a supplier return; and everything on Recurring Orders — create, edit, delete, pause/activate a template, and generate an order from it |
There's no separate right for recurring orders — the same "Manage purchase orders" right covers them, and there's no separate right for supplier returns either.
The built-in Outlet Admin role has both rights by default. Waiter and Delivery Rider have neither — Purchase Orders and Recurring Orders don't appear on their sidebar. As with the rest of Inventory, the brand owner account has no built-in access to any outlet's purchasing screens; someone has to grant it through a role, the same as any other staff member.
Purchase orders, their line items, and recurring templates are all tied to the outlet that created them; one branch cannot see or act on another branch's orders.
Two things tied to a purchase order aren't walled off by outlet the same way the order itself is. A purchase order's supplier returns, and a supplier's payment records, aren't individually tagged to an outlet — they're only reachable through the purchase order or supplier they belong to. If a listing screen ever showed every return or every payment across the whole system, rather than going through a specific order or supplier, it could in principle show another outlet's records. This comes from checking how those two features are built, not from watching it happen live with two outlets side by side — worth closing before it matters, though it's not a confirmed problem in daily use today.
A purchase order needs either a chosen supplier or a typed vendor name — not both left blank — and at least one line with a positive quantity. When receiving, the accepted and rejected quantity on each line must add up exactly to what was received, and the received quantity can never be more than what was ordered. A return's quantity can never be more than what's still outstanding for that ingredient on that order — already received minus already returned — checked both live in the form and again on submit. A recurring template needs a name that's unique within the outlet, a supplier, a frequency, a fulfilment choice, and at least one ingredient line.
Every purchase order created, edited, or deleted is written to the system's audit trail, along with who did it and what changed. Receiving an order, and recording a return or a recurring-template change, are not separately written to that audit trail — you can only see them through the order's own history on screen.
Related pages
- Adding a supplier — set up first; a purchase order is raised against a supplier (or a one-off typed vendor name).
- Ingredients, stock and recipes — receiving an order is currently the main way stock actually goes up; the Stock Log shows every movement an order produces.