
Staff leave requests
How staff apply for leave, how it is approved or rejected, and the step that has to be done by hand afterwards.
Staff ask for time off. A manager approves or rejects the request. The decision is saved with the request.
What it is
Leave Requests is the screen managers use to review staff time-off requests. They can approve or reject each one, and see who made each decision. My Leave Requests is the matching screen for staff — where a staff member applies for their own leave and checks what happened to it.
- Who uses it — Managers review and decide requests from Leave Requests. Staff apply for their own leave from My Leave Requests, if they have permission to (see below).
- Where it lives — It's a separate screen from Payroll, but closely linked to it. An approved leave day only gets paid if someone goes and marks it on the attendance sheet.
- Current status — Live and in use. There is no automatic link between an approved leave request and the attendance sheet. Someone has to mark it by hand, every time.
How it works
The four states
| State | Meaning |
|---|---|
| Pending | Submitted, awaiting a decision |
| Approved | Granted |
| Rejected | Refused — a reason is recorded |
| Cancelled | Withdrawn |
How a request moves
From My Leave Requests, giving the dates and a reason. A manager can also raise a request on someone's behalf.
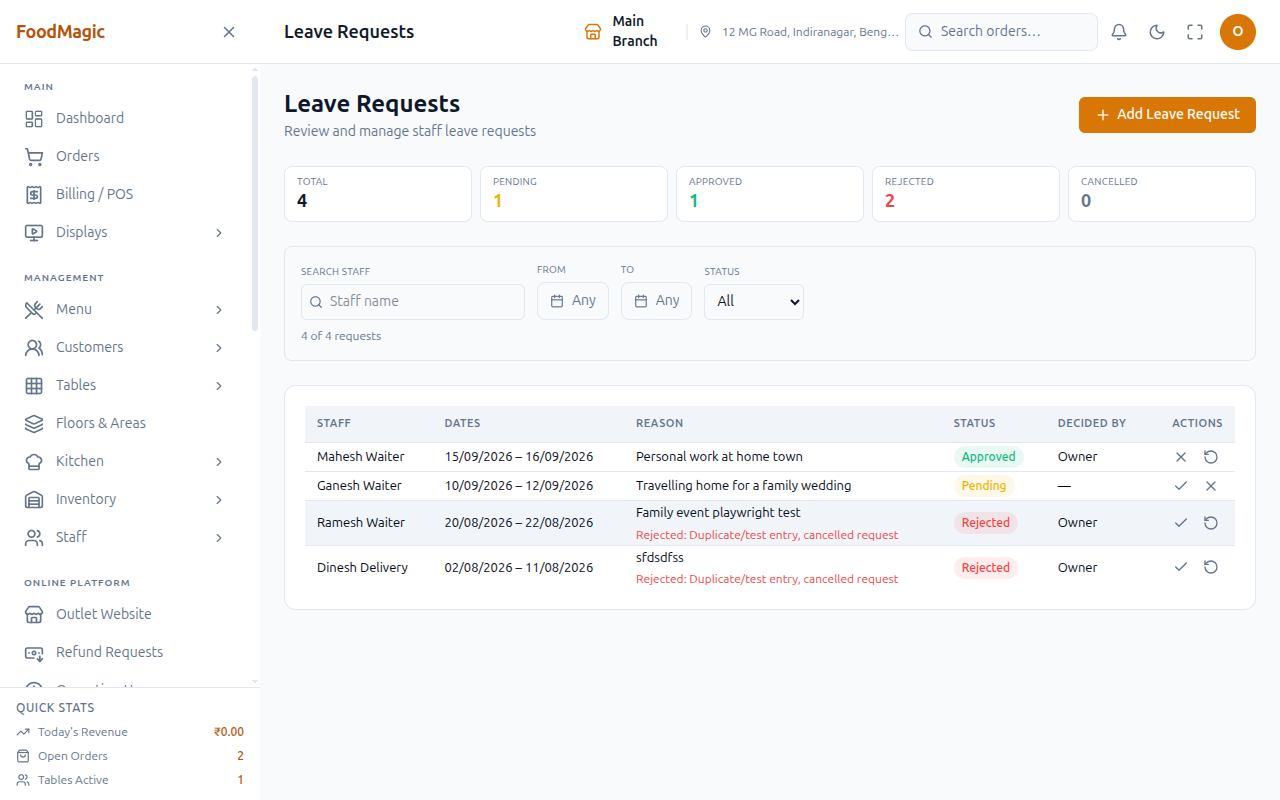
The outlet's Leave Requests screen lists every request, showing the staff member, dates, reason, status, and who decided it. You can filter by person, date range, and status.
Rejecting a request needs a reason. The system also records which manager made the decision, so there's always a record of who decided, not just that someone did.
This step does not happen automatically — see below.
Apply for Leave — raising a request
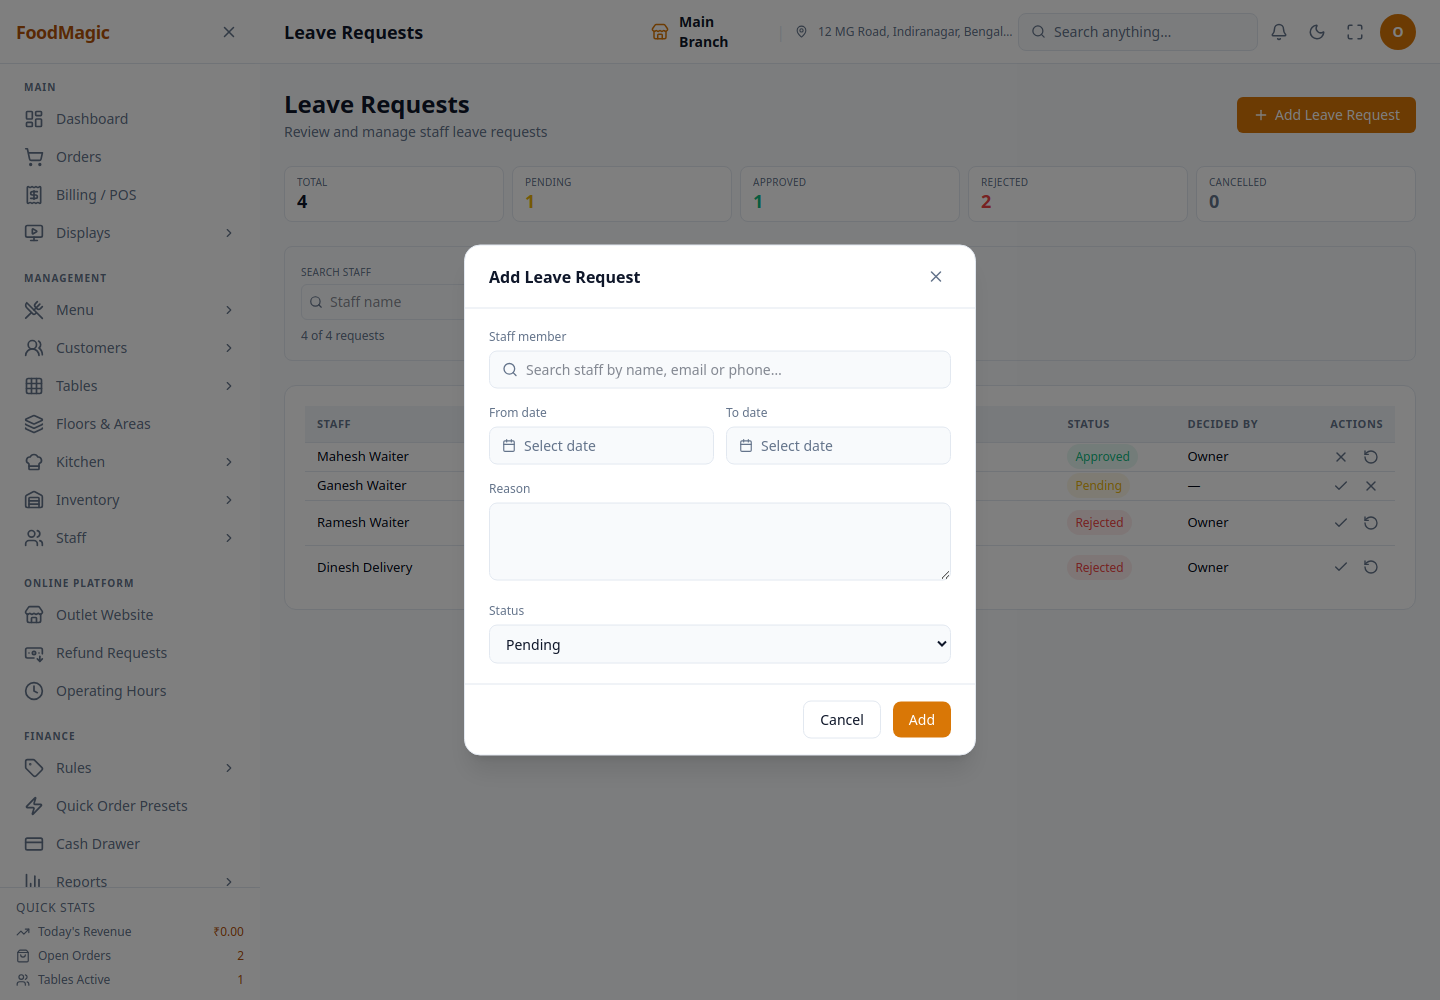
The form asks for a date range and a reason, and the reason is required. When a manager opens this form from the review queue, instead of from My Leave Requests, it also lets them pick which staff member the request is for. That lets a manager raise a request on someone else's behalf, and even approve or reject it in the same step.
A staff member uses this for their own upcoming leave. A manager uses it when the leave was already agreed outside the system — a phone call, a conversation — and just needs to be written down.
A staff member can't submit two overlapping leave requests. If a pending or already-approved request already covers any of the same dates, the new one is blocked, with a message explaining the clash — it won't quietly create a duplicate.
The Leave Requests review queue
| Element | What it is |
|---|---|
| Add Leave Request button | Opens the same apply form, with the staff picker turned on (the manager's path) |
| Staff name search | Filters the queue by who applied |
| Any status filter | Narrows to Pending / Approved / Rejected / Cancelled |
| Columns: Staff, Dates, Reason, Status, Decided by, Actions | One row per request |
Approve or reject
Approving or rejecting is a single action that moves the request to Approved or Rejected. Rejecting needs a reason — the form won't submit without one. The deciding manager's name is stamped onto the request too, so the record shows who made the call, not just that a call was made.
Deal with requests as they come in, rather than saving them up for month end. An approved leave day still needs to be marked as Holiday on the attendance sheet by hand before payroll runs — see below.
A cancelled request can never be changed afterward. The system will refuse to update it.
Cancel — withdrawing your own request
This sets the request to Cancelled. Only the person who applied can cancel their own request, and only while it's still Pending. Once a manager has made a decision, cancelling is no longer possible.
Use this when plans changed before anyone reviewed the request.
The step people miss
Approving leave does not mark attendance. These are two separate records, and nothing connects them automatically. If an approved leave day is left unmarked, or marked Absent on the attendance sheet, that staff member does not get paid for it.
Mark approved leave days as Holiday — this pays a full day. Do it before payroll runs, because once payroll runs, attendance is locked for good.
See Staff attendance for how to mark attendance, and Staff payroll for how the lock works.
Where to see it
| Screen | Who | Shows |
|---|---|---|
Leave Requests (/leave-requests) |
Managers | Every request for the outlet, with totals by status |
My Leave Requests (/my-leave-requests) |
Staff with the Apply for leave control | Their own requests, and the button to apply |
How it is secured
Leave has two separate controls on the Roles & Permissions screen — Apply for leave and Manage leave requests. One is for staff handling their own leave, the other is for managers overseeing everyone's.
- Apply for leave — opens My Leave Requests. It lets someone apply for their own time off, see their own history, and cancel their own pending request.
- Manage leave requests — opens the Leave Requests review queue. It lets someone raise a request for anyone at the outlet, and approve or reject any request.
Someone who has Manage leave requests but not Apply for leave can still raise and decide requests for other people from the review queue — they just won't have their own My Leave Requests page for their own time off.
Who holds these by default
By default, only the Outlet Manager role has both controls. Neither Waiter nor Delivery Rider gets Apply for leave automatically, and the brand Super Admin doesn't get either control either — leave is handled at the outlet level, and the Super Admin's automatic permissions cover brand-wide things plus a short list that doesn't include leave. See Staff overview for the full picture.
Out of the box, nobody except the Outlet Manager can apply for or manage leave at all — not even a Waiter. For My Leave Requests to show up on a Waiter's sidebar, a Super Admin has to open the role editor and turn Apply for leave on for that role. Some brands turn this on for Waiters but leave it off for Delivery Riders on purpose, since riders usually arrange time off outside the system anyway. That's a choice each brand makes for itself — it isn't the default setup. This warning describes what the system ships with by default, not any one brand's actual configuration.
On one real, live installation, this is exactly how it's set up: a Waiter's sidebar has a working My Leave Requests page with Apply for Leave turned on, while a Delivery Rider on the same brand has no leave screen at all. That's just one real example of the choice described above — not proof every brand sets it up the same way.
Tenancy — one outlet at a time
Every leave request belongs to one outlet — this is always required, never optional. There's no brand-wide leave calendar. A manager only ever sees their own outlet's queue.
Validation
A leave request needs a real date range — the end date can't be before the start date — and a reason, which is required and limited to 255 characters. Rejecting a request also needs its own reason. When a manager applies on someone else's behalf, that person must belong to the manager's own outlet, and can't be a staff member who has already been removed.
Audit trail
Every decision records who made it and when, right on the request itself — that's what fills in the "Decided by" column. There's no separate audit log beyond that. To check the history of a decision, open the request itself; there's no central log to search.
Related pages
How all four staff processes connect, and the safe order to do them in.
Where an approved leave day has to be marked as Holiday, by hand.
Why leave has to be settled before payroll locks the attendance behind it.
Turn Apply for leave / Manage leave requests on or off for a role.