
Taking and managing orders
How to take an order at the till, send it to the kitchen, assign staff, and follow it through to completion.
This page explains how orders work, from tapping New Order to the order closing.
What it is
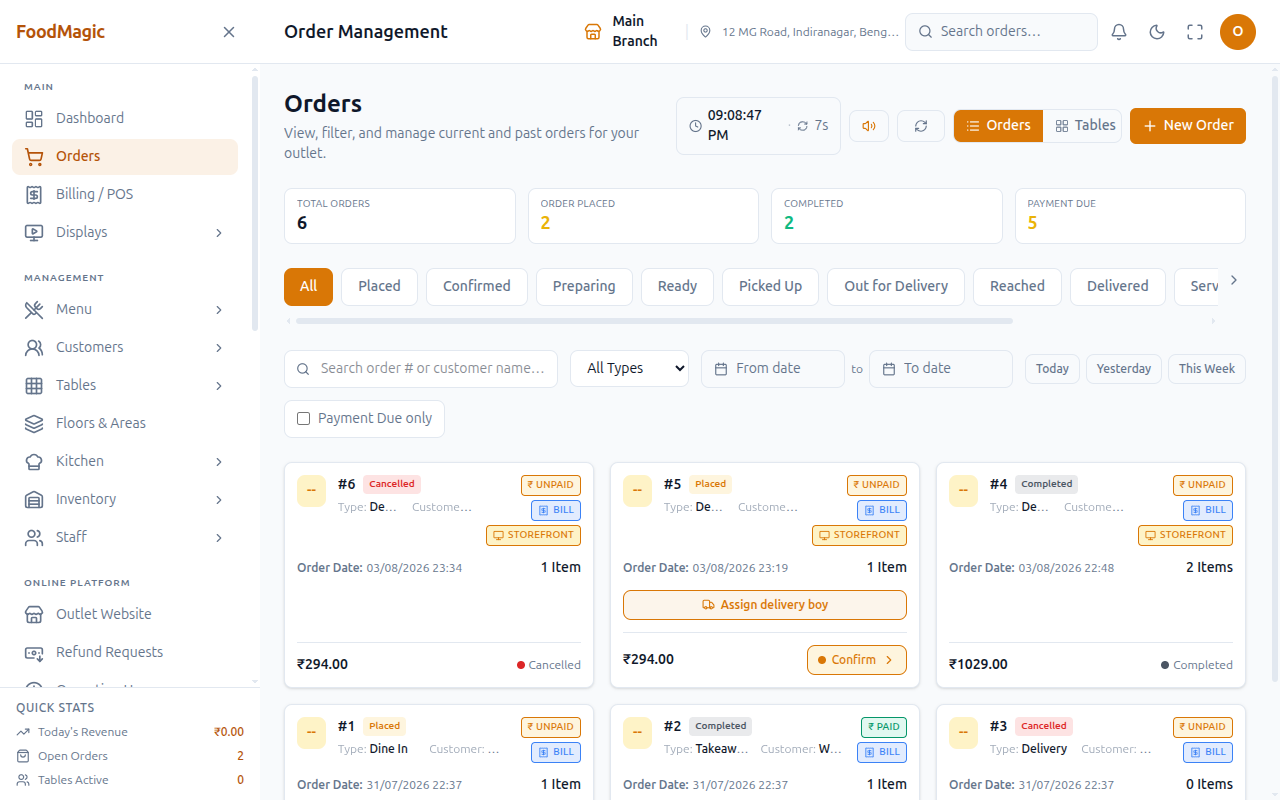
Every sale goes through Orders — dine-in, takeaway, or delivery. It starts the moment you open a ticket at the till, and ends when the order is paid and closed. Orders turns a table of guests, or a phone-in delivery, into two things: a ticket the kitchen can cook from, and a bill the customer can pay.
- Who uses it — Cashiers and outlet managers open and manage orders at the till. Waiters handle their own tables from My Orders. Delivery riders handle their own deliveries from My Deliveries. Kitchen staff work from the kitchen display. Managers watch the whole floor from the main Orders screen. Customers can ask for a refund from their own account, and staff then handle that request.
- Where it lives — Orders are created on the Billing / POS screen (see Billing and payments for the full picture of that screen). After that, you track and update an order on the Orders, My Orders, My Deliveries, or kitchen-display screens.
- Current status — This is live and working. Dine-in (with table selection), takeaway, and delivery are all built. So are kitchen station routing, waiter and rider accept/decline, and a refund-request queue customers can use.
Where to go
| What you want to do | Go to |
|---|---|
| Take an order | yourdomain.com/billing |
| See all orders | yourdomain.com/orders |
| Open one order | yourdomain.com/orders/{number} |
| See the orders assigned to me | yourdomain.com/my-orders |
| See my deliveries | yourdomain.com/my-deliveries |
| Watch the kitchen | yourdomain.com/kitchen/display |
| Handle refund requests | yourdomain.com/storefront/refunds |
How it works
Taking an order at the till
Open Billing / POS from the sidebar, or go to yourdomain.com/billing.
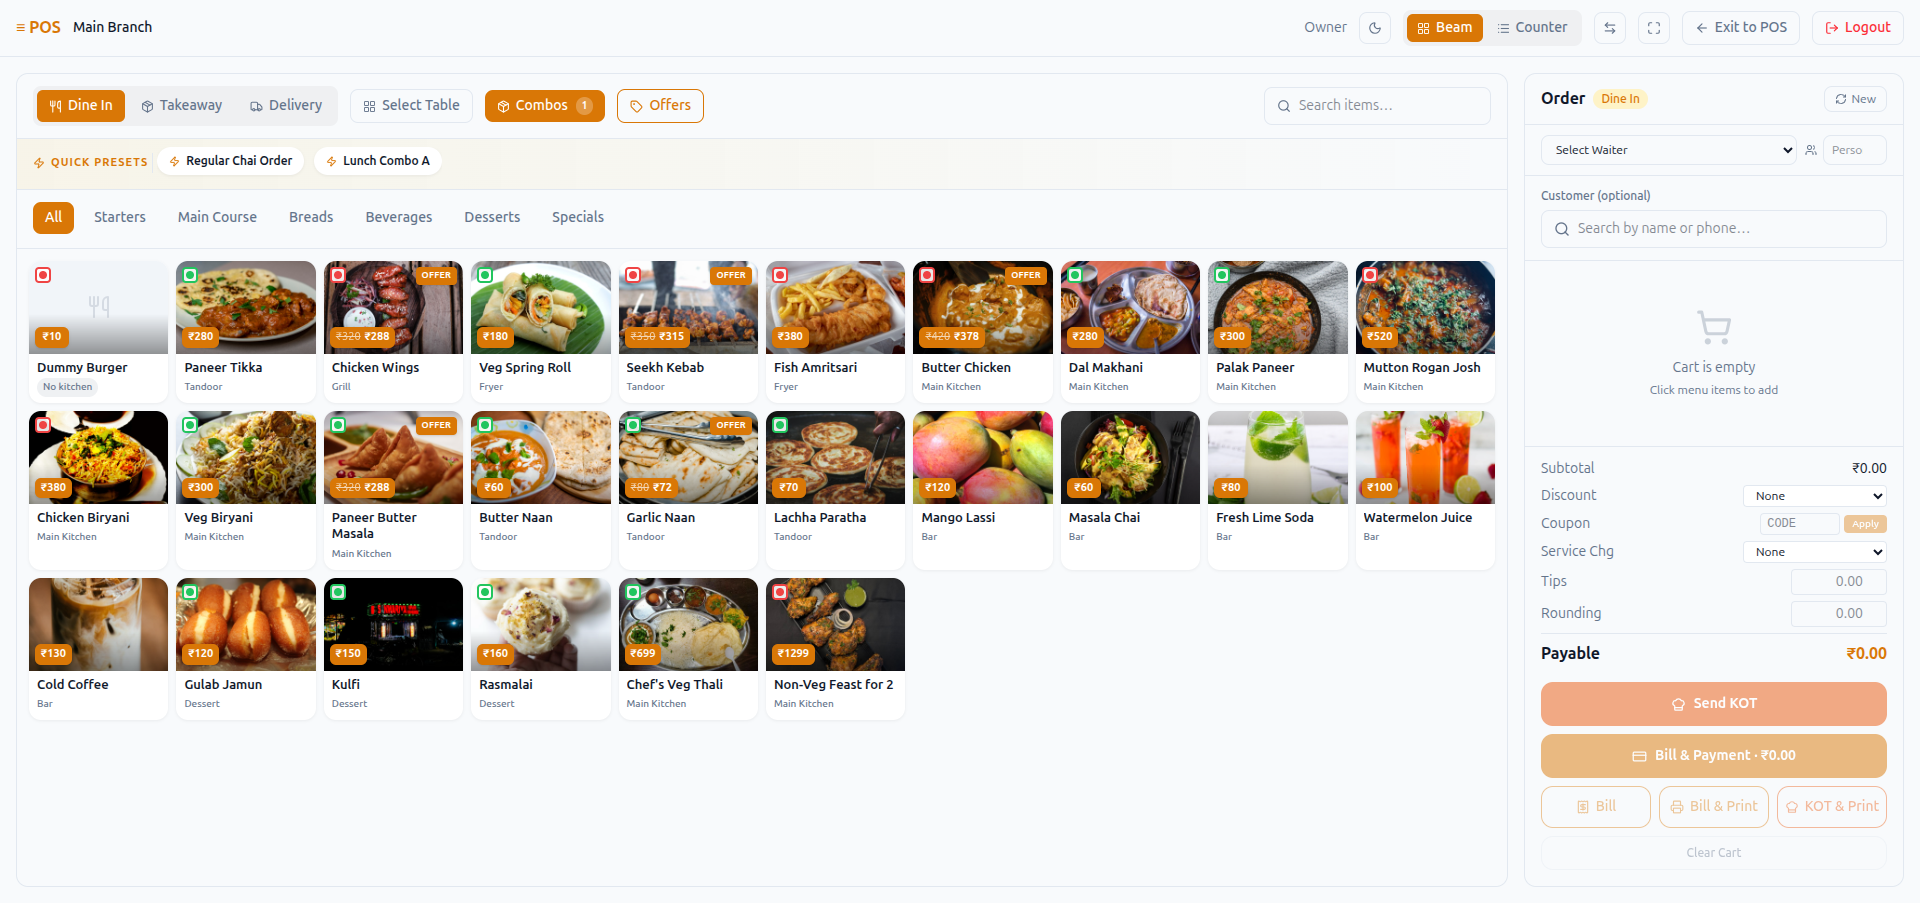
At the top of the screen, choose Dine In, Takeaway, or Delivery. Pick this first — it decides what the rest of the screen will ask you for.
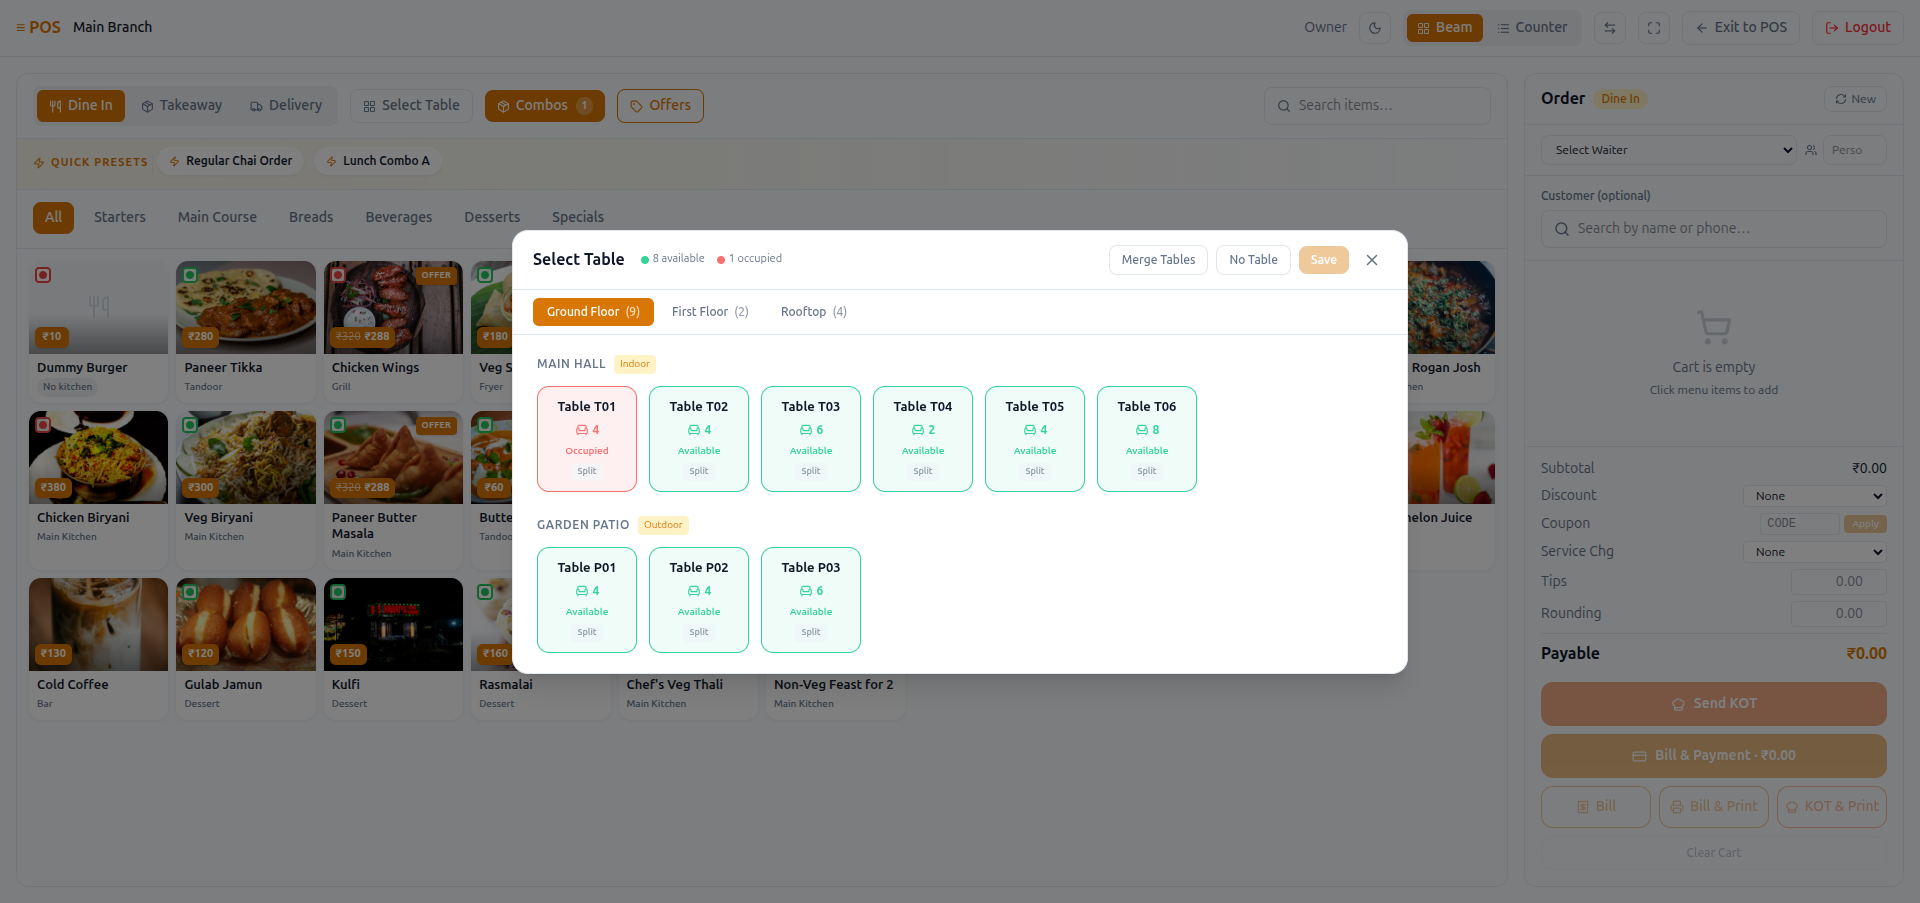
Click Select Table and choose the table the guests are on.
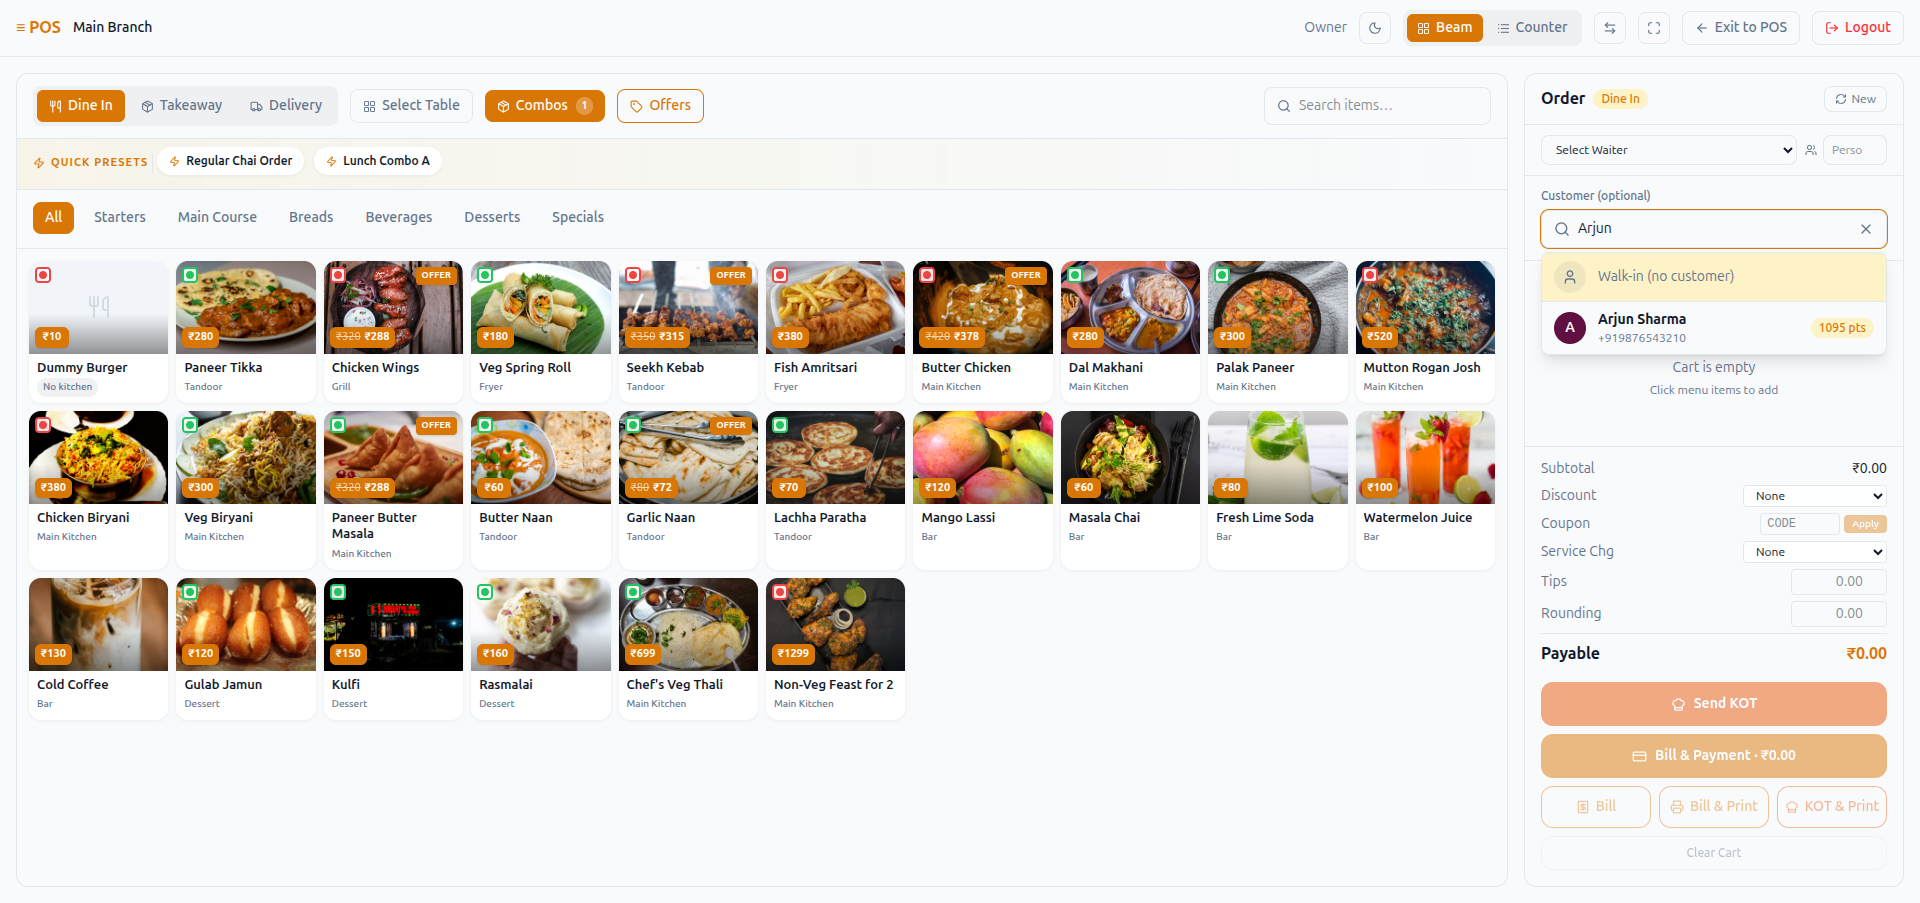
In the order panel on the right, search by name or phone. If the customer already exists, they'll show up as you type. Leave it blank and the order is booked as a walk-in.
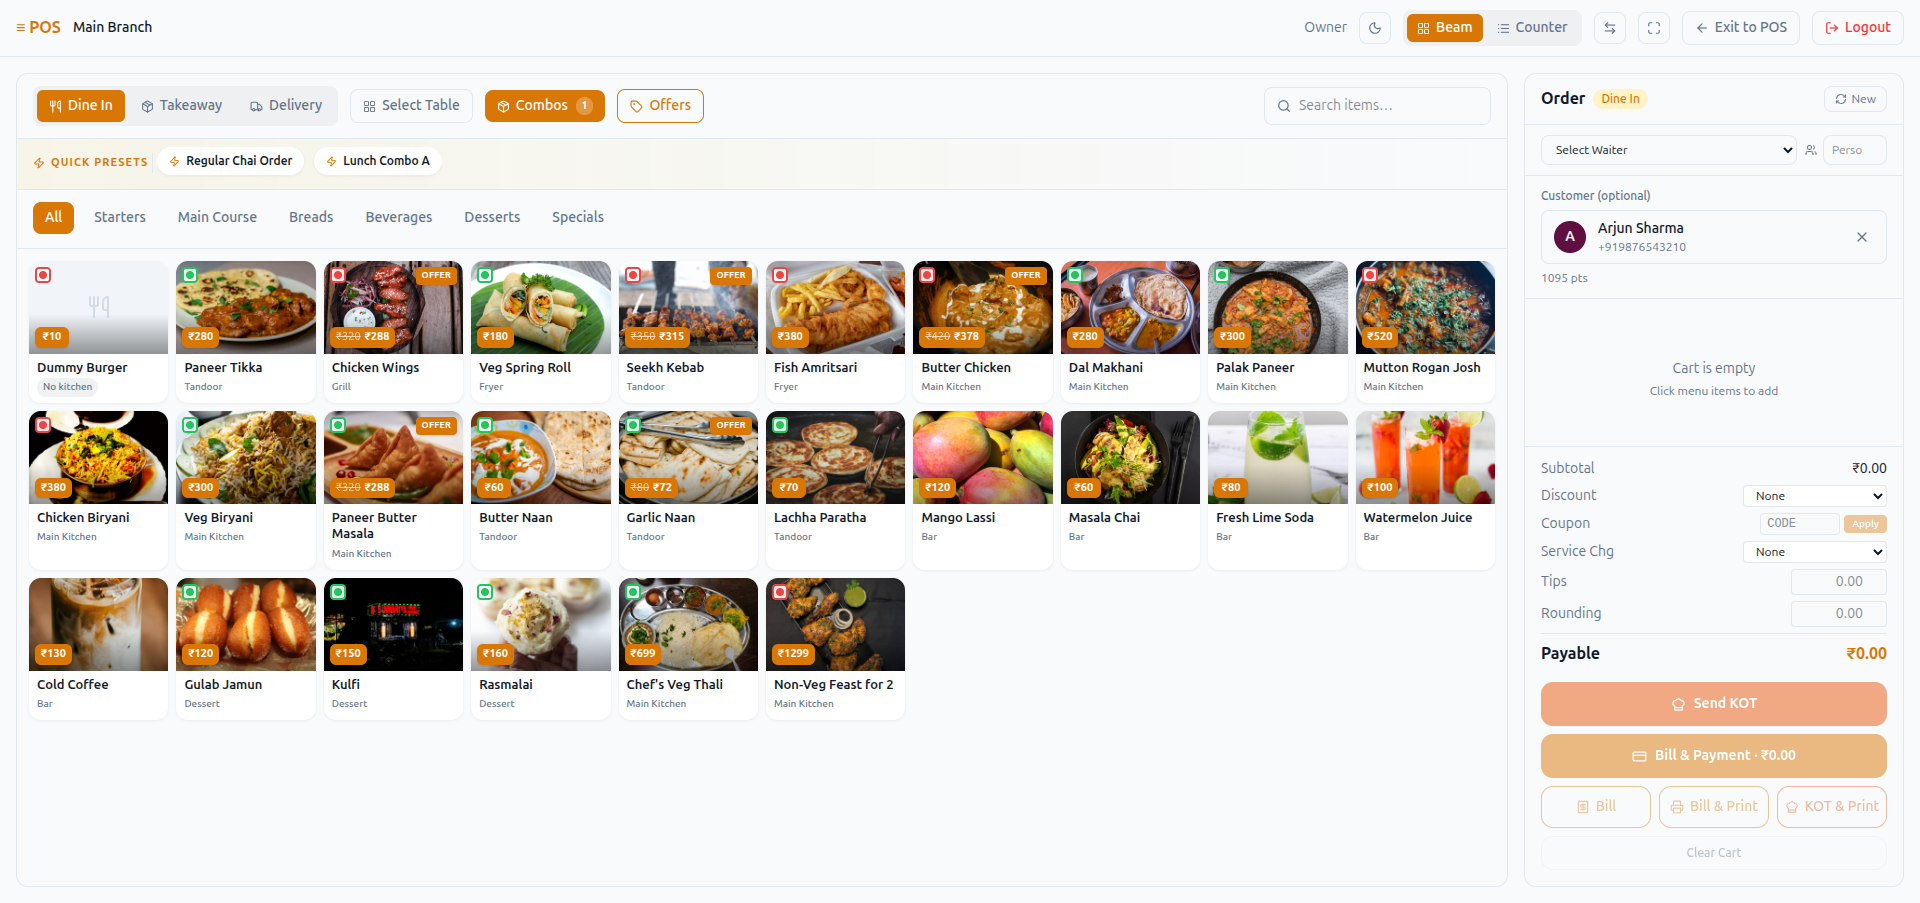
Use the Select Waiter dropdown, and set the number of people.
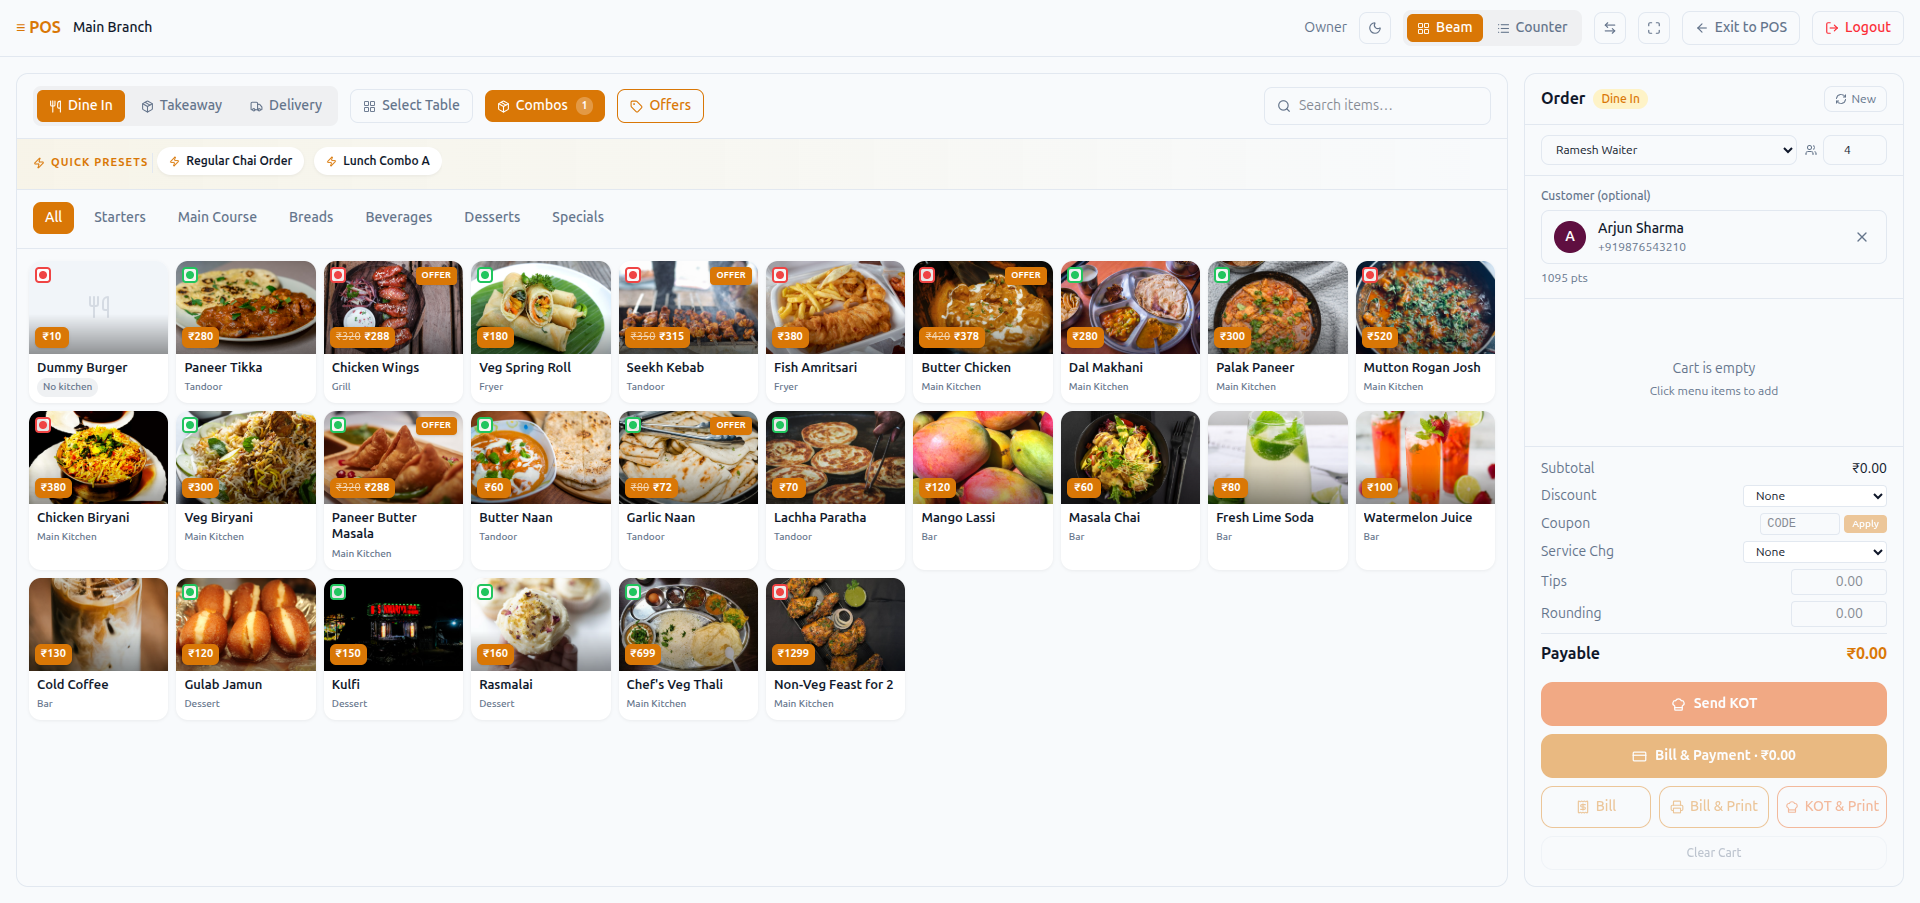
Click items to add them. You can:
- Filter by category — All, Starters, Main Course, Breads, Beverages, Desserts, Specials
- Use Search items… to find something by name
- Click Combos or Offers to add a deal
Each card shows the price, whether the dish is vegetarian, and which kitchen station it goes to (Tandoor, Grill, Fryer, Bar, Dessert, Main Kitchen). A sound confirms each item added. Once an item is in the cart, the − and + buttons next to it change how many you're ordering.
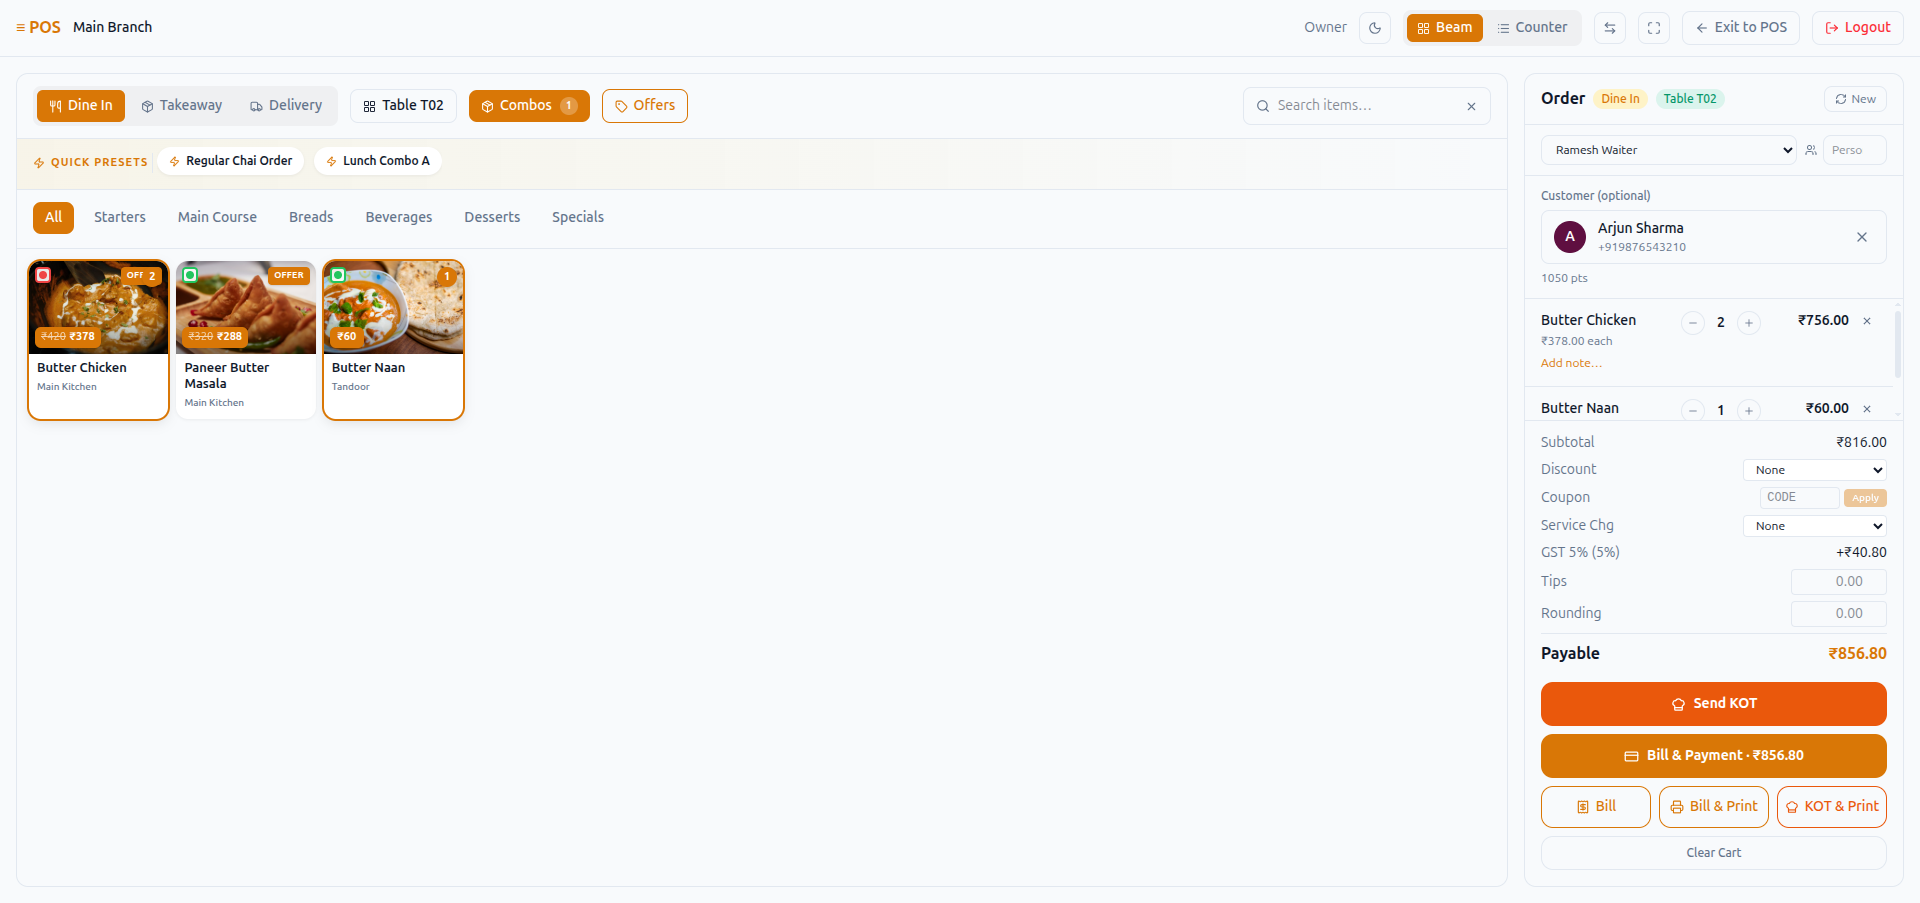
Under the cart:
- Discount — choose a rule from the dropdown
- Coupon — type the code and click Apply
- Service Chg — choose a service charge rule
- Tips and Rounding can be entered directly
The Payable figure updates as you go. That is what the customer pays.
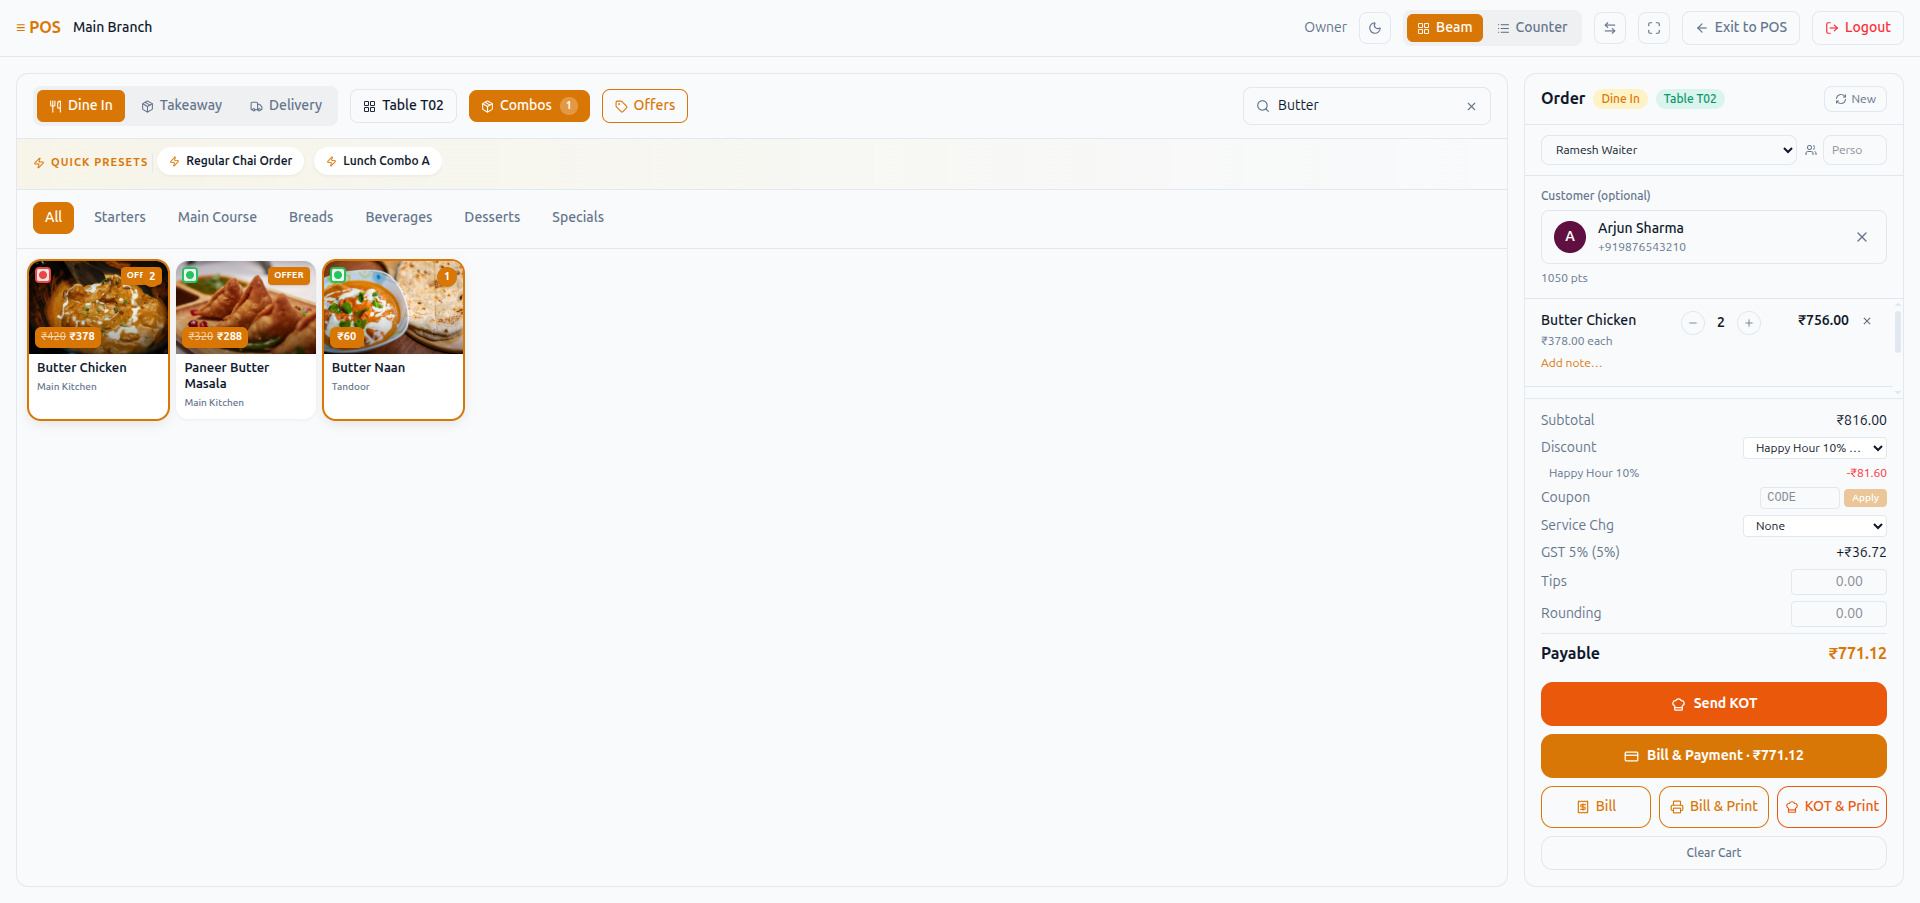
Click Send KOT. The items appear on the kitchen display at their stations. Use KOT & Print instead if the kitchen works from paper.
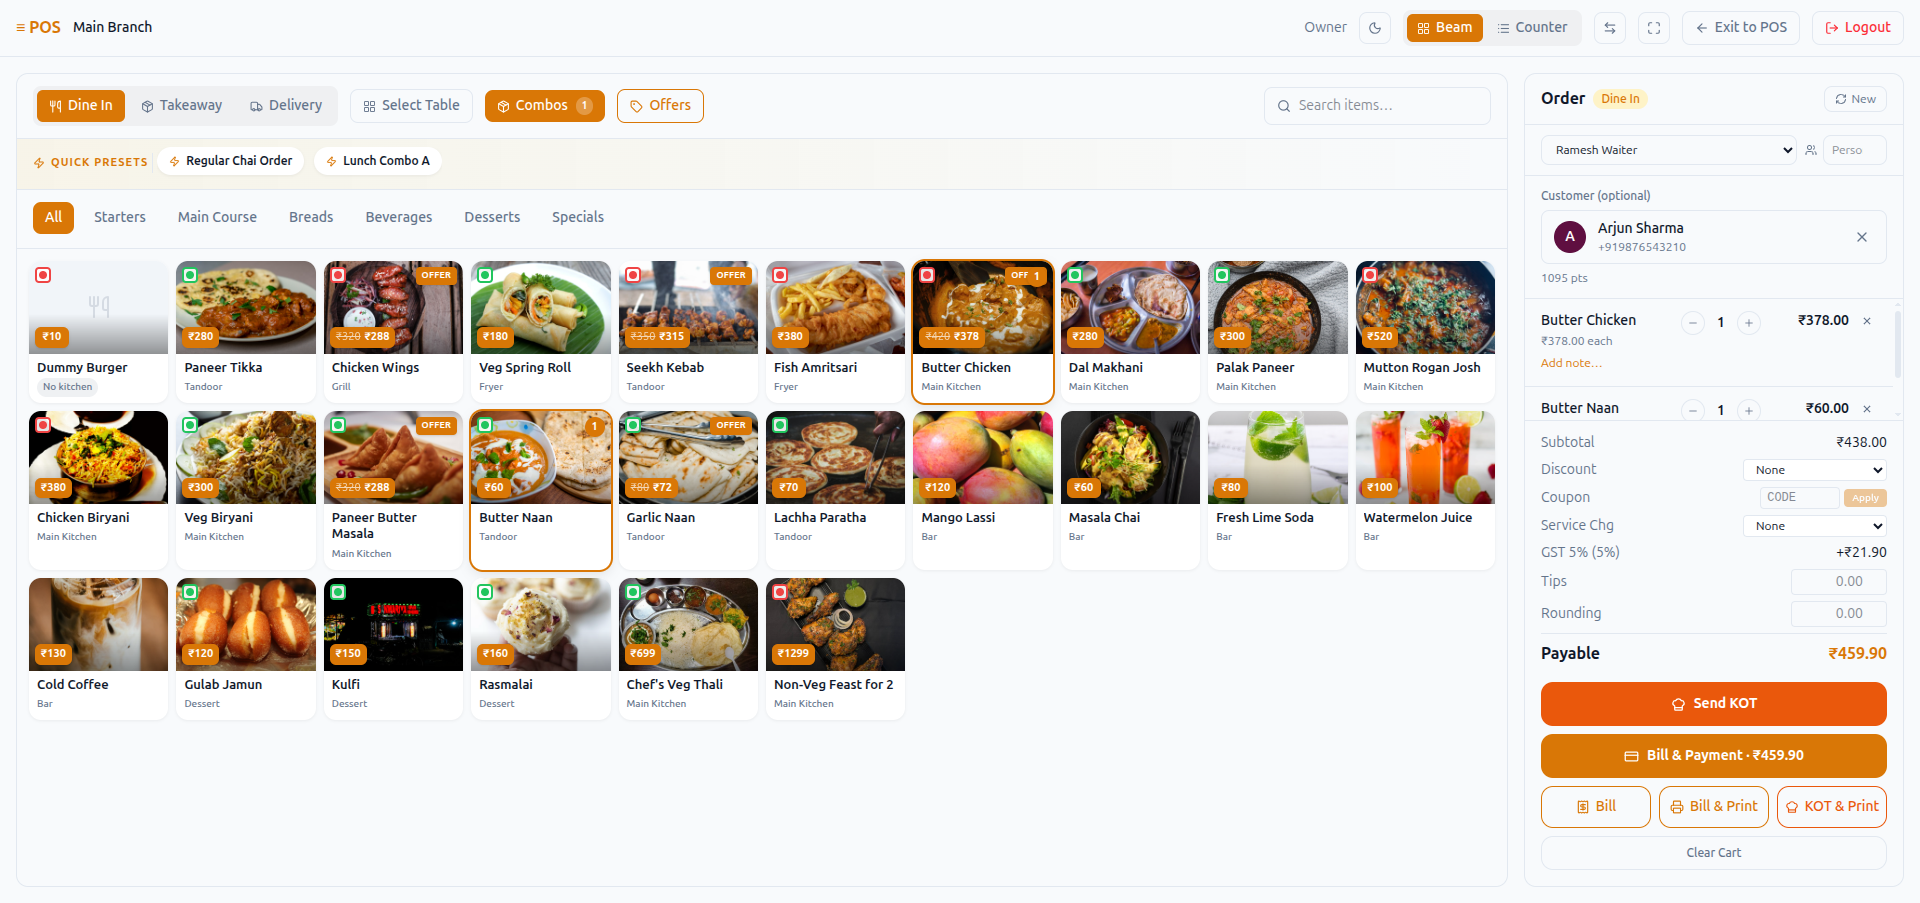
Click Bill & Payment. Use Bill or Bill & Print if the customer wants the bill before paying.
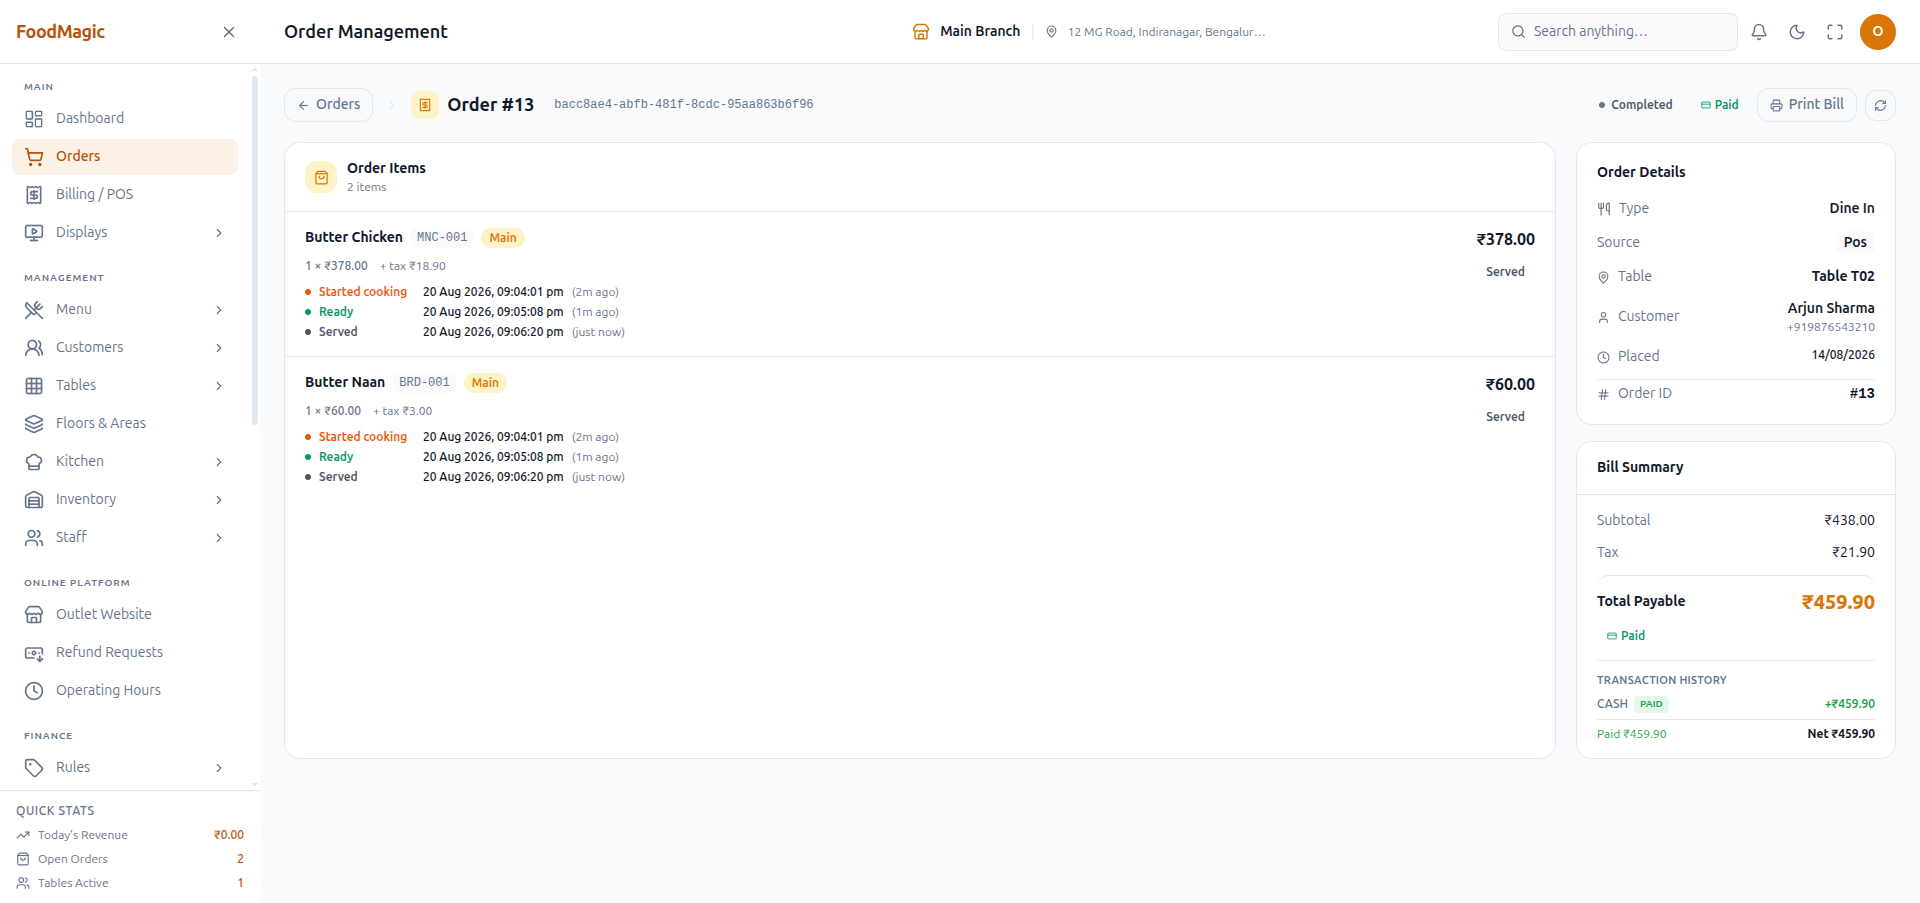
The till screen has two layouts. Switch between them using Beam and Counter at the top right. Beam shows a grid of picture cards. Counter shows a compact list built for fast service. Your choice is remembered on that device.
Exit to POS takes you back to the terminal screen. Logout signs you out completely. These are kept separate on purpose, so finishing a sale never accidentally signs the till out.
A dine-in order needs a waiter assigned before it can be sent, and a delivery order needs a rider. The system won't let either go through without one. It also checks that the person you picked is actually a waiter or rider at this outlet — not just any staff account.
Working offline
If the till loses its internet connection in the middle of a sale, it keeps working. It always tries to send the order normally first. Only if that truly fails to reach the server — not if the server comes back with a real error, like a missing field — does the till save the order on the device itself and carry on as if it had gone through.
The order appears on screen right away, just like it would if you were online. You can keep taking the next order without missing a beat.
A small banner appears at the bottom of the screen. It turns red and says "You're offline — orders will queue and sync when reconnected" while the connection is down. The moment the connection returns, it turns green and says "Syncing N offline orders..." while it catches up.
The device checks the connection every 20 seconds on its own, and again the instant it senses it's back online. There's no button to press — nothing for the cashier to remember.
What works while offline: creating an order, marking it as paid in cash, and moving an order through its stages. What doesn't work: any payment that isn't cash. Card, UPI, wallet, and similar all need a live connection, so the till will refuse them with a clear message instead of accepting them and failing later.
Every order and payment saved while offline gets its own unique ID, created on the device before it's sent. If it gets sent twice — say, because of a shaky connection retrying it — the server recognizes it's already been recorded and doesn't create a duplicate. This is what makes it safe for the till to keep retrying on its own. A cashier never has to worry about a sale being booked twice.
The server doesn't just trust a device blindly. Before accepting a queued order, it checks that the order really belongs to the outlet that device is signed into — a device can't queue an order and later claim it was for a different branch. It also checks the timing. If an offline status change, like marking an order Ready, is out of date by the time it syncs — because someone else already moved that order along in the meantime — the server refuses the outdated update rather than overwriting what really happened. It flags this as something to sort out, instead of quietly losing the newer information.
Managing orders
Go to Orders in the sidebar, or yourdomain.com/orders.
The top of the page shows Total Orders, Order Placed, Completed and Payment Due for the period you are looking at.
Finding an order
- Status tabs — All, Placed, Confirmed, Preparing, Ready, Picked Up, Out for Delivery, Reached, Delivered, Served, Completed, Cancelled
- Search by order number or customer name
- All Types to filter dine-in, takeaway or delivery
- Date range, with Today, Yesterday and This Week shortcuts
- Payment Due only to show just the unpaid
Switch between Orders and Tables at the top right to see the same trading as a list of orders or as a floor plan.
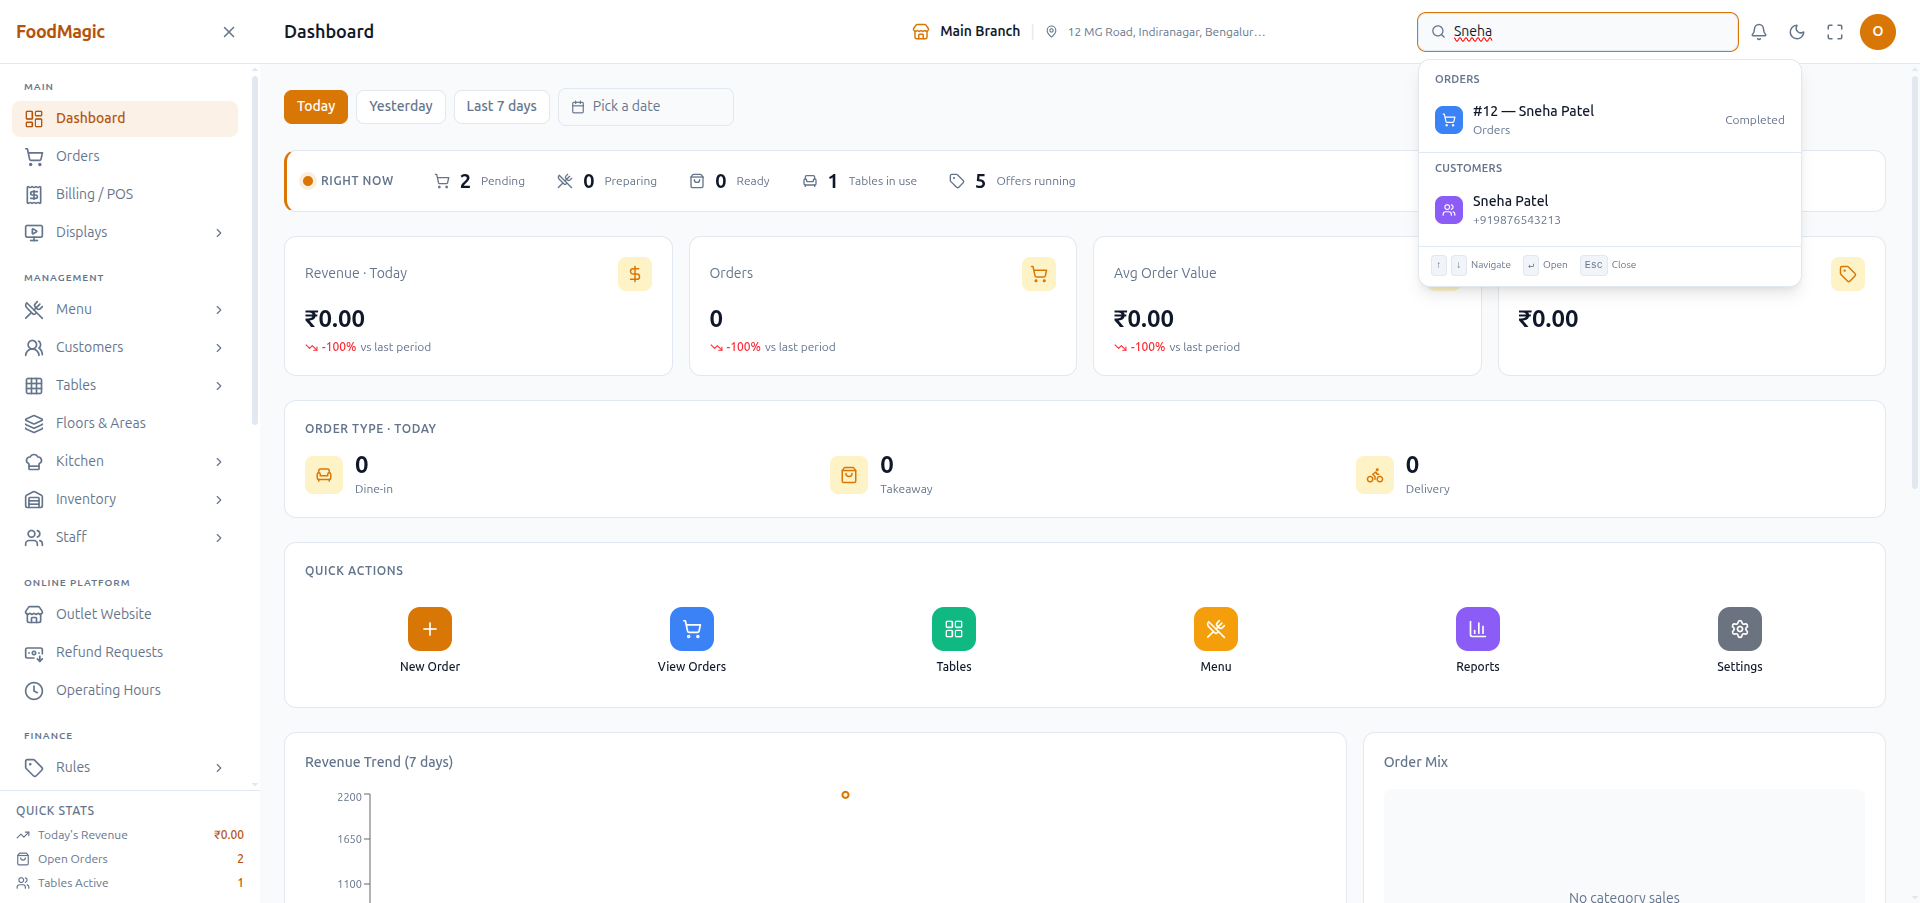
There's also a faster way to jump straight to an order from anywhere in the app: the Search anything… box in the top header — not the search box on this page. Click it, or press Ctrl K (⌘K on a Mac) from anywhere, and a centered search panel opens with the cursor already in the box. It searches five things at once: Orders, Customers, Menu Items, Tables and Staff. Each type shows with its own colored icon, so a mixed list of results is still easy to read. Type at least two characters — an order number, a customer's name, a dish name, a table name, or a staff member's name — and results appear about a third of a second after you stop typing (up to 5 per category), grouped by type. Click a result, or use the arrow keys and Enter, to open it. Press Esc to close the panel.
Orders, Customers, Menu Items and Tables only appear if you hold that module's own list permission — a Waiter, for example, never sees an Orders group here, because that needs the same permission as the main Orders screen itself. Staff is the one exception: it's deliberately open to every logged-in user regardless of permissions, so anyone can look up a colleague — it doesn't require the admin-only permission the Users screen itself needs.
A Table or Staff result doesn't jump to that specific table or person — neither screen has a URL-addressable search yet, so clicking one just opens the Tables or Staff list unfiltered. Orders, Customers and Menu Items do jump straight to (or pre-filter to) the specific result.
On a phone or narrow tablet, this search box isn't reachable at all. It's hidden from the header below a width breakpoint to save space, and nothing in the mobile layout currently opens the same panel another way — Ctrl K/⌘K only works if a physical keyboard is attached. On a touch-only device, use each screen's own on-page search instead (Orders, Customers, Menu Items all have one).
What each order card tells you
The order number and status, the type, the customer, whether it is PAID or UNPAID, a STOREFRONT badge if it came from your website, the date, the number of items and the total. A BILL button opens the bill.
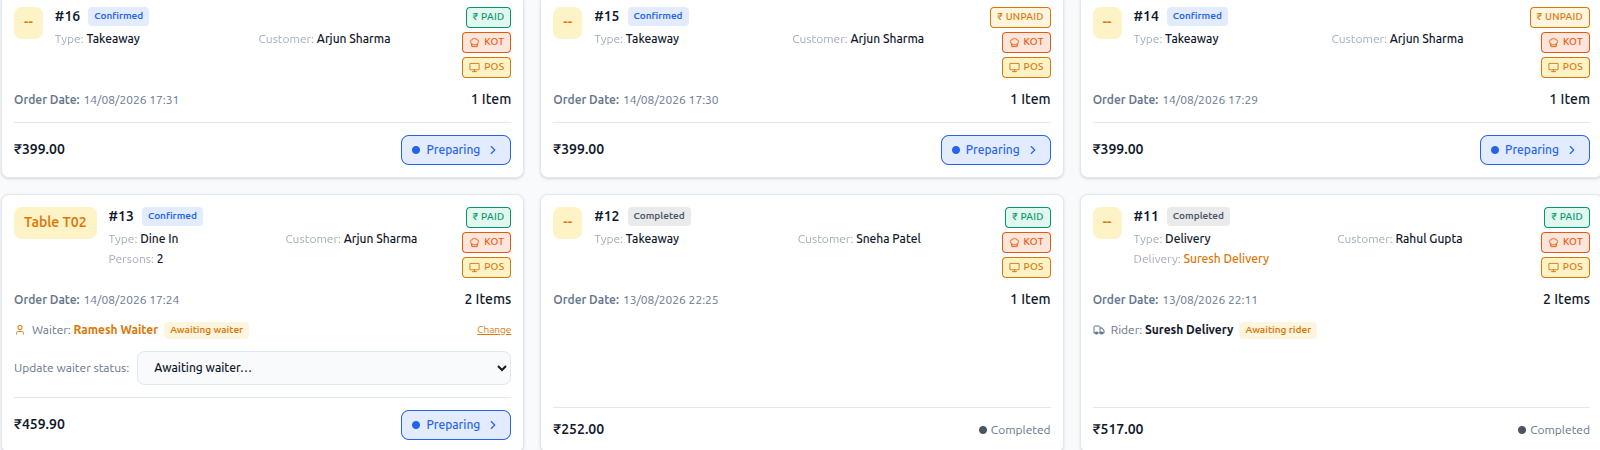
This matches the "online vs offline" split you'll see in Reports. Every order remembers where it came from. An order with a STOREFRONT badge is what Reports calls online — it was placed by a customer on your own website. An order with no badge — taken at the till or over the phone — is what Reports calls offline. See Reports → Sales Report for the table this feeds into.
Moving an order along
The card shows the next action:
- Confirm — accept a newly placed order
- Assign waiter — dine-in orders with nobody assigned
- Assign delivery boy — delivery orders with no rider
Click Confirm on a Placed order.
Click Assign waiter or Assign delivery boy and choose from the list. They then accept or decline it on their own screen.
Items move to Preparing and then Ready as the kitchen bumps them.
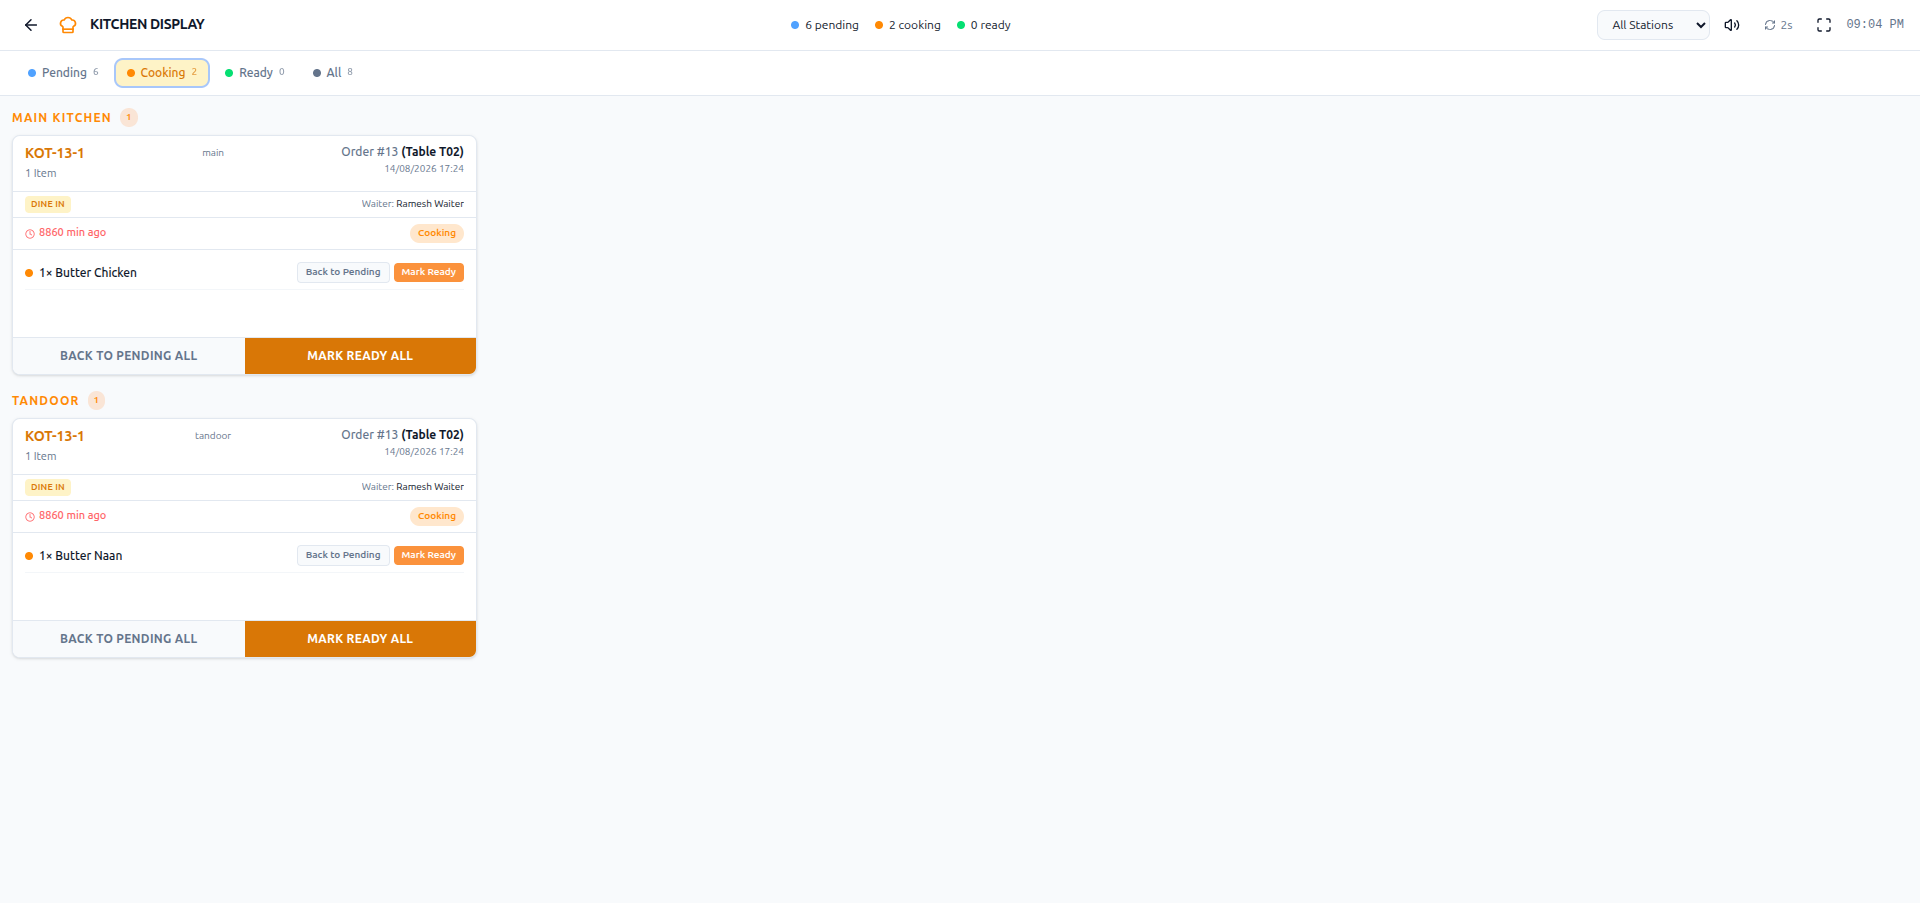
Dine-in is Served, takeaway is Picked Up, delivery runs through Out for Delivery, Reached and Delivered.
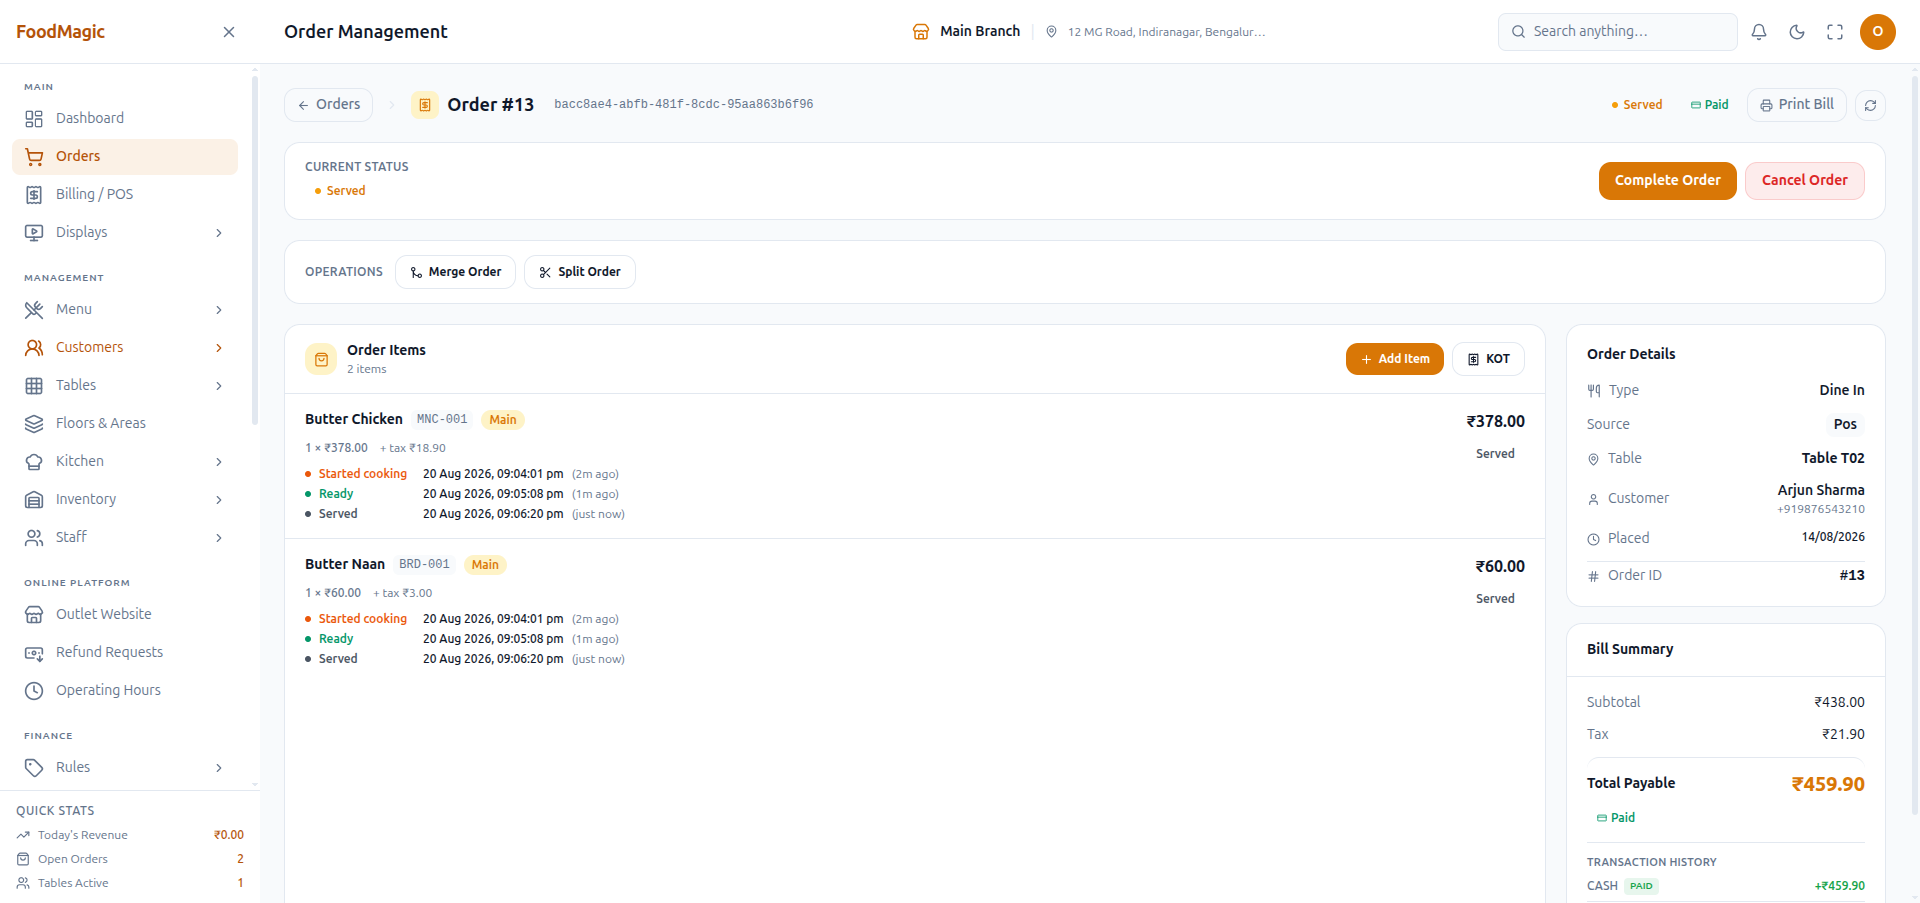
The order closes.
Staff don't set an order's status directly. It's worked out automatically from the status of the individual items on it. Serve the last ready item, and the order becomes Served on its own — there's no separate "mark order served" step to remember. This also stops a whole table from being marked served while one dish is still cooking. The order can't reach that status until every item on it has.
Completing an order also does a few things automatically. It frees up the table for the next guests (if that setting is switched on), credits any loyalty points the customer earned, and — if the order used store credit and later gets cancelled — puts that credit back automatically.
What actually triggers this, and where to turn it on or off. The table
frees up when the order's status reaches Completed — not simply when the
bill is paid, since payment and status are tracked separately. The on/off
switch is in Brand Settings → Tables (/brand-settings, Super
Admin only). With it off, a completed order leaves the table marked
occupied until someone frees it by hand from the
Tables screen.
Cancelling a dine-in order always frees its table, no matter this setting — the switch only affects what happens when an order is completed.
A delivery order can't be completed until it's paid, and can't be picked up until a rider is assigned — you'll see the message "Assign a delivery boy first". Dine-in and takeaway orders can be completed even if payment is still outstanding.
You cannot mark a whole order Served while any item that was sent to the kitchen is still being cooked. Serve items as they become ready, and the order updates itself.
If a customer wants to cancel or be refunded
There are two different situations here, and they work differently.
Cancelling an order
Open the order and cancel it, picking a reason from the list. The reasons are set centrally, so the same wording is used everywhere and can be reported on later. The order itself keeps a record of who cancelled it and when, so it's always clear afterward.
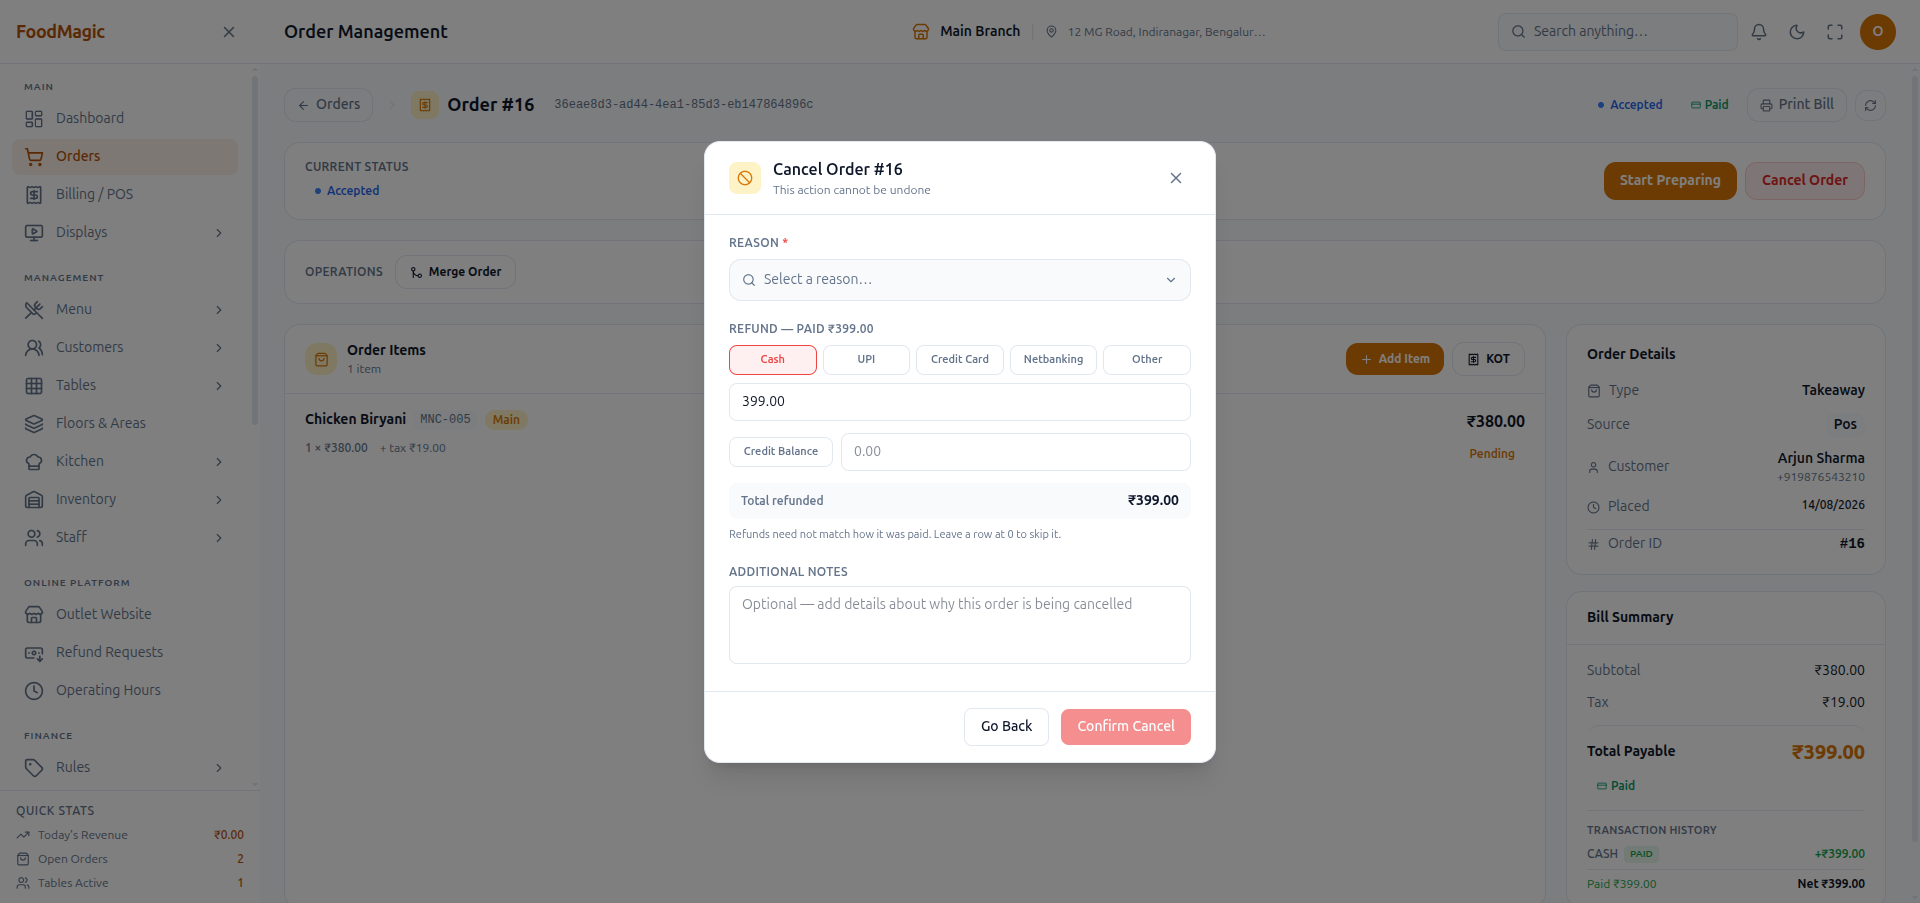
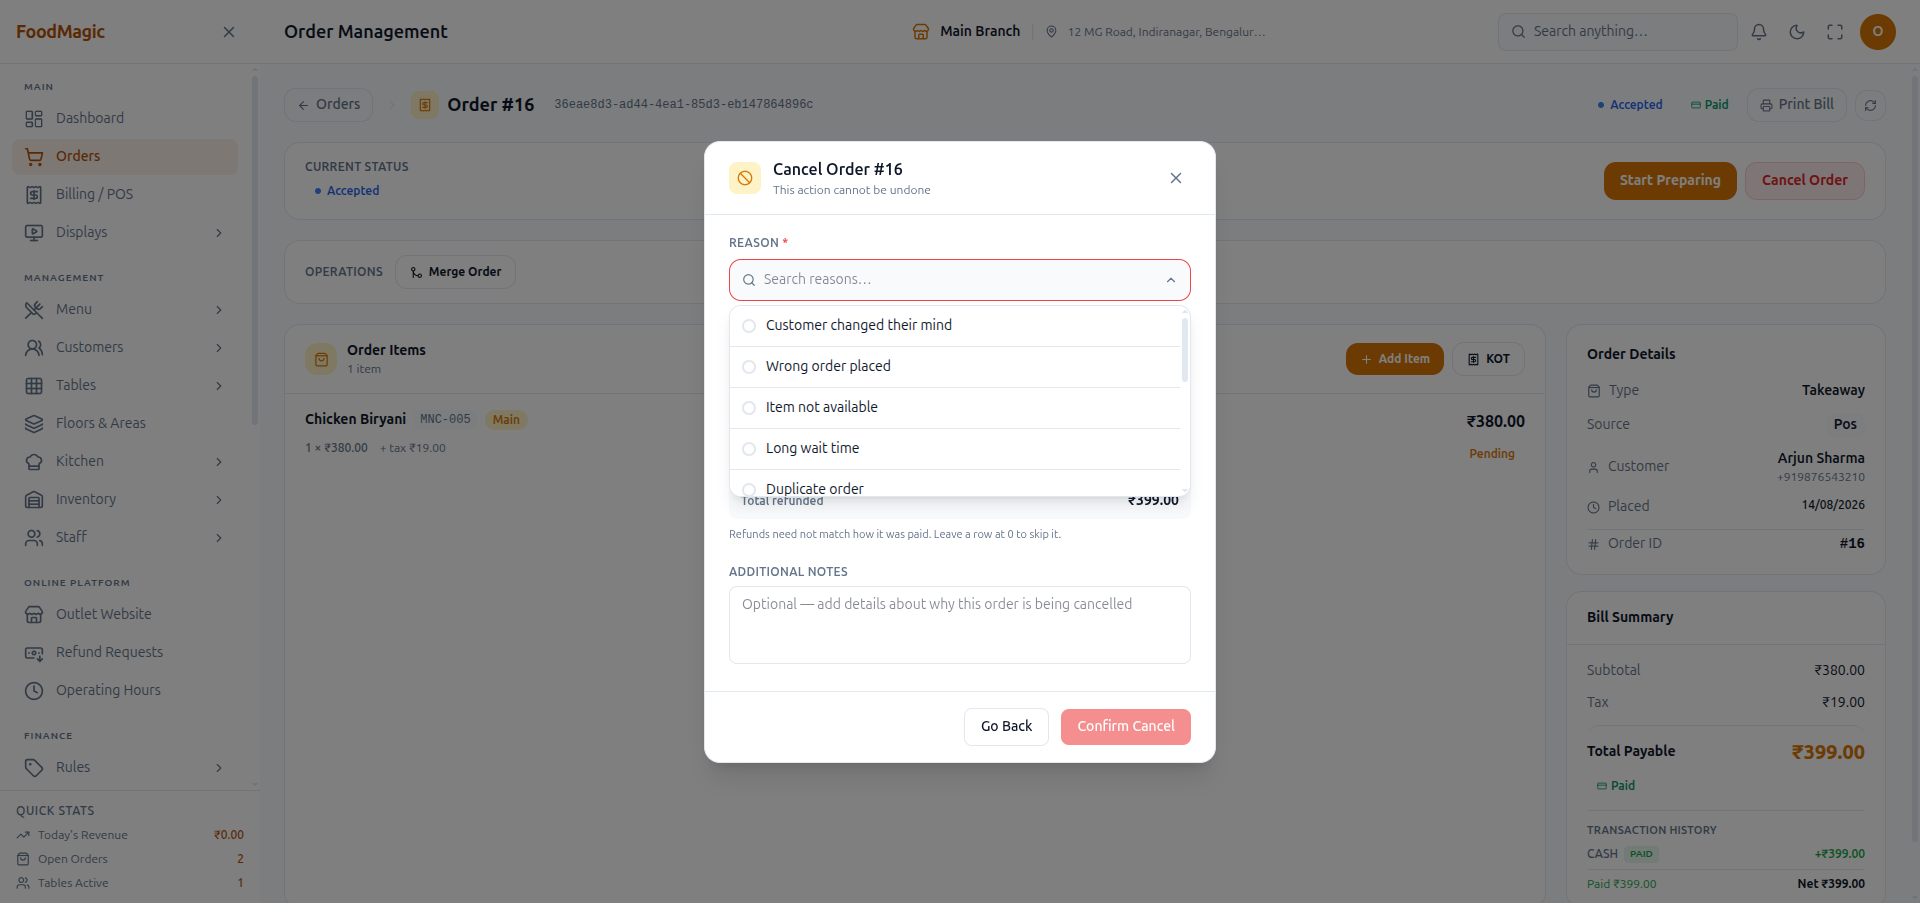
The list of reasons is edited on its own screen — Cancel Reasons, under System. Each reason has a name, can be turned on or off, and can be dragged into a new order. Put the reasons staff pick most often near the top — staff are choosing under pressure, and the order you set affects how useful your cancellation data ends up being. Turn a reason off instead of deleting it, so past orders keep the wording they were cancelled with. The list comes with twelve reasons already set up: Customer changed their mind, Wrong order placed, Item not available, Long wait time, Duplicate order, Customer left, Payment issue, Other, Customer requested to cancel, Customer no longer wants the order, System error/Technical issue, Restaurant closing early.
Like every other brand-only screen, if someone at outlet level tries to open this page directly by typing its address, they won't see an error — they'll just be sent back to the dashboard instead. See Menu management for the same behavior on Item Types.
Refund requests from customers
Go to Refund Requests (yourdomain.com/storefront/refunds).
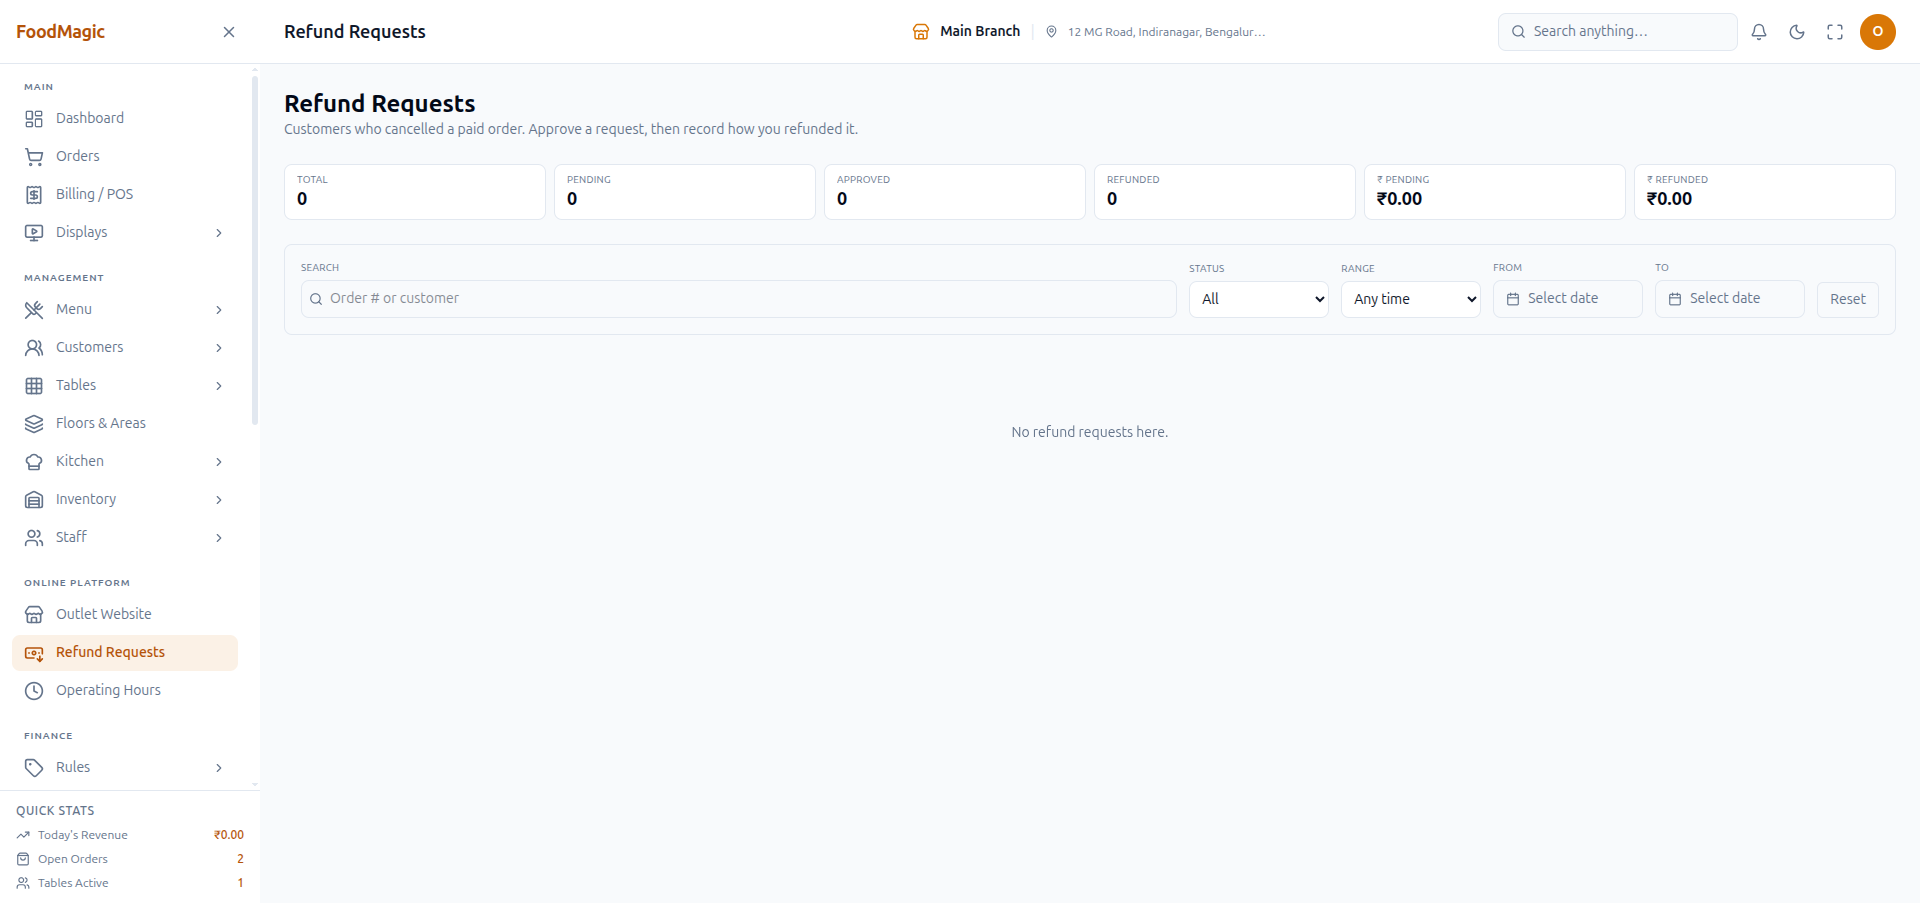
Approving a refund and actually paying it are two separate steps — you can agree to a refund before the money moves. You can also decline a request.
A refund can go back as money, or as credit the customer can spend with you next time. The amount paid out can never be more than the amount approved. This wasn't always true — a past incident let an approved ₹30 refund pay out ₹80 — but that gap is now closed with a hard limit.
Waiters and delivery riders
Go to My Orders (yourdomain.com/my-orders).
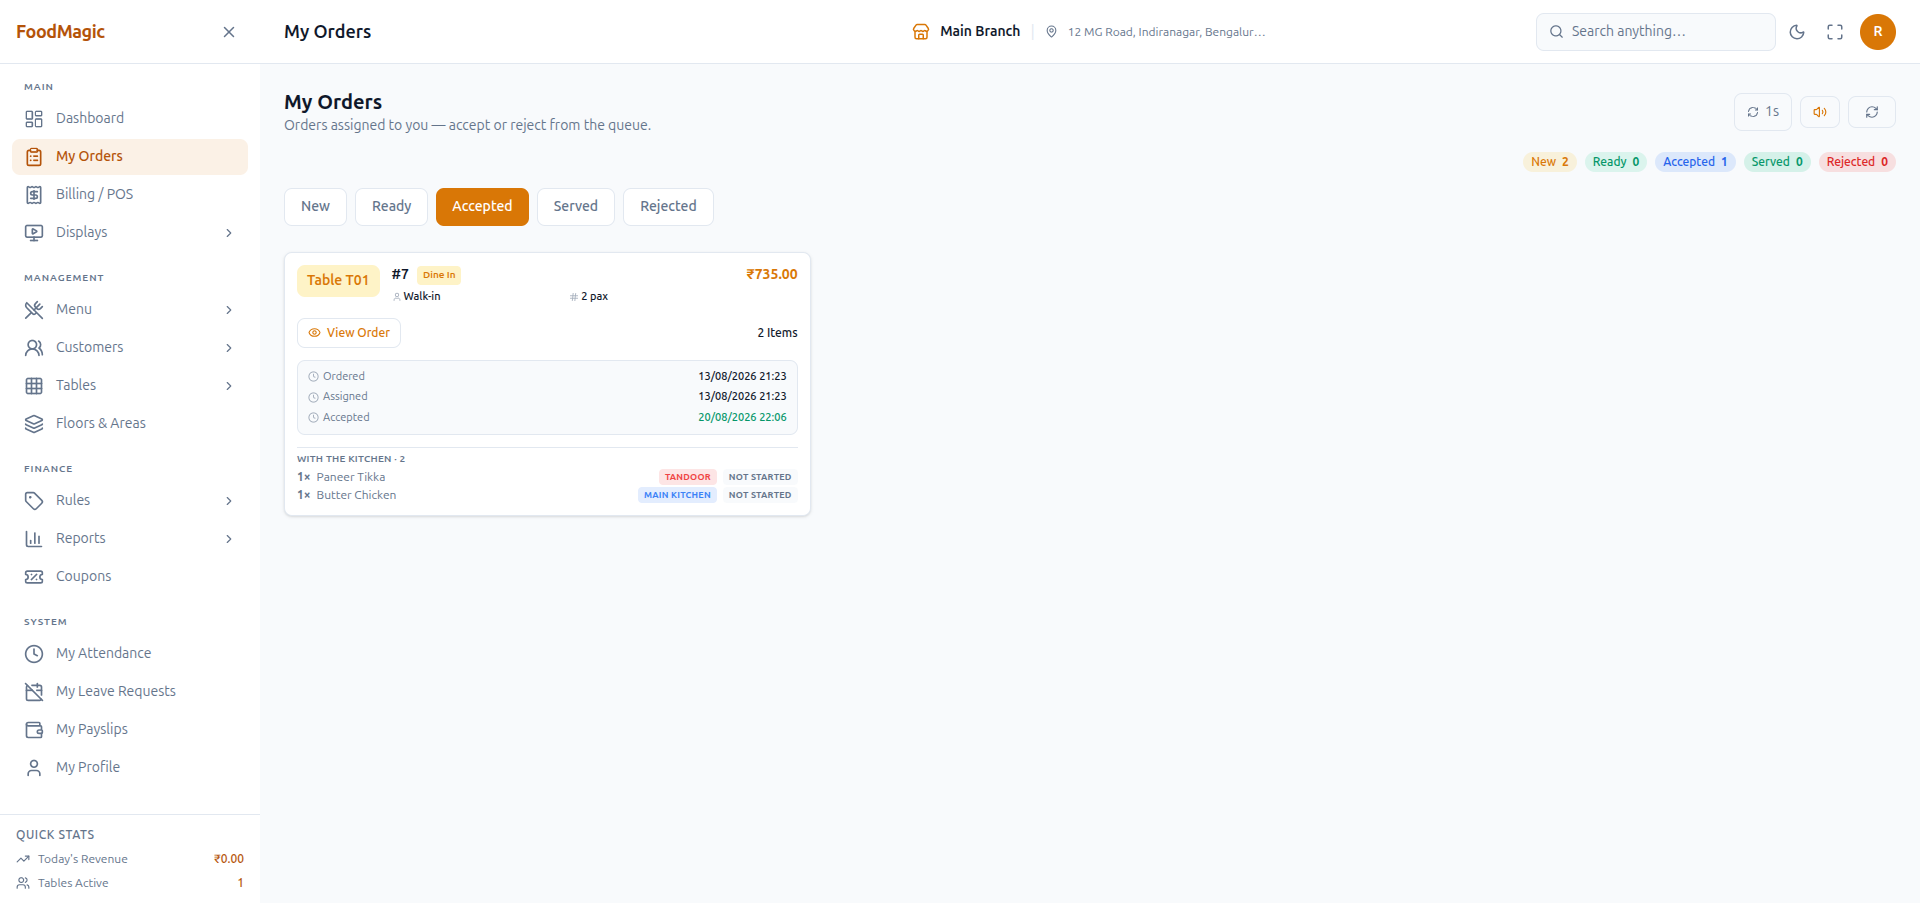
The screen has five tabs, each with its own live count: New, Ready, Accepted, Served, Rejected. A busy waiter can jump straight to the tab that matters, instead of scanning one long list.
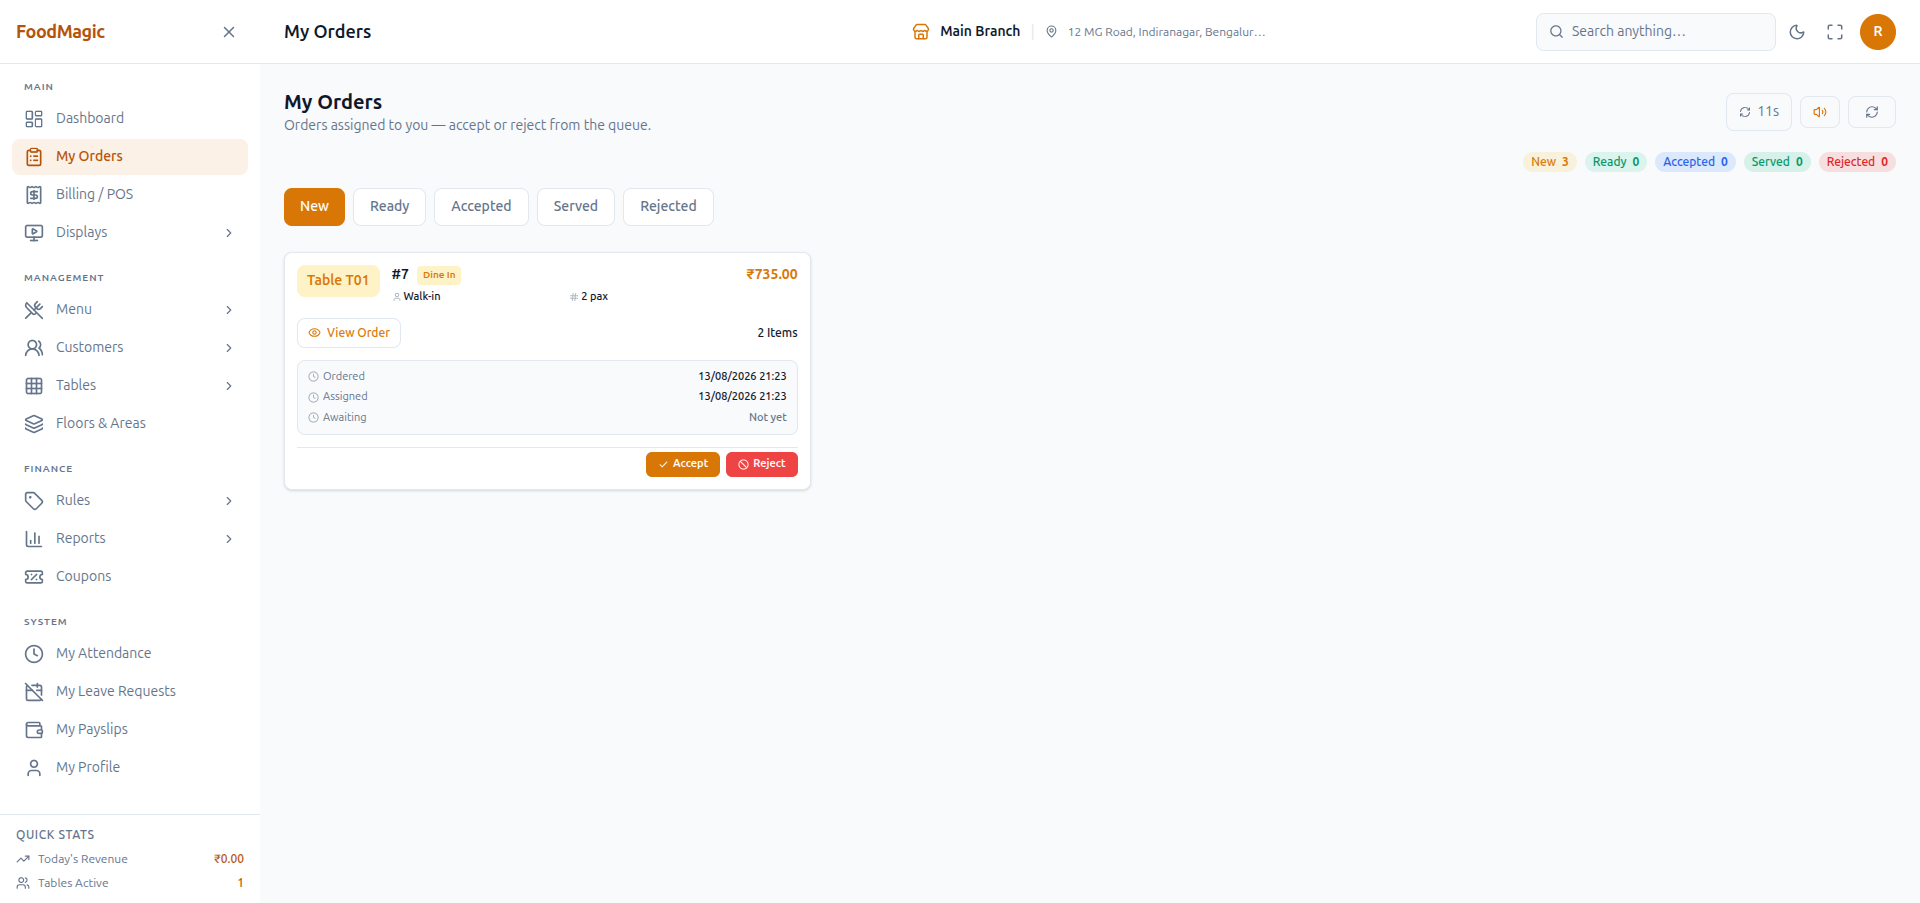
- Orders assigned to you appear here — accept or decline them
- Declining asks for a reason from a list — a different list from order cancellation, since declining sends the order back to be reassigned to another waiter rather than ending it. The list currently has six reasons: Busy with another table, Section not assigned to me, End of my shift, On a break, Reassigned by manager, Other. It's edited on its own screen, Waiter Reject Reasons, the same way Cancel Reasons is above.
- You are alerted when an order you accepted becomes ready
- Serve items one at a time as they come out
- Take payment, and free the table when the guests leave
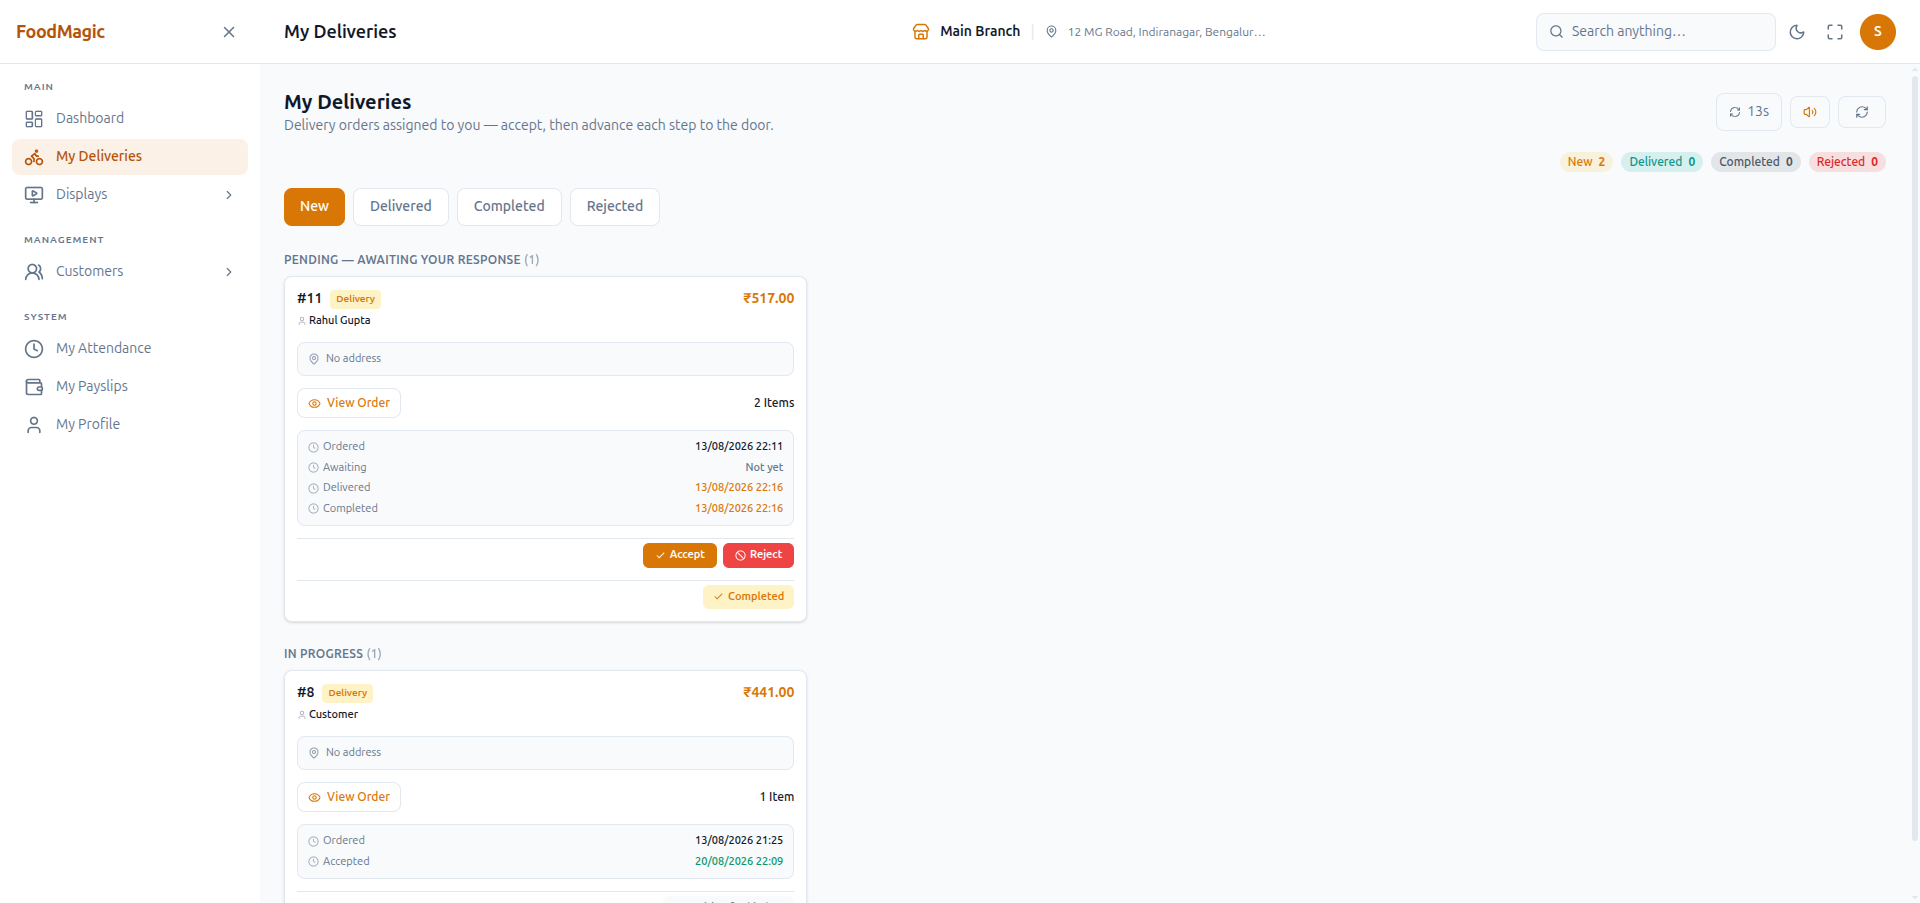
Go to My Deliveries (yourdomain.com/my-deliveries).
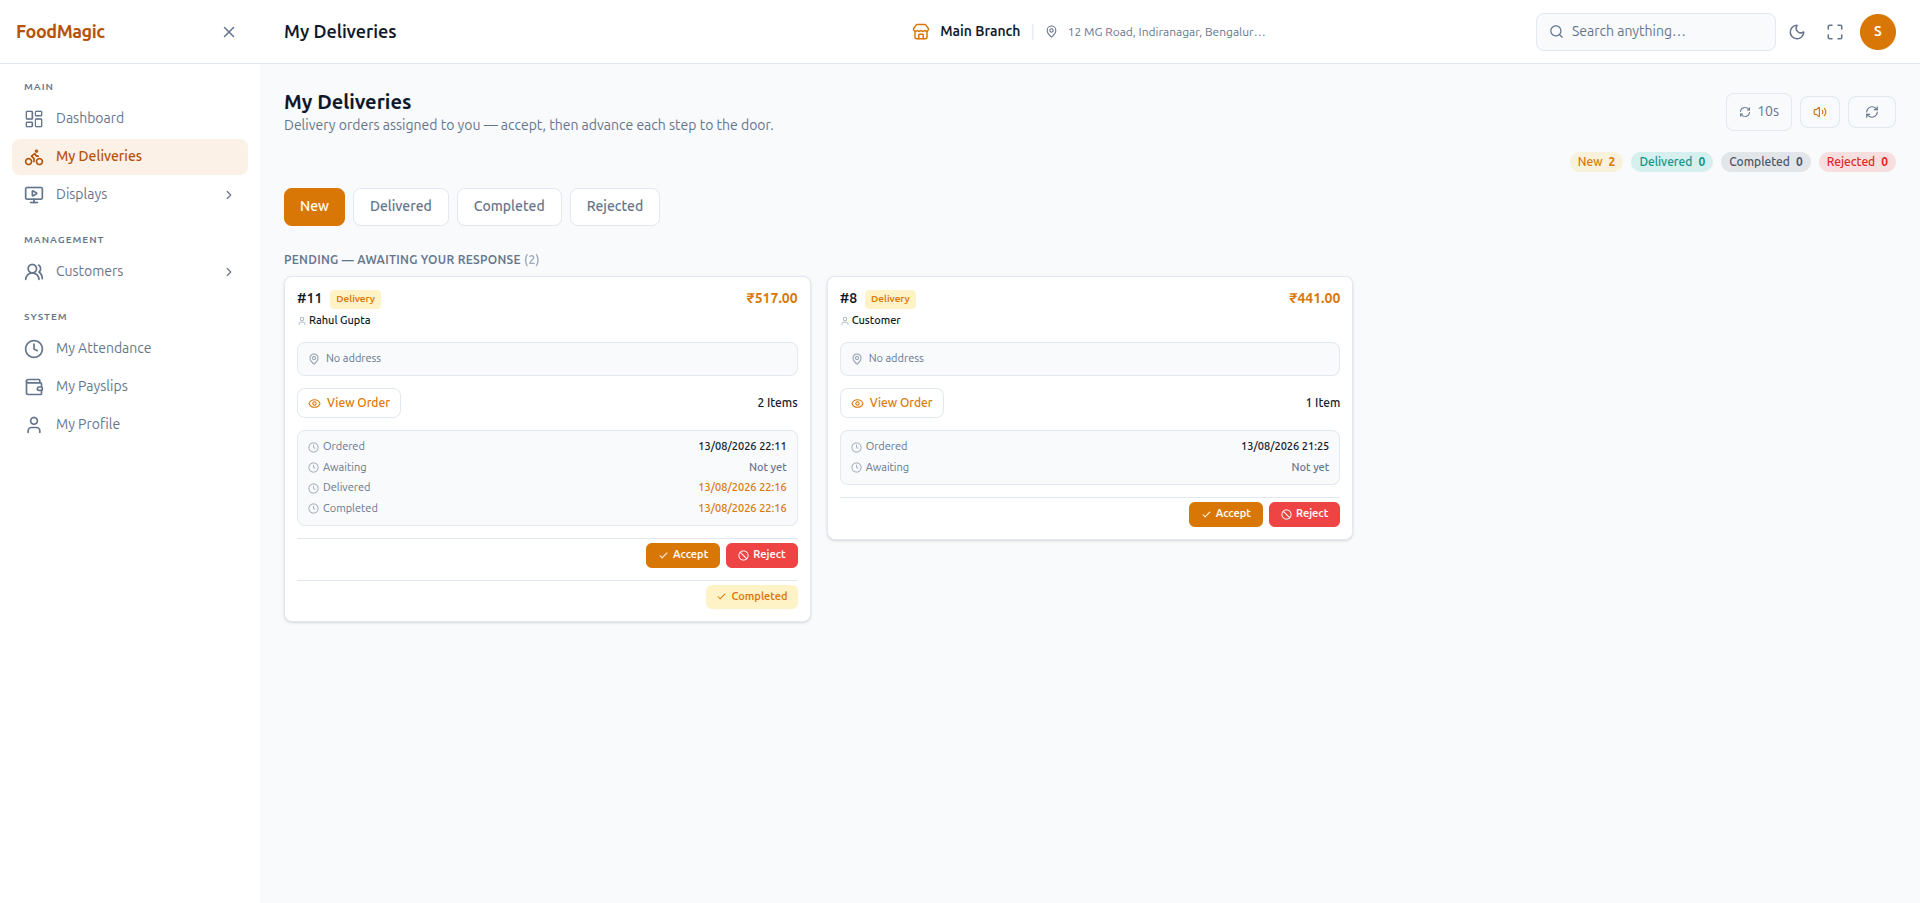
- Deliveries assigned to you appear here — accept or decline
- Declining asks for a reason
- Move the order through Picked Up, Out for Delivery, Reached, Delivered
- There is a mute control if you do not want the alert sound
The kitchen
| Screen | URL |
|---|---|
| Kitchen display | yourdomain.com/kitchen/display |
| Waiter board | yourdomain.com/kitchen/display-board |
| Customer board | yourdomain.com/kitchen/customer-board |
| Kitchen stations | yourdomain.com/kitchen/stations |
| Transfer between kitchens | yourdomain.com/kitchen/transfer |
Stations — where each dish goes
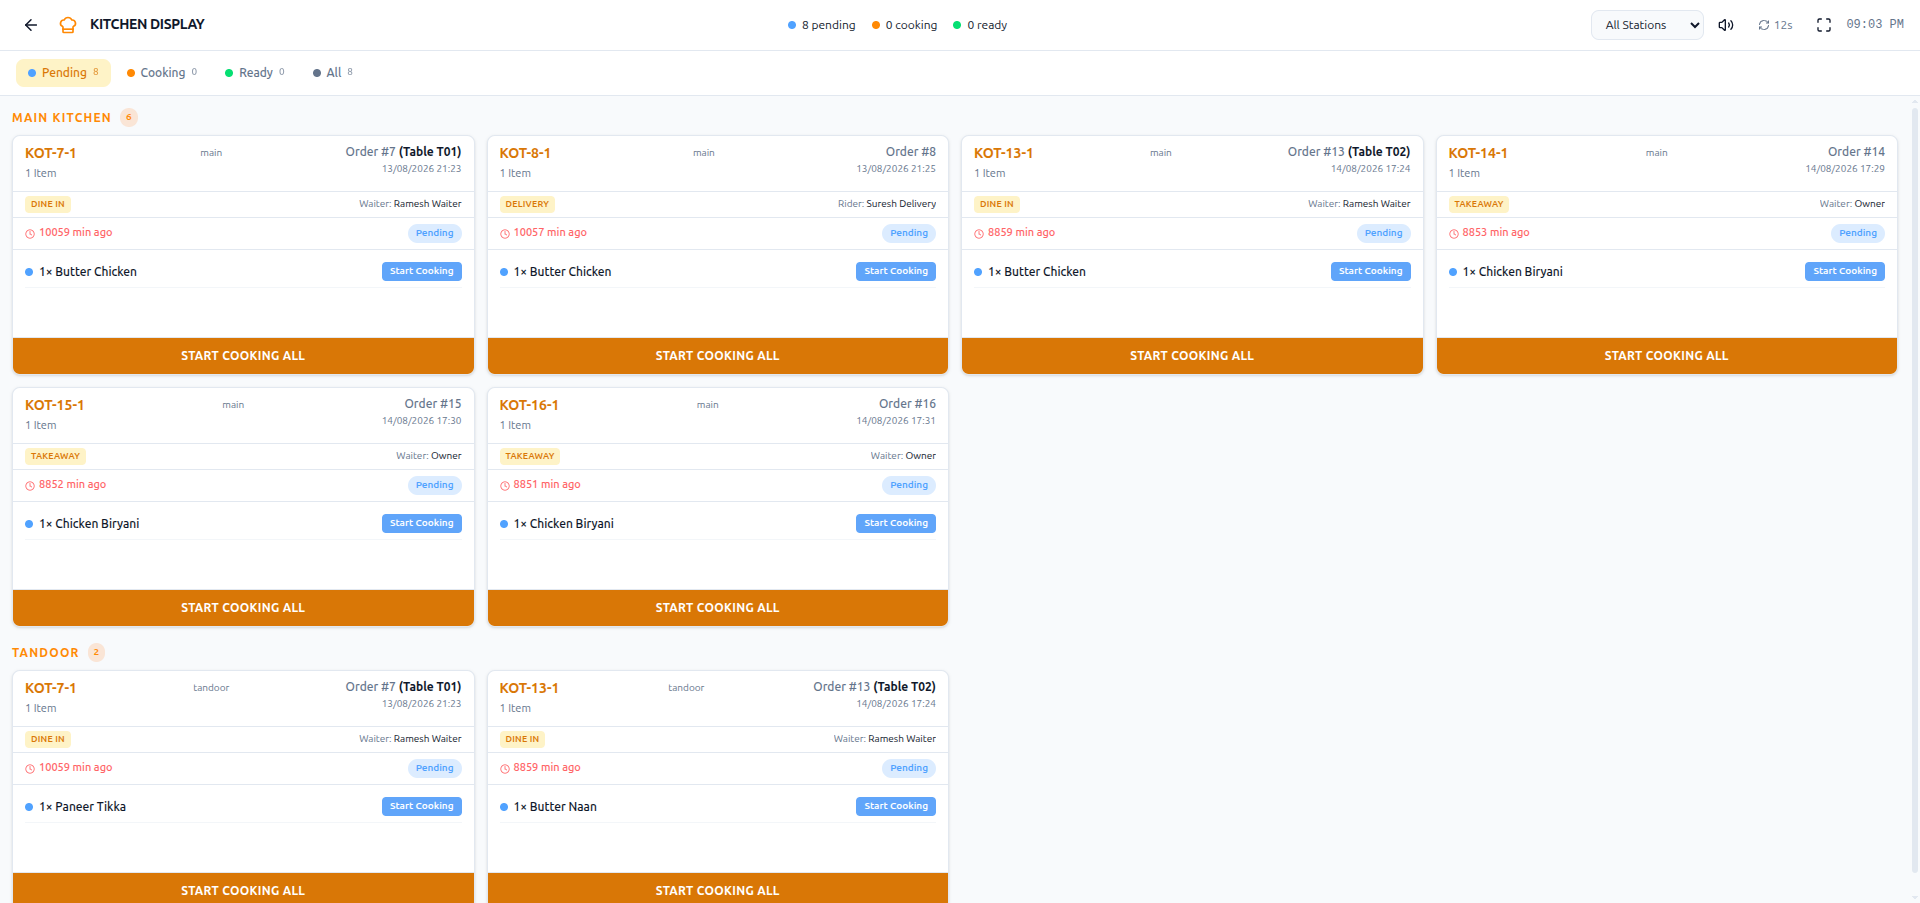
A station is a named section of the kitchen — Tandoor, Grill, Fryer, Bar, Dessert, and Main Kitchen, six in total. Each menu item is tagged with the station that cooks it. So once an order is placed, its items automatically split onto the right station's queue, instead of arriving as one mixed-up ticket. Set stations up once, before service starts, under Kitchen → Stations. After that, they only need to change when your kitchen's physical layout changes — a new station added, or one merged into another.
Each station also has its own colour, shown next to its name on the Stations screen. This isn't just decoration — it's how staff tell stations apart at a glance on a busy kitchen display. Pick colours that are easy to tell apart.
The queue — bump, recall, reassign
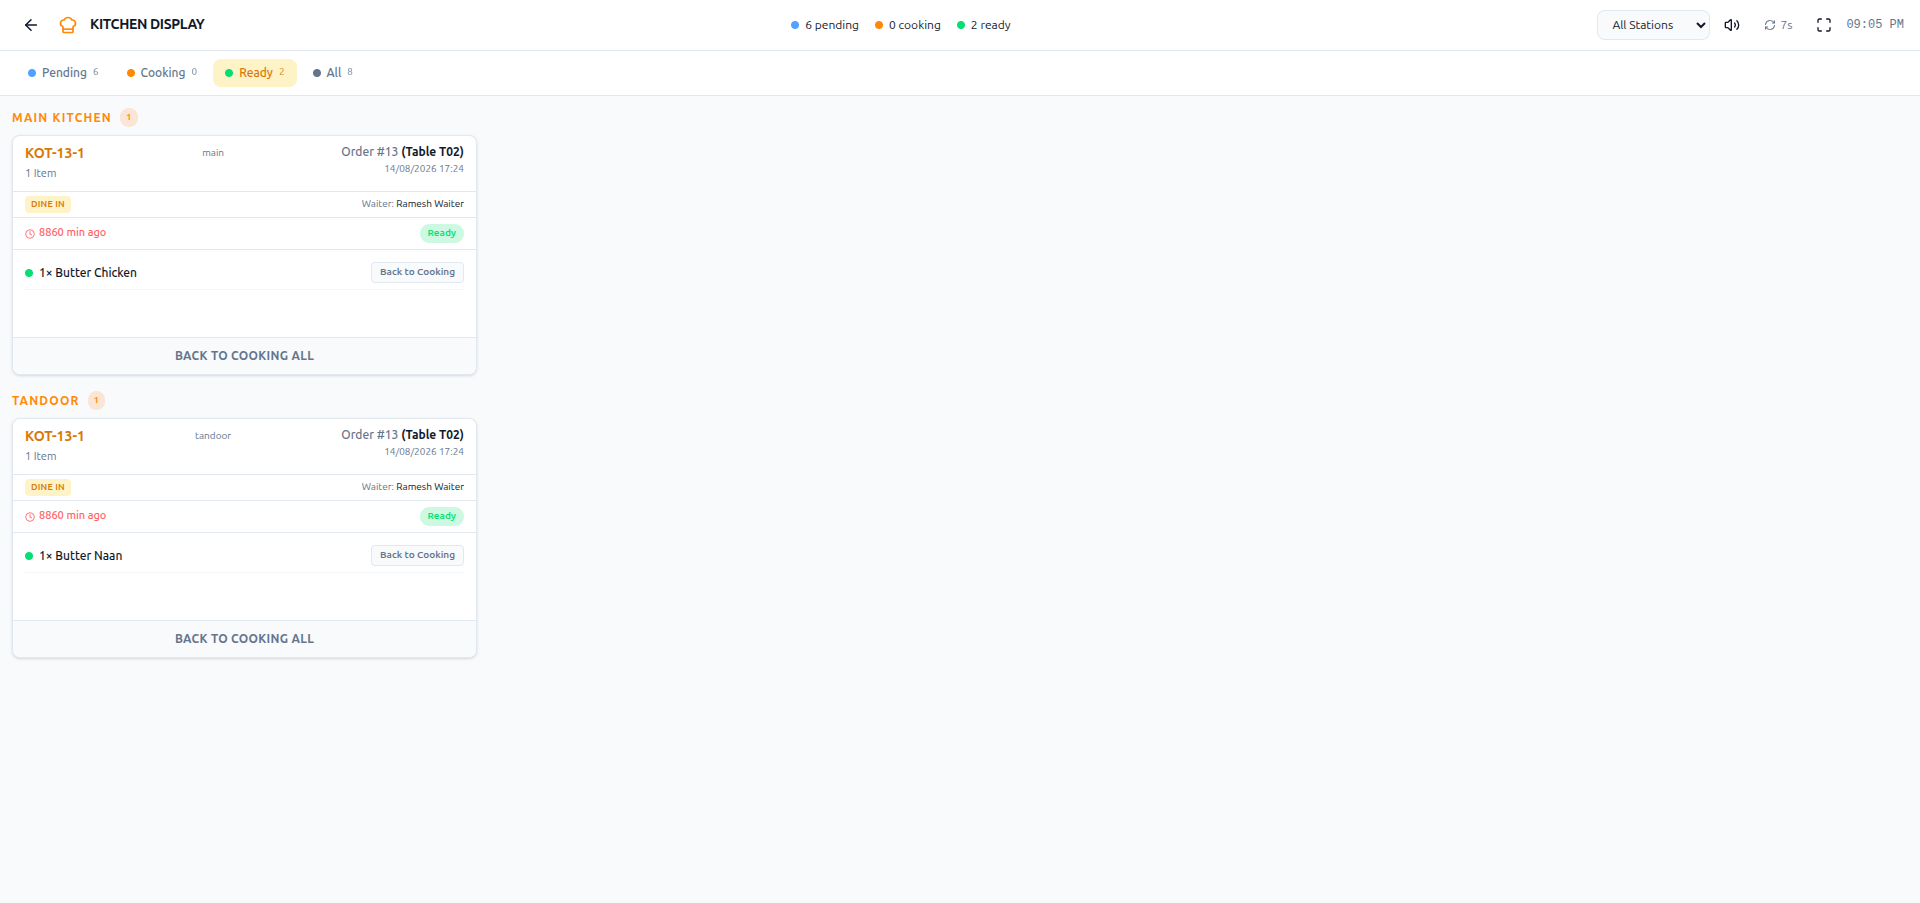
The main kitchen display, the waiter board, and the customer board all show the same live queue — just filtered or styled differently for each audience. As items cook, staff bump an item when it's done, which clears it from the screen. Recall undoes a bump made by mistake. An item can be reassigned to a different station — one at a time, or several at once — if it was sent to the wrong one.
Waiters can see station names on the menu and billing screens, but they don't have access to the full station list. Because of this, they sometimes see the plain internal name, like "tandoor," instead of the nicer label, like "Tandoor." This is just a display quirk, not a security issue — see Billing for another place this shows up.
Transfer between kitchens
/kitchen/transfer is its own screen for the same bulk-move action the
kitchen display offers inline. Pick a station, tick the tickets you want
to move, and move them all to a different station at once.
This screen only works if Allow Kitchen Transfer is switched on, under Brand Settings → Kitchen (see Settings reference). With it switched off, items stay at whichever station they were first sent to, and this screen has nothing to do.
How it is secured
On-screen permissions. Almost every action on an order has its own on/off switch on the Roles & Permissions screen — viewing the order list, creating an order, updating it, cancelling it, confirming it, assigning a waiter or rider, accepting or declining an assignment, serving items, and handling a refund request. You can build a role that allows exactly the actions it needs — for example, a role that can create orders but never cancel one.
Role access. Out of the box the system ships four starting roles:
-
Super Admin — the brand owner. Sees everything across every outlet, including day-to-day order actions.
-
Outlet Owner — gets nearly every ability at their own branch automatically. The one deliberate exception: they don't see My Orders, because an outlet owner is never meant to be assigned orders themselves.
-
Waiter — can create and update orders, sees only My Orders (their own assigned work, not the general list), can accept or decline what's assigned to them, and can serve. A waiter cannot see the general Orders list and cannot cancel an order — those stay with management.
A waiter can open the Orders list without getting an error message — but what they see is automatically narrowed down to just their own assigned orders. They can't see the rest of the outlet's orders this way, any more than they can through the normal screen.
-
Delivery Rider — sees only My Deliveries, can accept or decline, and can move a delivery through its stages, but cannot assign a rider (to themselves or anyone else) — that has to come from a manager.
Confirmed, low impact. The waiter's queue screen, My Orders, isn't
in a rider's sidebar menu — but it isn't actually blocked either. A rider
who types /my-orders into the address bar directly isn't sent back to
the dashboard the way they would be for /orders or /billing. The
screen loads fully, with all the waiter tabs, because riders and waiters
share the same underlying permission for viewing assigned orders. No real
data is exposed — the screen just shows zero orders, the same way it's
narrowed down for waiters. The only downside is a rider can land on a
screen built for serving tables, including a Served tab that means
nothing for delivery work.
Editing the Cancel Reasons and Waiter Reject Reasons lists is a brand-level action, held by Super Admin by default — the wording is set once so it stays consistent across every branch. Just seeing either list, to pick a reason while cancelling or declining, is open more widely, to anyone who can already see orders.
A few other roles — Head Chef, Cashier, dedicated Kitchen Staff, and similar — were once planned as ready-made templates, but they aren't included out of the box today. A restaurant that wants a kitchen-only login right now can build one from scratch on the Roles & Permissions screen, picking just the kitchen-display abilities it needs.
Approving a refund and paying it out use the same single permission. Whoever can see the Refund Requests queue can both approve it and pay it — there's no separate "can approve" versus "can pay" setting. This is a deliberate design choice, but worth knowing if you want two different people involved in a refund. That would have to be a rule you enforce yourselves, not something the system requires.
Tenancy. Every order belongs to one outlet, and staff only ever see orders from their own branch — a login for one outlet can't browse another outlet's orders. The individual items on an order, and its tax lines, are kept private only because they're always looked up through the order they belong to, not because they're separately locked to a branch. As long as every screen looks things up through the order first — which is true everywhere we checked — this keeps different outlets' data apart, though it's a slightly less direct safeguard than a separate check would be. Refund requests are different: each one is directly tagged with its outlet, so a request from another outlet is genuinely invisible, not just hidden on screen. Cancel-reason and decline-reason lists are shared across the whole brand rather than per outlet, which matches how they're managed — set once for the whole brand so the wording stays consistent everywhere.
Validation. Creating a dine-in order requires the number of guests to be filled in. Creating a delivery or dine-in order requires a rider or waiter to be chosen, and the system checks that the person chosen really does hold that role at that outlet — not just any account.
Audit trail. Every change to an order — created, updated, cancelled — is written to a central activity log, along with who made the change, when, and what changed. This means a total that looks wrong can be traced back later. Cancelling an order also stamps who cancelled it and when, directly on the order. Refund-request decisions keep their own record of who decided and when, but that record isn't part of the same central activity log — you'd need to check the Refund Requests screen directly rather than search the general activity log.
A delivery rider's live location updates are accepted simply because they come from the rider assigned to that delivery — not because of any general staff permission, the way every other order change works. This isn't necessarily a problem, since only the assigned rider can send their own location, but it's a different kind of check from everything else on this page, and worth knowing about.
Related pages
Where an order is created, billed and paid.
Tables, merging and freeing.
Codes applied to an order at the till or at checkout.
How the order total is actually calculated.
Where a discount or coupon amount comes from before tax sees it.
Where the STOREFRONT badge becomes the online/offline channel split.