
Managing your front website
How to run the customer-facing ordering website — branding, theme, opening for orders, fees, offers and the cancellation policy.
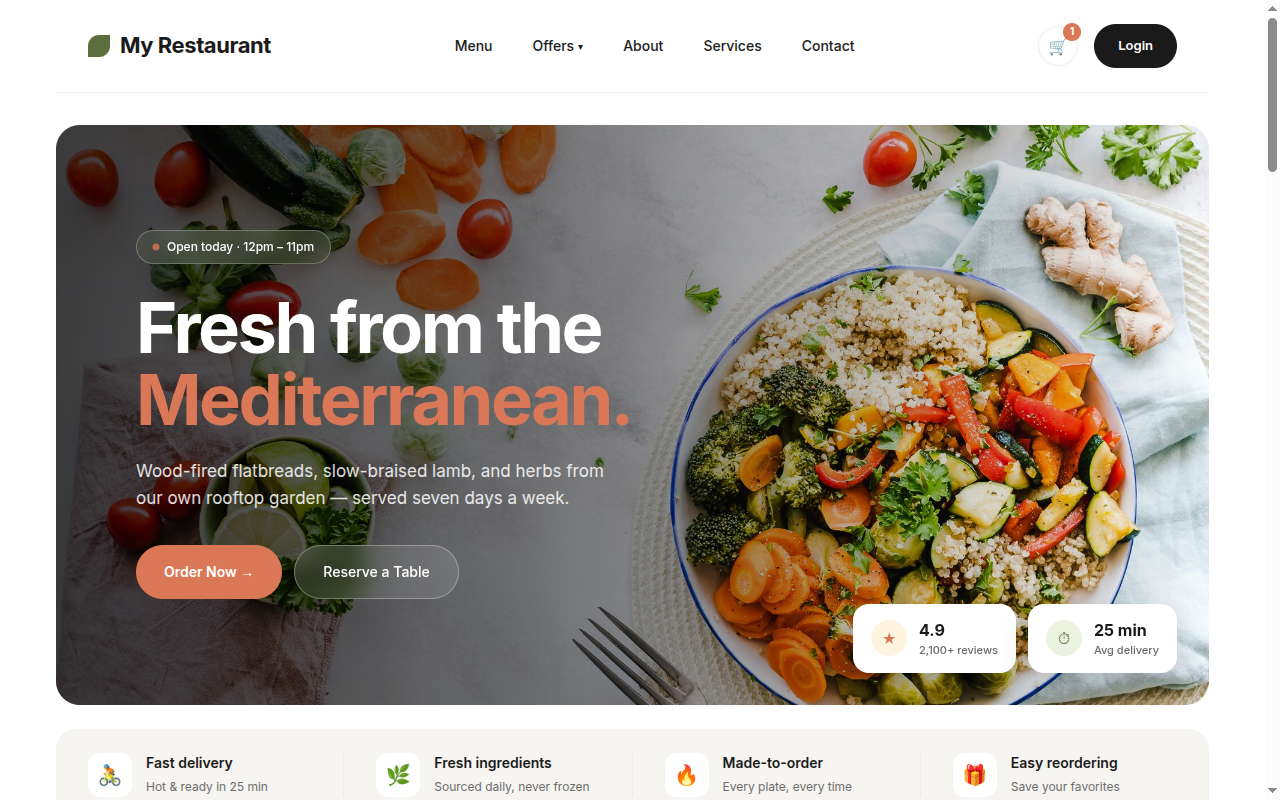
Food Magic includes a public website where your customers browse the menu and place orders themselves. It is called the storefront.
The storefront is controlled from two places, and knowing which is which saves a lot of hunting:
- Brand Storefront — how the website looks and behaves, set once for the whole business
- Outlet Storefront — whether this branch is open and what it charges
What it is
Food Magic runs a public ordering website for each brand — the storefront — where customers browse the menu, place an order, pay, and manage their own account. It sits alongside the point-of-sale system: the same orders, the same menu and the same kitchen, just a different door for the customer to walk in through.
Two screens control it, and they answer two different questions:
- Brand Storefront decides how the website looks and behaves everywhere — logo, colours, login options, accepted payment types, cancellation rules. Only the brand owner can touch it.
- Outlet Storefront decides whether this specific branch is currently taking orders, plus a small set of things that only make sense per branch — its support contact, its own Today's Specials picks.
That split matters because two different people are responsible for these two screens, and — as the security section further down explains — neither one can do the other's job from their own screen.
What your customers see
| Page | What it is |
|---|---|
/ |
Home page |
/menu |
The full menu |
/menu/{item} |
A single item, with options |
/offers |
Current offers |
/combo-offers |
Combo deals |
/cart |
Basket and checkout |
/reviews |
Customer reviews |
/contact |
Contact form |
/orders/{id}/confirmation |
Order confirmation after checkout |
Once a customer signs in, they also get an account area: dashboard, orders, profile, saved addresses, rewards, wallet history and credit codes.
Brand-level: how the website looks and behaves
Settings → Brand Storefront (/settings/brand-storefront, sidebar label
Front Website) · Super Admin only. The screen has a master on/off switch
above four tabs: Login & Identity, Payments & Checkout,
Cancellation Policy, Branding & Display.
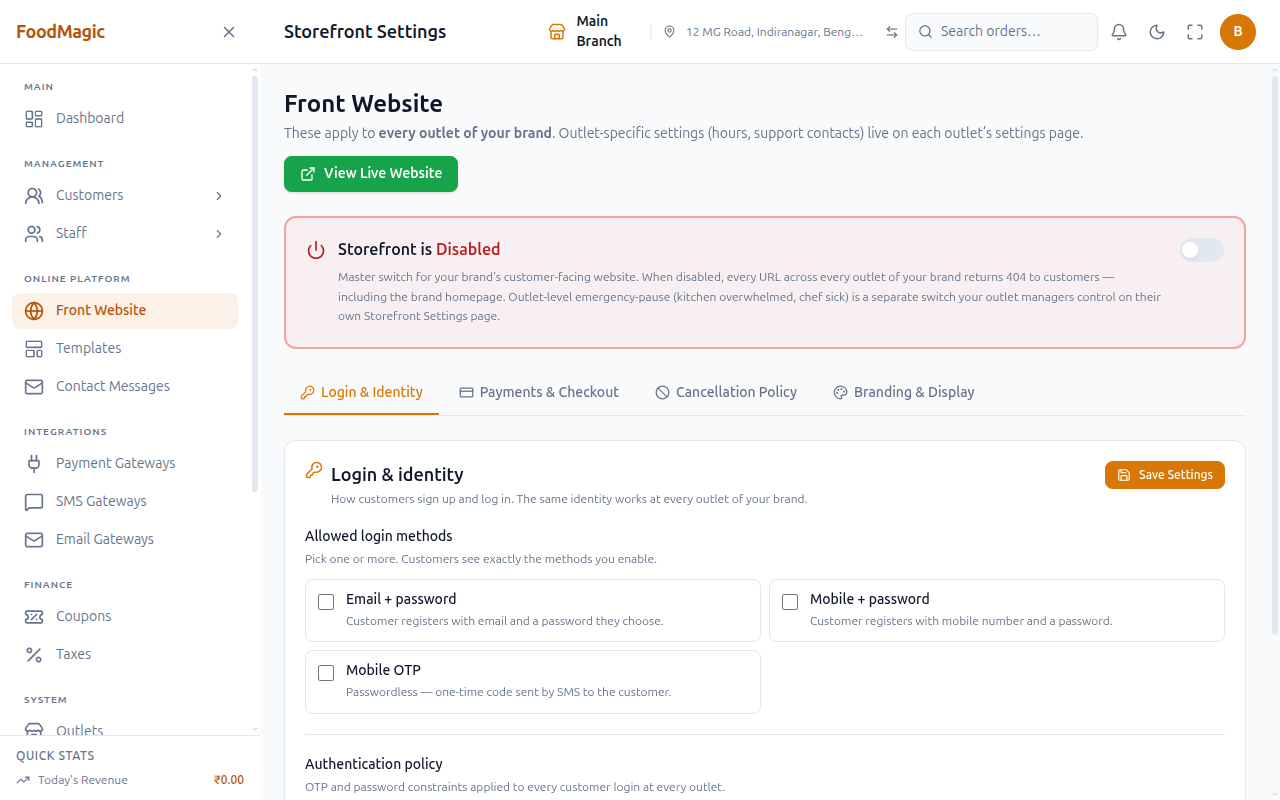
Storefront is Live / Disabled — the master switch
A single toggle at the top of the page, separate from the four tabs below and from the tabbed form's own Save button. Flipping it in either direction opens a confirmation dialog first, since both directions matter a lot, and confirming takes effect right away — it doesn't wait for the "Save Settings" button.
Use this to take the entire public website down brand-wide — a compliance pause, a payment-gateway emergency, or any situation where every outlet's site needs to disappear at once, instantly, without touching the rest of the settings form. Once disabled, every page at every outlet shows customers a not-found error, including the brand homepage.
Only brand-level administrators can use this switch — an outlet manager can't reach it, because it only works for accounts that aren't tied to a single outlet.
This is a different switch from the outlet's own Ordering Status (see below) and from the brand-wide Ordering Mode on the Branding & Display tab. This one removes the site entirely (customers see a 404 page). Ordering Mode keeps the menu browsable but pauses checkout. Outlet Ordering Status does the same thing, but at one branch only.
Login & Identity
How customers sign up and log in — the same identity policy applies at every outlet of the brand.
Allowed login methods
A row of three checkboxes — Email + password, Mobile + password, Mobile OTP — each one turned on or off independently, not a single choice. Customers see exactly the methods checked here at signup and login, and at least one must stay selected or the form won't save.
This is where you decide how customers prove who they are: OTP doesn't need a password, but it does need a working SMS provider, while the password-based methods work without one but ask customers to remember a password. It saves together with the rest of this tab — see Save Settings below.
Authentication policy — OTP length, OTP TTL, password minimum
Three number fields control this: OTP length (4–8 digits), OTP TTL — how many minutes a code stays valid before expiring (1–30) — and the minimum password length (6–32 characters).
If customers report their code expiring before they can type it in, raise the OTP TTL here. If codes never arrive at all, that's an SMS delivery problem, not this screen — see Setting up email and SMS. Length and TTL only control the code Food Magic itself generates and checks.
Payments & Checkout
Three sections on this tab: Payment acceptance, Checkout minimum, Delivery fees.
Payment acceptance
Two checkboxes — Cash on Delivery, which needs no provider, and Pay Online, which stays greyed out until a payment gateway is actually connected and switched on, with a tooltip explaining why. At least one method must stay checked.
This decides what customers may pay with, brand-wide — an individual outlet can't opt out of a method the brand has turned on, or add one the brand hasn't. The payment gateway itself is connected separately, under Settings → Payment Gateways.
Checkout minimum
One number field — the smallest cart total a customer may check out with. Zero means no minimum. A customer below it sees exactly how much more they need to add. Use this to enforce a minimum order size brand-wide, so a very small order doesn't lose you money once delivery cost is factored in.
Delivery fees
Four fields set the delivery-cost rules for the whole brand: the flat delivery fee per order, a COD handling fee that's an extra charge on cash-on-delivery orders only and is never waived, a choice of which order types the delivery fee actually applies to (both / cash on delivery only / pay online only), and a free delivery above threshold that waives the fee once the cart reaches that amount (zero means always charge it).
These are brand-wide numbers — an individual outlet doesn't set its own delivery fee, it only sees the result, read-only, on its own Outlet Website → Fees tab (see below).
Cancellation Policy
A master switch, then three sections that grey out together when it's off.
Allow customers to cancel orders (master switch)
One toggle. Off stops cancellations across the brand outright; on reveals the cutoff, auto-refund and refund-schedule controls below it.
Cancel-button cutoffs — online and COD, set separately
Two groups of five buttons — one for online (prepaid) orders, one for cash on delivery — each letting you pick one stage from Order placed → Confirmed → Preparing → Ready → Out for delivery. The customer's Cancel button stays visible only while the order is at or before the stage you chose, then disappears once the order passes it.
Cash-on-delivery is usually set stricter than online, with an earlier cutoff, simply because no money has been taken yet on a COD order — there's nothing to refund, so there's less reason to keep the door open.
Automatically refund online cancellations
A toggle. Turned on, a cancellation sends the refund straight back to the customer's payment method instantly. Turned off, cancelling instead creates a pending-refund task in the outlet's queue (see Refund requests) rather than moving money automatically.
Refund schedule (online orders)
Five percentage fields, one per stage (defaulting to 100/100/75/50/0), that control how much of the payment is refunded if the customer cancels while the order is at that stage. A stage past the cutoff above can't actually be reached, since its Cancel button is already hidden, so its percentage never applies — and a 0% stage that's still within the window lets the customer cancel, just with no refund. Cash-on-delivery orders ignore this schedule entirely, since no money was taken to refund in the first place.
Use this to tune how forgiving cancellation is as an order gets closer to being cooked and delivered — a full refund right after placing, tapering down to nothing once it's out the door. All four cancellation controls save together as one form, and only a brand admin can save them.
Branding & Display
Four sections: Branding, Geocoding, Public display, Ordering Mode.
Branding
One field — the brand logo URL, shown at the top of every storefront page. Theme colours live on the dedicated Theme page described further down; this is the only branding control left on this tab.
Geocoding
A password-style field for a Google Maps API key, used to turn a customer's typed delivery address into a map location. Once saved it shows only a masked placeholder rather than the real key. It's optional — address entry still works without it, you just lose map positioning.
Public display toggles
Three independent toggles:
- Show customer ratings publicly — off hides star ratings and reviews from the public menu; you still see them privately in the admin dashboard.
- Show ingredients on item detail — on shows each item's ingredient list (from your recipes) to customers; individual ingredients can still be hidden on the Ingredients page regardless of this switch.
- Show delivery rider details to customers — on reveals the assigned rider's name and phone on the customer's order page, but only after the rider has accepted the delivery. Off by default to keep staff numbers private.
Ordering Mode — the brand-wide View only / Order switch
A two-option switch, different from both the master Live/Disabled switch above and any single outlet's own Ordering Status. View only keeps the menu browsable everywhere but hides the cart, checkout, login/signup and account pages at every outlet at once. Order hands control back to each outlet — each branch's own Ordering Status setting (on its Outlet Website → Acceptance tab) then decides whether that specific branch takes orders. There's no way to pause just one outlet remotely from here; that's done by that outlet's own manager instead.
Use this for a brand-wide reason to stop taking orders everywhere without taking the site fully offline — a payment-gateway outage, a compliance freeze, a soft launch before payments are wired up — while customers can still browse the menu. All four sections on this tab save together, and only a brand admin can save them.
Save Settings / Save changes
Every tab shows its own "Save Settings" button, and a "Save changes" button repeats at the bottom of the page — both submit the entire form, all four tabs' fields at once, not just whichever one you're looking at. The form checks itself before submitting: at least one login method and one payment method must stay selected, online payments need a connected gateway, every fee and percentage field must be zero or higher, and refund percentages must sit between 0 and 100. Only a brand admin can save this page.
View Live Website
A green external-link button next to the page title opens the public storefront's home page in a new tab — the same link that reappears on the Theme pages as "View live" / "View live storefront." Use it to double-check that a setting you just saved — a logo change, a cancellation-window edit — is actually live for customers.
Choosing and customizing a theme
Settings → Storefront Theme (/settings/storefront-theme, sidebar label
Templates) is a gallery; /settings/storefront-theme/:themeVariant
is where each template is actually customized. The gallery never saves
anything itself — every change is saved on the per-template settings page.
Nothing you do while customizing a template is saved until you press Activate & Save (or Save) at the very end. Picking a layout, editing text, and choosing colors are all held as an unsaved draft until that final click.
Go to Settings → Storefront Theme (sidebar label Templates).
Click a card to open that template's own settings page. This does not turn it on by itself.
Pick one of the template's ready-made home-page layouts. This is held as a draft, not saved yet.
Use the pencil icon on a home variant card to edit that section's wording, and the three color pickers to match your brand's colors. Both are optional.
Press Activate & Save (or Save, if this template is already live) to commit everything — the layout, the text edits, and the colors — in one go.
The template gallery
One card per enabled template, each showing a thumbnail, its name, and an Active badge on whichever one currently powers the live site. Clicking a card opens that template's own settings page — it doesn't turn it on by itself.
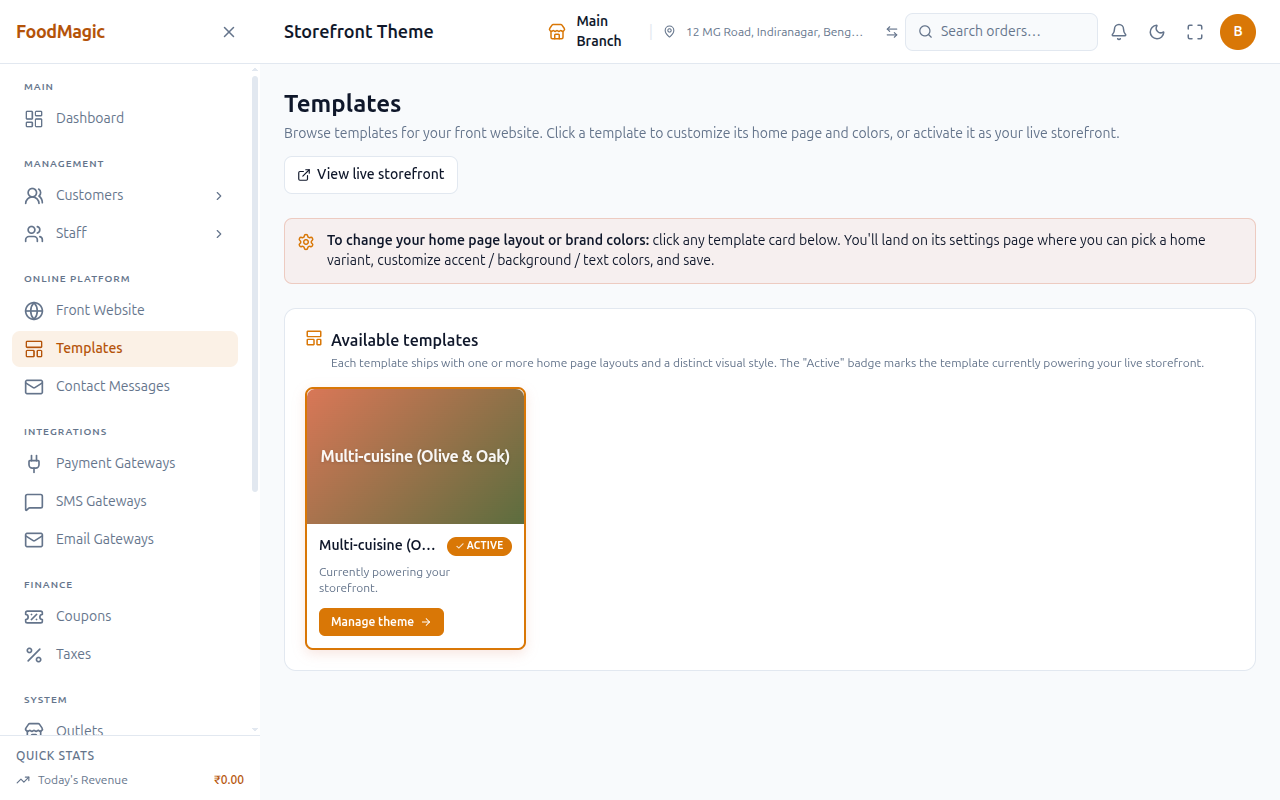
On the install we checked, exactly one template was installed — Multi-cuisine (Olive & Oak) — already Active. A brand with only one template installed still goes through the same Activate & Save steps described below, the first time it's configured.
Home page layout picker
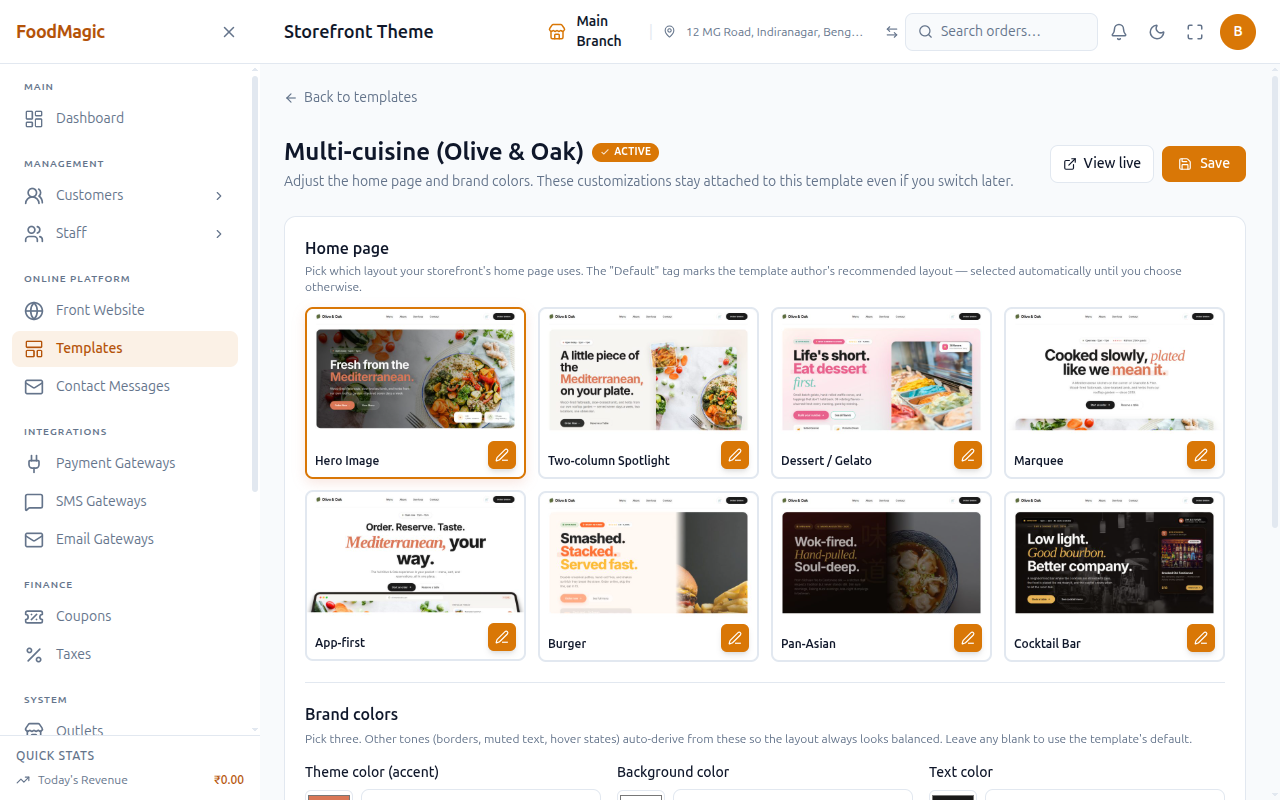
A grid of home-page layout cards belonging to the open template. Clicking one selects it, marked with a highlight and a check badge, but nothing saves until you press the page's Save button — a Default tag marks the template author's recommended layout.
Use this to choose which of a template's ready-made home-page layouts your storefront's home page actually shows.
Edit text (pencil icon on a home variant card)
This only shows up on the active template's cards, and only for someone who can make changes. It opens a panel for editing that home page's wording and turning sections on or off — separate from the layout picker and saved on its own, with its own Save button inside the panel rather than the page-level one.
Use it to tweak the wording of a home-page section — a hero headline, an about blurb — without touching layout or colours.
Brand colors — three color pickers with a reset icon
Three colour pickers — Theme colour (accent), Background colour, Text colour — each a colour swatch plus a hex text field, with a small reset icon that appears once a field has a value and clears it back to the template default. A live preview card and a contrast-check indicator update as you edit, using the same text and background combination customers would actually see.
Use this to match the public site's colours to the brand's own colours without touching any code — leaving all three blank simply uses the template's own defaults. This saves together with the home-layout pick, and viewing the current settings needs the same permission as saving: someone who can only view brand storefront settings can't open a template's colour editor at all, even to look.
Activate & Save / Save
The button reads "Activate & Save" when the template you're editing isn't the live one yet, or plain "Save" when it already is. Either way it saves two things: if activating, the live site switches to this template immediately, and then the home-layout and colour choices are saved right after. If that second part fails after the template has already gone live, a message tells you so you know to retry saving the colours — the site doesn't switch back to the old template on its own.
Use this to commit layout or colour changes, or to switch which template is live by editing a template that isn't currently active and saving it.
Outlet website — quick links
A read-only list at the bottom of the per-template page: every active outlet that has a URL slug set, each with a "View live" button opening that outlet's own storefront in a new tab. An outlet without a slug shows "Slug missing" instead of a link.
Use this to check what a specific branch's customer-facing site looks like right after a template or colour change, without having to hunt down its web address by hand.
Outlet-level: is this branch open, and what does it charge?
Settings → Outlet Storefront (/settings/storefront, page heading and
sidebar label Outlet Website) · Outlet Superadmin. Three tabs:
Acceptance, Fees, Today's Specials. A read-only summary panel at
the top mirrors the brand-level settings (live status, payment methods,
gateway, checkout minimum, cancellation policy) so a branch manager can see
what the brand has decided without leaving this page.
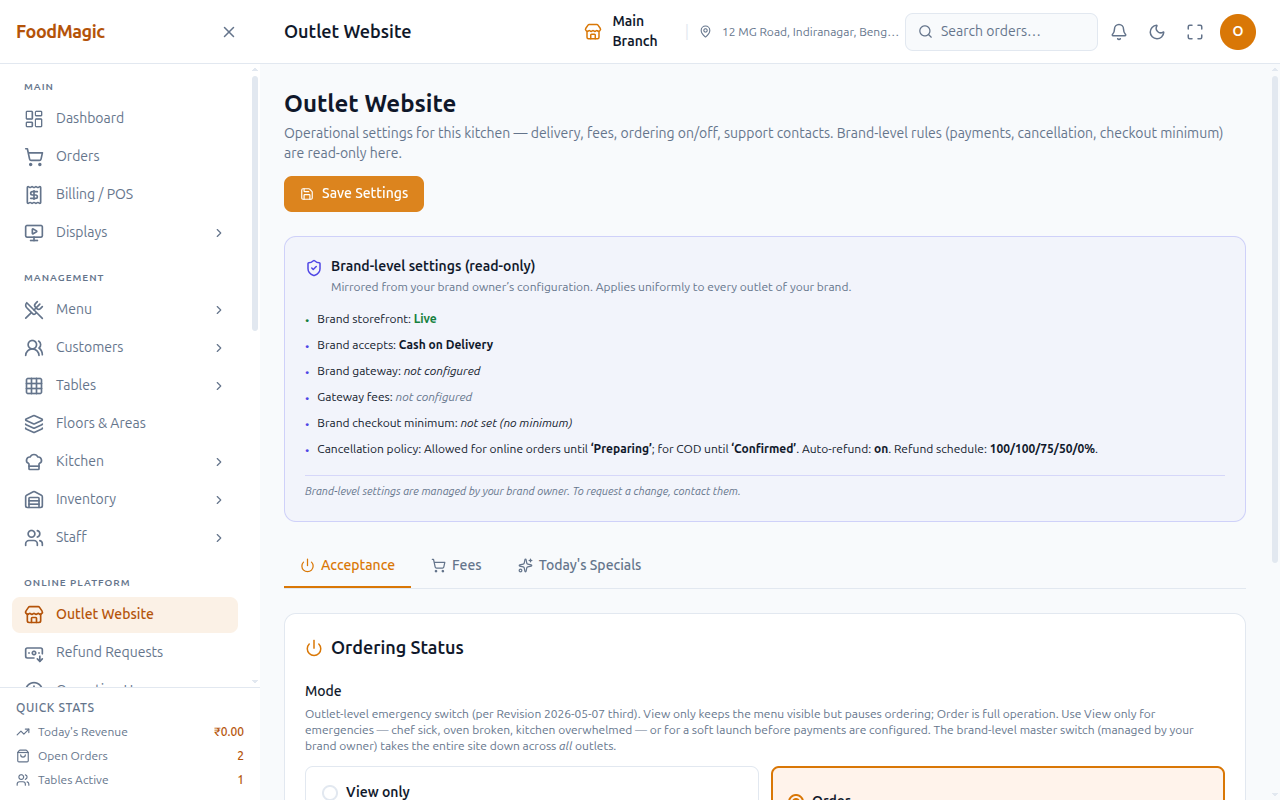
Acceptance tab — Ordering Status
Mode: View only / Order
A two-option switch — this branch's own emergency pause, independent of both the brand-wide Ordering Mode and the brand's master Live/Disabled switch. View only hides the cart, signup, login, checkout and account pages at this outlet alone, while the menu stays browsable; Order is full normal operation.
Turn it off for a kitchen that's overwhelmed with tickets, at closing time, on a day the branch is shut, or during a soft launch before payments are wired up — customers then see that this particular location isn't taking orders, rather than placing one nobody will cook.
If the brand storefront is Disabled (the master switch), this toggle has no effect that customers can see — every page already shows a not-found error regardless of what this outlet's own switch says. The page points this out with an inline warning when it detects that.
Only outlet management can save this.
Acceptance tab — Support Contact
Two plain fields — phone and email — shown to customers on this outlet's storefront pages, for who to contact about an order from this specific branch. It saves together with Ordering Status above, under the same Save Settings button.
Fees tab — read-only brand fees + live preview
This tab has no editable fields at all — the delivery fee, COD handling fee, the rule for which order types it applies to, the free-delivery threshold, and the online gateway's processing rate are all pulled read-only from the brand's Front Website settings and its connected payment gateway. A "Live preview" section works out a sample ₹500 order's Pay-Online total and Cash-on-Delivery total using those brand numbers, so a branch manager can see the real effect of the brand's fee rules without doing the arithmetic themselves.
Use this to understand exactly what a customer at this branch pays, or to confirm a brand-level fee change actually took effect, without needing access to Front Website. To change an actual fee amount, that has to happen on the brand's Front Website → Payments & Checkout tab instead.
Today's Specials tab
Mode: Randomly from the menu / I'll pick them
A two-option picker. Random has the system automatically feature a set number of available items (6 by default, 1–12), rotating at midnight — set it and forget it. Manual switches to a curated list you build yourself.
Show how many? (random mode only)
A number field, 1–12, that's ignored while in manual mode but still saved, so switching back to random later restores whatever count you'd set.
Manual picker — search, add, reorder, remove
In manual mode, two lists appear: your Selected items on the left, with up/down arrows to reorder them and a remove icon per row, and the full list of Available menu items on the right with a search box — clicking an item adds it to the end of your selected list. You can feature up to 50 items. If an item later goes inactive or gets deleted, it still shows in your selected list marked "Unavailable" rather than silently disappearing, so the gap stays visible.
Use manual mode to feature what this specific branch actually has in stock today, rather than a system-wide random rotation — handy when one outlet is out of an ingredient that another isn't.
All Today's Specials fields save together with the rest of the tab, and only outlet management can save them; the item list itself is only fetched once this tab is opened.
Save Settings (Outlet Website)
One button, top-right, saves whichever tab you're currently on plus any unsaved edits on the other two — all three tabs share one form and one Save action, the same pattern as the brand-level settings page. Only outlet management can save; simply viewing the page is open more widely. A brand-level administrator viewing this page gets an outlet picker at the top to switch which branch they're editing; an outlet manager's own branch is fixed, so no picker appears for them.
When is this branch open?
Online Platform → Operating Hours (/outlets/operating-hours) · Outlet.
Two tabs: Weekly Schedule and Holiday Closures (the second only
appears if your role has access to holiday closures specifically).
The ordering switch on Outlet Website is the manual override; this screen is the schedule that runs on its own.
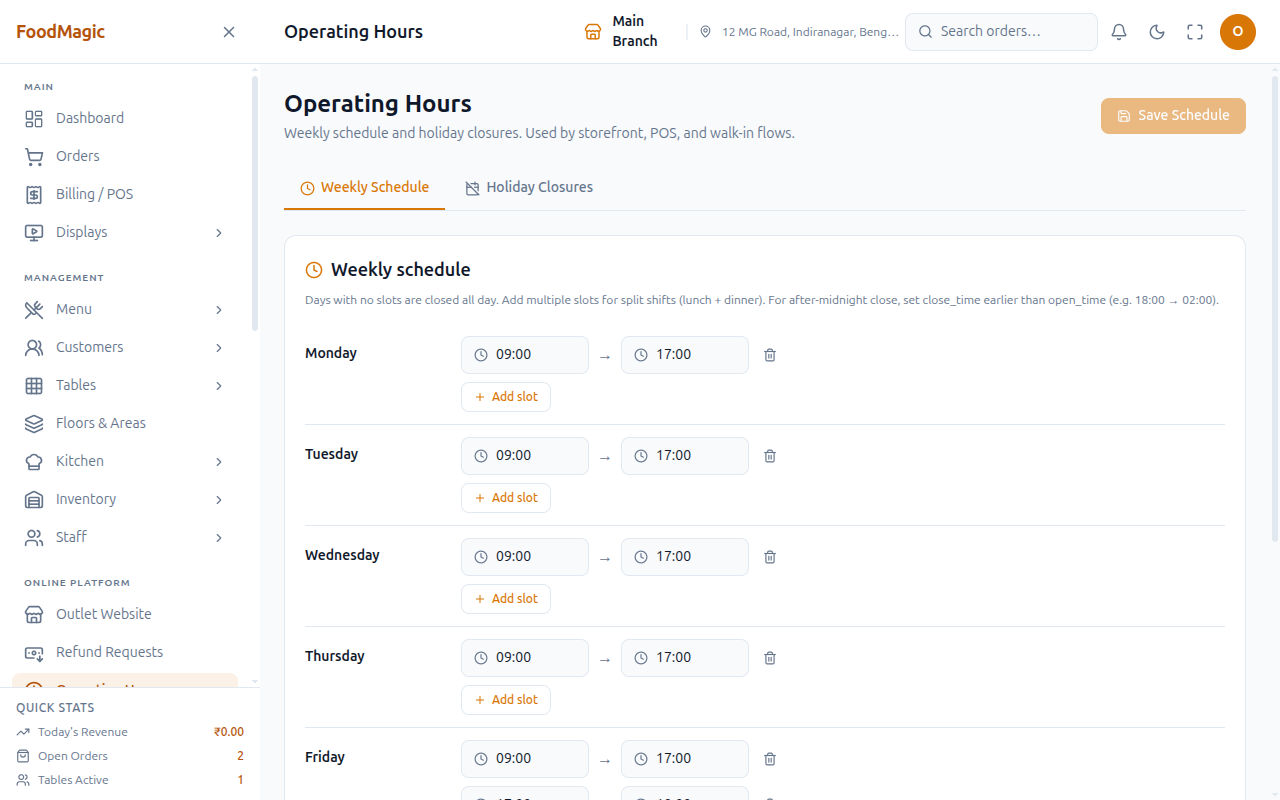
Weekly Schedule tab
Per-day time pickers
One row per day of the week, each holding zero or more open-to-close time slots. A day with no slots shows "Closed" and is treated as closed all day. Setting a close time earlier than the open time — say 18:00 to 02:00 — is valid, and gets an "after midnight" badge next to that slot.
Add slot
Adds a new slot to that day, starting where the day's last slot ends and running for one hour, so a newly added slot never overlaps with an existing one.
Use two slots on the same day for a split shift — lunch service and dinner service — which is how you close the kitchen between them without marking the whole day closed.
Remove slot (trash icon)
Removes one slot from a day, right away in your draft — nothing is actually saved until you press Save Schedule.
Save Schedule
A single button, greyed out until your draft actually differs from what's currently saved, that saves the whole week's slots for every day at once. Only someone with the right permission can save — that's separate from the permission that just lets someone view the page.
Holiday Closures tab
Add a holiday closure
A date picker plus an optional free-text reason, then an "Add holiday" button — the date is required, the reason isn't.
Use this for one-off dates the branch is shut regardless of the weekly pattern — set these ahead of festivals so nobody has to remember to flip the manual switch on the day itself. Only someone with the right permission can add one.
Delete (trash icon, on hover)
A confirmation prompt, then removes that one closure date — also restricted to those with the right permission.
Viewing this tab needs its own separate permission from the Weekly Schedule tab. A role that can edit the weekly schedule but lacks holiday-closure access sees only the Weekly Schedule tab — the Holiday Closures tab doesn't show up at all, rather than showing up read-only.
Changes are not live until you press Save Schedule.
Two different things can stop online orders, and it matters which one you used: Operating Hours closes the branch on a schedule, while the ordering switch on Outlet Website closes it right now, regardless of the timetable. If a branch is unexpectedly refusing orders during its normal hours, check the manual switch first — the Operating Hours page itself links straight to it in a footer note.
What comes back from the website
Two inboxes receive what customers send, and they sit at different levels — which is the usual reason people cannot find them.
| Screen | Path | Level |
|---|---|---|
| Contact Messages | /storefront/contact-messages |
Brand |
| Refund Requests | /storefront/refunds |
Outlet |
Contact Messages — brand level
Everything submitted through the customer /contact form, across every
branch. Columns: # (a serial number that carries on across pages),
From (name + email, with an unread dot), Topic, Subject /
Message (a short preview), Outlet, Received (relative time,
exact timestamp on hover), Status, Actions. A KPI strip above the
table shows Total Messages, Unread, Read and On This Page.
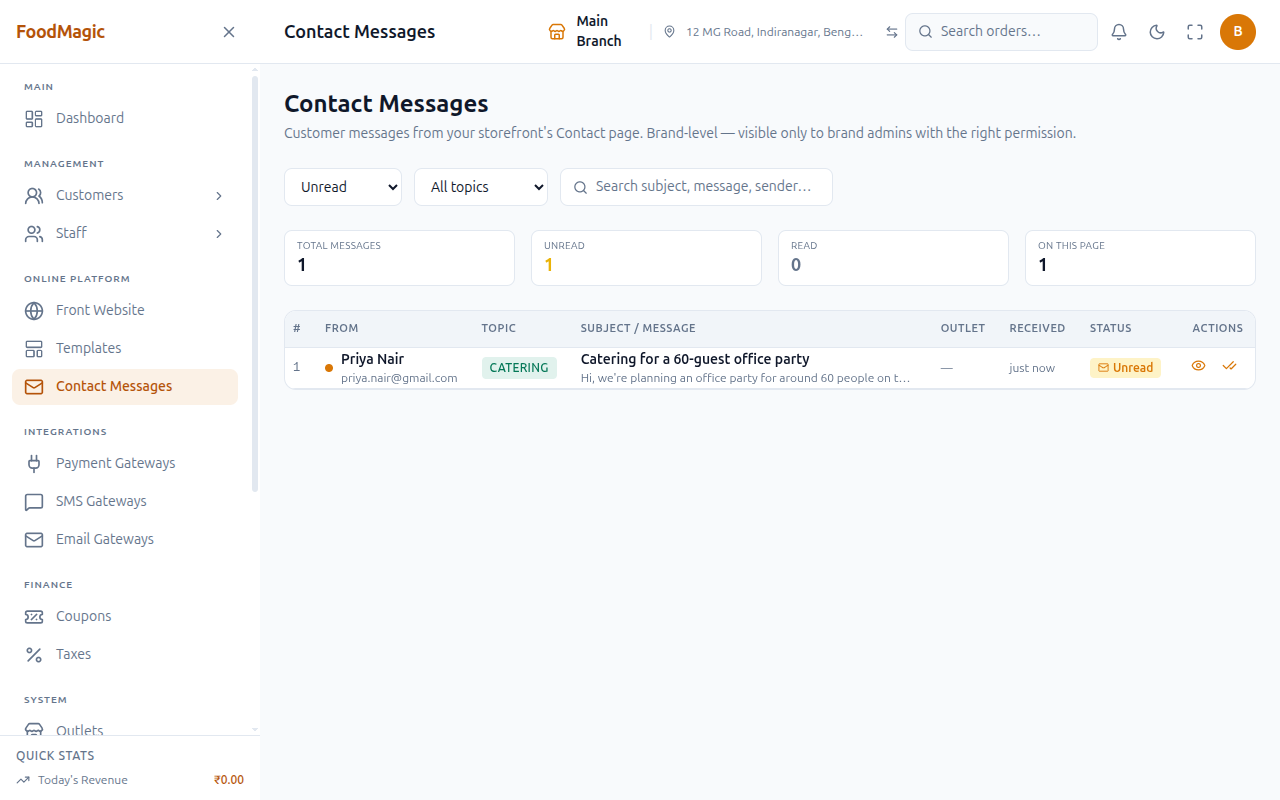
This is brand level even though it shows an Outlet column — one inbox for the whole business, tagged by which branch the message concerns (the customer's "preferred outlet" pick on the contact form). An outlet owner cannot open it.
Filters
A status dropdown (All statuses / Unread / Read), a topic dropdown (All topics / General / Feedback / Catering / Press & Media / Careers), and a free-text search across subject, message and sender that reruns a moment after you stop typing. Changing any filter jumps back to page one.
View (eye icon)
Opens a two-column detail view — the message itself with the sender's details and a read receipt on the left, and details like IP address, browser and submitted time on the right. If you can mark messages read, opening an unread message automatically marks it read as part of opening it — most staff use View as their one action for "handle this message," since it takes care of marking it read for them.
Mark as read (double-check icon)
A separate, explicit action shown only next to still-unread rows, and only to someone who can mark messages read — for marking a message read without opening the full detail view. Available both inline in the table and inside the detail view itself.
There is no delete action on this screen — messages are read/unread only, with no way to remove one from the inbox.
Refund Requests — outlet level
Refunds customers have asked for on their own orders, searchable by order number or customer and filterable by date. This one is outlet level: the branch that took the money is the branch that approves giving it back.
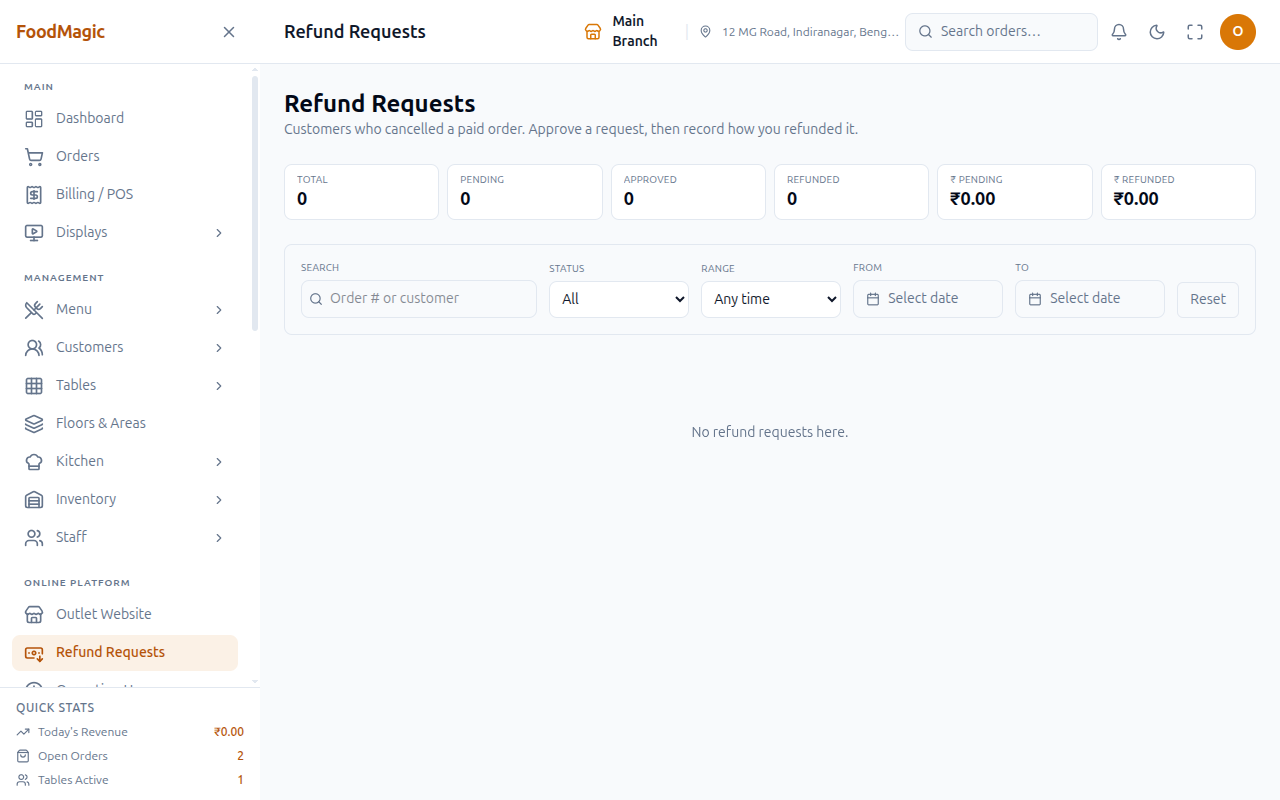
See Refund requests from customers for the approve/pay/decline flow.
Which screen do I need?
| I want to… | Screen | Level |
|---|---|---|
| Stop taking online orders right now | Outlet Storefront | Outlet |
| Change the logo | Brand Storefront | Brand |
| Change which payment methods are offered | Brand Storefront | Brand |
| Connect the actual payment provider | Payment Gateways | Brand |
| Change how long customers can cancel | Brand Storefront | Brand |
| Change the minimum order value | Brand Storefront | Brand |
| Change this branch's delivery charge | Outlet Storefront | Outlet |
| Promote a dish at one branch | Outlet Storefront | Outlet |
| Change the site's colours and layout | Storefront Theme | Brand |
| Change the OTP length | Brand Storefront | Brand |
| Read messages from the contact form | Contact Messages | Brand |
| Set the branch's opening and closing times | Operating Hours | Outlet |
| Close the branch for a festival | Operating Hours → Holiday Closures | Outlet |
| Run a split lunch/dinner service | Operating Hours → Add slot | Outlet |
| Approve a customer's refund request | Refund Requests | Outlet |
Common questions
Customers can't place an order at one branch
Check Ordering status on that outlet's Outlet Storefront screen first. It is the usual cause and takes one click to fix.
A payment method is missing at checkout
Two things must both be true: the method is turned on under Brand Storefront → Payment acceptance, and a payment gateway is connected and switched to live mode under Payment Gateways.
Customers never receive their sign-in code
That is SMS delivery, not a storefront setting — see Setting up email, SMS and WhatsApp.
A customer says they couldn't cancel
The cancel window is set per payment type under Brand Storefront → Cancellation policy. Prepaid orders typically have a shorter window than cash on delivery.
One branch shows a different delivery fee
That is expected — fee amounts are per outlet. The brand sets the rule and the checkout minimum; the branch sets its own amount.
How it is secured
Who can open which screen
| Screen | Who can view it | Who can save changes |
|---|---|---|
| Brand Storefront (Front Website) | Brand owner (Super Admin) only | Brand owner (Super Admin) only |
| Storefront Theme (Templates) | Same access as saving — there is no view-only version of this screen | Brand owner (Super Admin) only |
| Outlet Storefront (Outlet Website) | Outlet management, at their own branch | Outlet management, at their own branch |
| Operating Hours — Weekly Schedule | Outlet staff holding that permission | Outlet staff holding a separate, higher permission |
| Operating Hours — Holiday Closures | A separate permission from the weekly schedule — some roles see one tab but not the other | Same — separately permissioned per action |
| Contact Messages | Brand owner by default; can be handed to a dedicated role (e.g. a "Customer Care" role) without giving that role anything else | Same delegation model for marking messages read |
| Refund Requests | Outlet management, at their own branch | Outlet management, at their own branch |
Every row above is an explicit, named permission on the Roles & Permissions screen — labels like "View brand storefront settings", "Update outlet storefront settings", "View contact-us messages" — so an admin can see exactly what a role can and can't do, and hand out narrower access (contact-form handling without any other brand-owner power, say) without needing anyone to touch code.
On the Storefront Theme screen specifically, there is no separate "just look, don't touch" permission — opening a template's colour editor to see the current settings needs the same permission as saving them. A role that can only view Brand Storefront settings can't open the theme editor at all, not even read-only.
Tenancy — brand settings and outlet settings are two different records
Brand Storefront settings are one single set for the whole business — every outlet reads the same login rules, payment methods, cancellation policy and delivery-fee numbers. There is no per-branch override anywhere on that screen.
Outlet Storefront settings are completely separate per branch — each outlet has its own set, storing only what legitimately varies branch to branch.
These two settings are walled off from each other more strictly than the screen suggests. The Outlet Website screen shows the brand owner (Super Admin) a branch picker at the top, as if they can pick any outlet and edit its settings directly. In practice, doing that is refused outright — the system tells the brand owner that outlet-level operational settings belong exclusively to that branch's own management, and to ask the outlet's manager instead. On top of that, the brand owner's own role isn't even given the underlying permission for outlet-level settings by default, so this control is closed off twice over. If a brand owner ever reports that the outlet picker on this page "does nothing" when they hit Save, this is why — it isn't an everyday bug, it's a deliberate lockout, but a picker that looks like it should work and doesn't is a genuinely confusing thing to leave in front of an owner.
Confirmed by checking how the access rules are built — not yet reproduced by clicking through the app as a brand-owner account.
What gets checked before a save goes through
Both settings screens block an invalid save rather than silently accepting it:
- At least one login method and one payment method must stay selected on Brand Storefront — the form won't let the last one be unchecked.
- "Pay Online" cannot be turned on without a payment gateway already connected and active.
- Every fee, minimum-order and refund-percentage field must be zero or higher; refund percentages must sit between 0 and 100.
- Today's Specials in manual mode is capped at 50 items, and an item from a different branch's menu is rejected outright — only items belonging to that outlet can be featured there.
- Cancellation cutoff stages must be one of the five real order stages — nothing else is accepted.
What's recorded when something changes
Both the brand-wide and the per-outlet settings only carry a last-saved timestamp — there's no list of who changed which field and when, and neither shows up on the Audit Logs screen. The Home Page Text editor (under Storefront Theme) is one exception: it does remember which admin last touched each section. The Contact Messages inbox also remembers which staff member marked a given message as read.
No settings-change history exists for either storefront screen. If a cancellation window or a delivery fee changes unexpectedly, there is currently no record inside the product of who made that change or when — only that it happened at some point, from the last-saved timestamp. Worth knowing if a change ever needs to be traced back to a person.
Related pages
Every settings screen and who can open it.
Connect the providers that deliver OTPs and order updates.
What actually gets sent to a customer at each stage of their order.
Where every permission named on this page gets assigned to a role.