
Staff overview
How attendance, leave, payroll and advances connect — and the order to do them in.
There are four staff processes, and none of them work alone. Attendance decides how much someone is paid. Leave affects attendance. Advances get deducted from the payslip. Doing these in the wrong order can cost someone money.
What it is
Four screens work together to turn your staff roster into a paid, properly managed workforce: Attendance, Leave Requests, Payroll, and Salary Advances. Underneath all of them sits the staff register — the Users list, where every staff member's profile, pay details, and role are kept — and Roles & Permissions, where an admin decides who is allowed to do what.
- Who uses it — outlet managers run all four screens day to day. Every staff member also has their own view of their attendance, leave, and payslips.
- Where it lives — Payroll, Attendance, and Salary Advances sit together in one admin area. Leave Requests is a separate screen. Both rely on the same staff list (Users) and the same role system (Roles & Permissions).
- Current status — all four processes are live and used every day, but they're all done by hand. There is no automatic monthly payroll run, no automatic syncing between leave and attendance, and no automatic recovery of advances beyond what's described below.
How it works
How they connect
flowchart LR
    B[Leave<br/>requested and approved] --> A[Attendance<br/>marked daily]
    A --> C[Payroll<br/>generated and approved]
    D[Salary advance<br/>approved] --> C
    C --> E[Payslip<br/>staff can view]
| Process | What it decides |
|---|---|
| Staff attendance | Who worked, and therefore what most staff earn |
| Staff leave requests | Who is entitled to be away |
| Salary advances | Money paid early, recovered from pay |
| Staff payroll | Turns all of the above into money |
The two rules that cause most problems
1. Approving payroll locks attendance permanently. Once a payroll period covering a date is approved, that date can never be corrected again. Fix attendance before you approve payroll, not after.
2. Approving leave does not mark attendance. They are two separate records. If an approved leave day is left unmarked, or marked as absent, it simply will not be paid. Mark it as Holiday instead.
The safe order
Don't leave this for a rush at month end.
This includes setting approved leave days to Holiday.
Advances have to be approved before payroll runs, so they can be recovered from it.
Unmarked days don't get paid. This is your last chance to catch them.
Once you approve, there's no going back.
Before any of that — the staff register and roles
Attendance, leave, payroll, and advances all depend on one thing: a staff record with a role attached. That record is created and kept up to date on two screens that sit outside the four processes above, but feed into all of them: the Users list, and Roles & Permissions.
Finding someone on the staff list
| Control | What it does |
|---|---|
| Search users… | Searches by name or email as you type |
Role tabs (All, Outlet Manager, Waiter, Delivery Rider, plus any custom role) |
Filters the list to one role |
Scope tabs (All / Brand / Outlet) |
Shows brand-level staff (like the Super Admin, who isn't tied to one outlet) separately from outlet-level staff — only useful when looking across more than one outlet |
| Sort: Joined / Name / Email, plus Ascending/Descending | Reorders the list |
| Show archived | Shows staff who have been archived. Their card shows a Restore button instead of Archive, and their attendance/payroll history is kept untouched |
Whether someone can see this list at all is controlled by permissions, which an admin manages from Roles & Permissions.
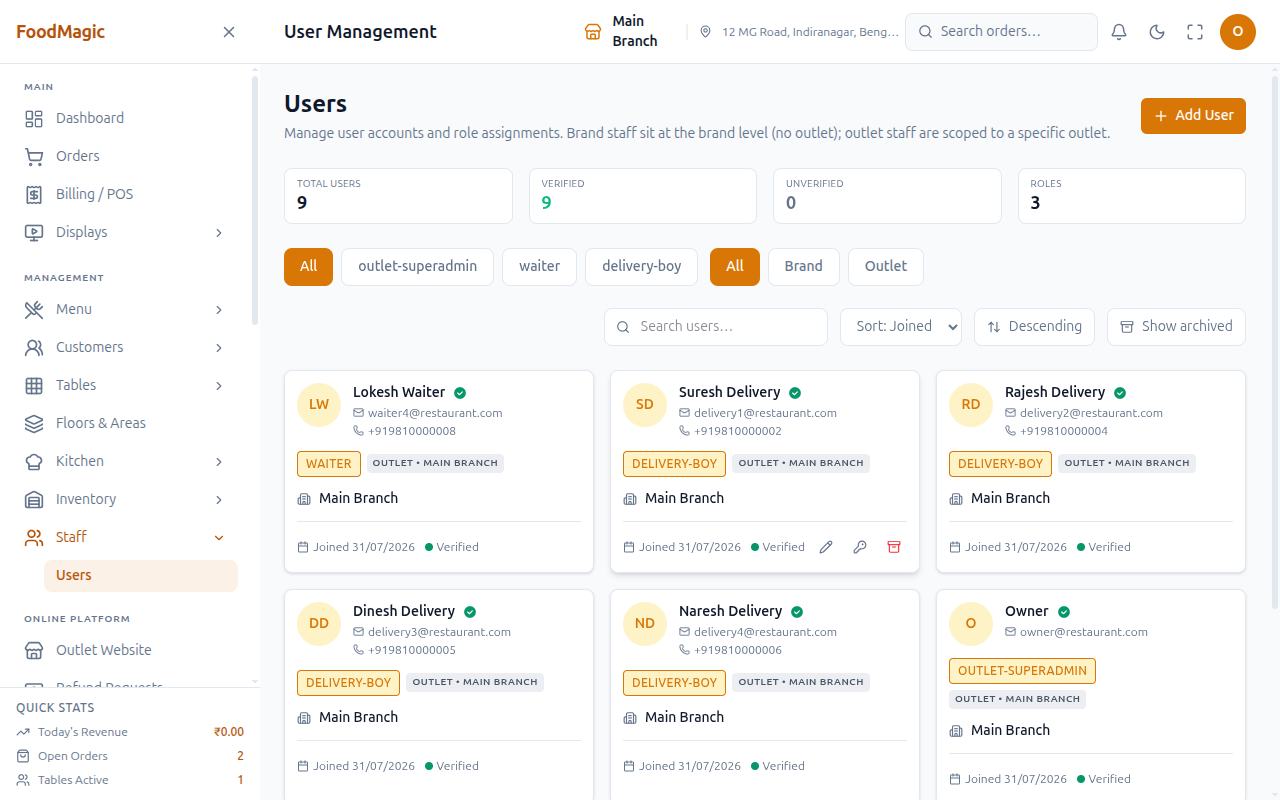
Row actions on each staff card
- Edit (pencil icon) — opens the same tabbed editor described below, plus an eighth Access tab (see Roles & permissions).
- Change Password (key icon) — an admin sets a new password directly. No reset email is sent.
- Archive (box icon, red) — removes the user from the active list. They can no longer log in, but every attendance, leave, payroll and advance record they were part of stays exactly as it was.
- Restore (only shown when Show archived is on) — brings an archived user back.
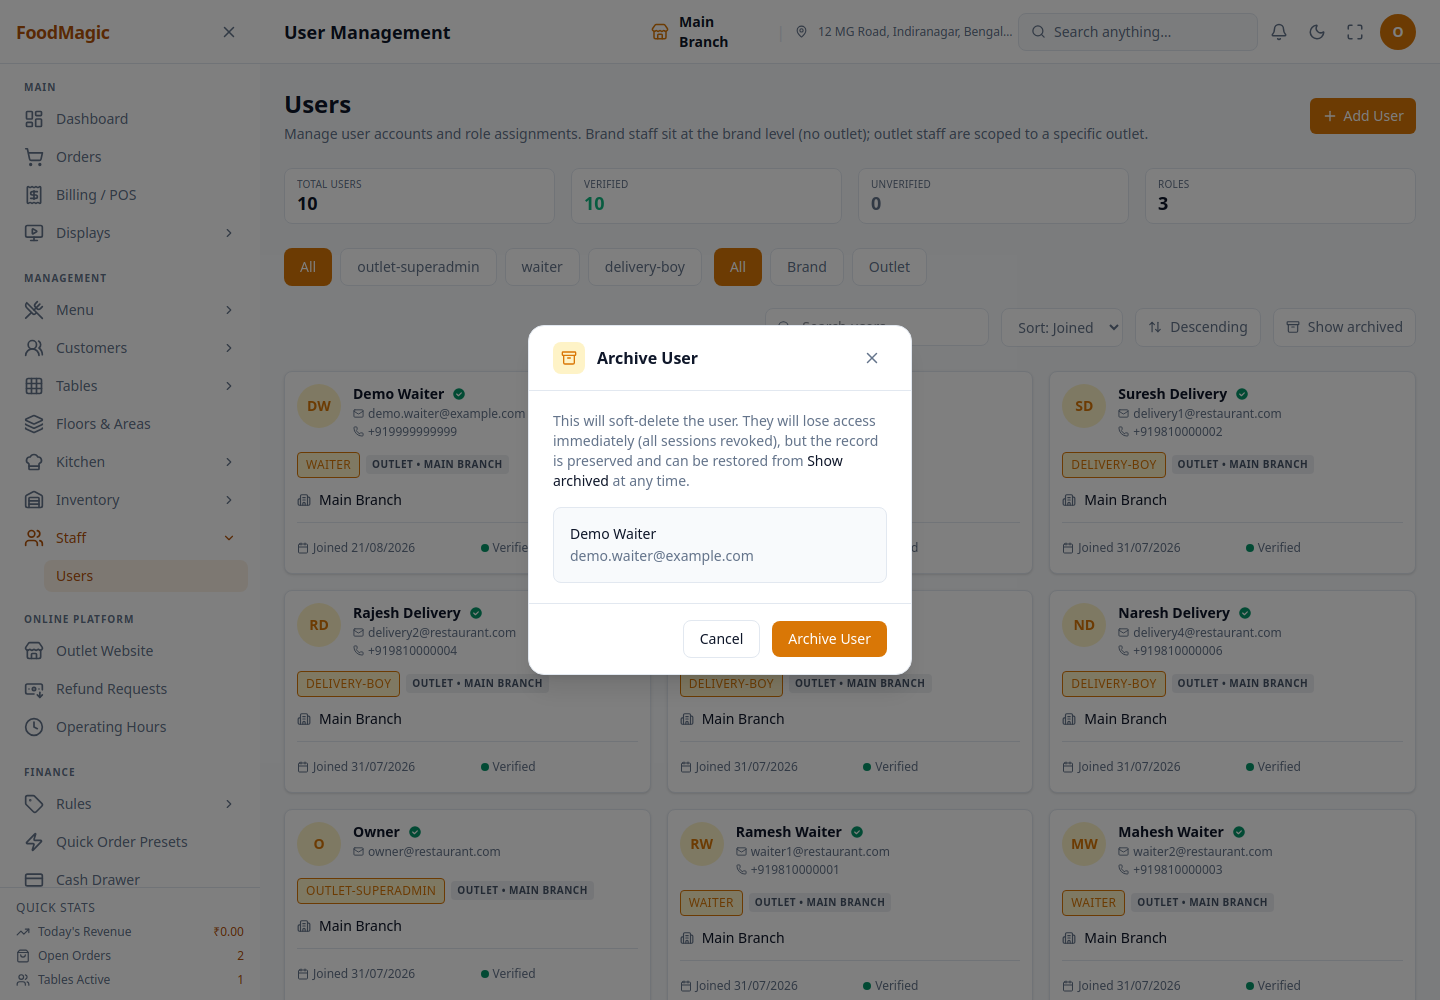
Archiving is a soft delete, confirmed live: it revokes every one of that user's active sessions immediately, on top of blocking new logins — so a session they're already signed into stops working too, not just future sign-in attempts.
Each of these actions has its own on/off switch in the role editor, so a role can be given, for example, edit access without archive access.
Add User — the six-step wizard
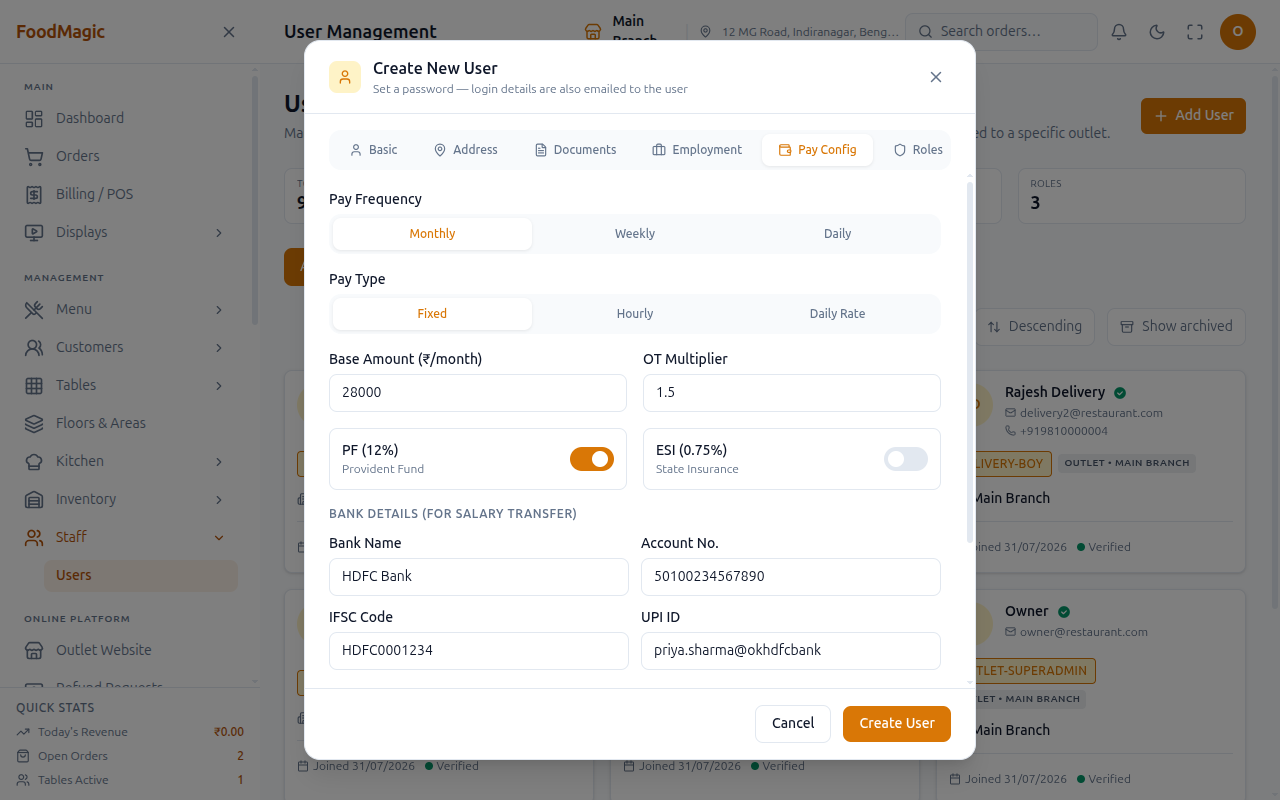
Add User opens a form with six tabs — Basic, Address, Documents, Employment, Pay Config, Roles — that all submit together as one action. There's no save button on each tab; every field from every tab is collected and sent together at the end.
| Tab | Collects |
|---|---|
| Basic | Full name, email, phone, date of birth, password + confirmation, gender, blood group, emergency contact name/phone |
| Address | Current address (line 1/2, city, state, pincode, country) and a permanent address, with a Same as current shortcut |
| Documents | Aadhar (12 digits) and PAN (ABCDE1234F format) |
| Employment | Employee code, joining date, monthly salary |
| Pay Config | Pay frequency (monthly/weekly/daily), pay type (Fixed/Hourly/Daily Rate), base amount, overtime multiplier, PF/ESI toggles, bank name, account number, IFSC, UPI ID |
| Roles | One role (Outlet Manager, Waiter, Delivery Rider, or a custom role), plus an Outlet picker that only appears for some actor/role combinations — see below |
Whenever a new person joins, this is the only way to create their login. Whether someone can even see the Add User button is controlled by permission — a role without that permission never sees the option.
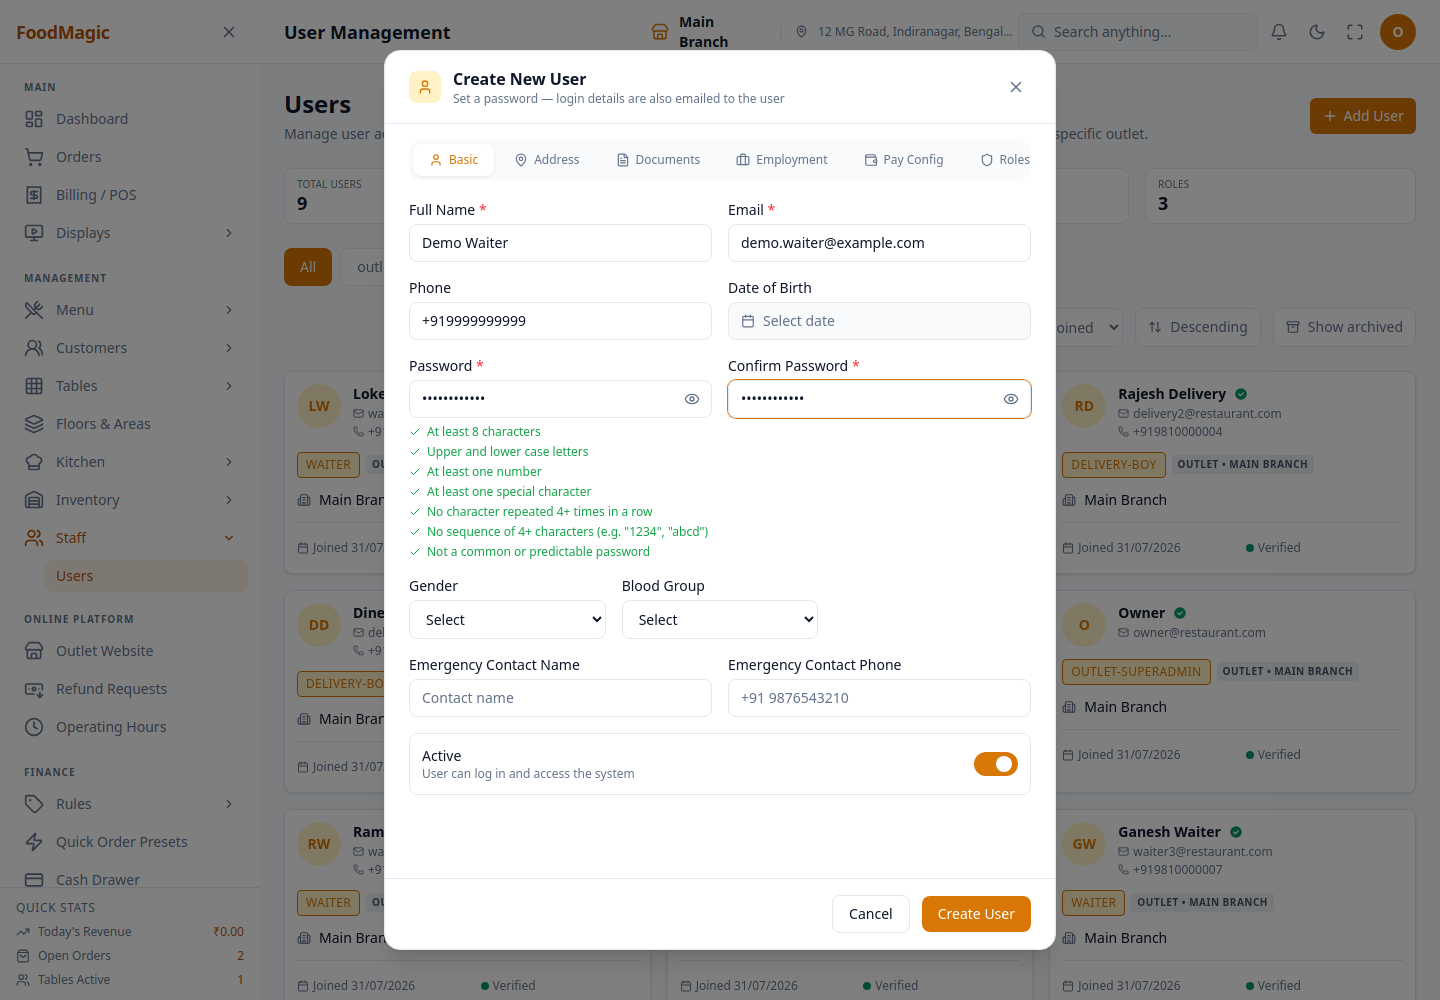
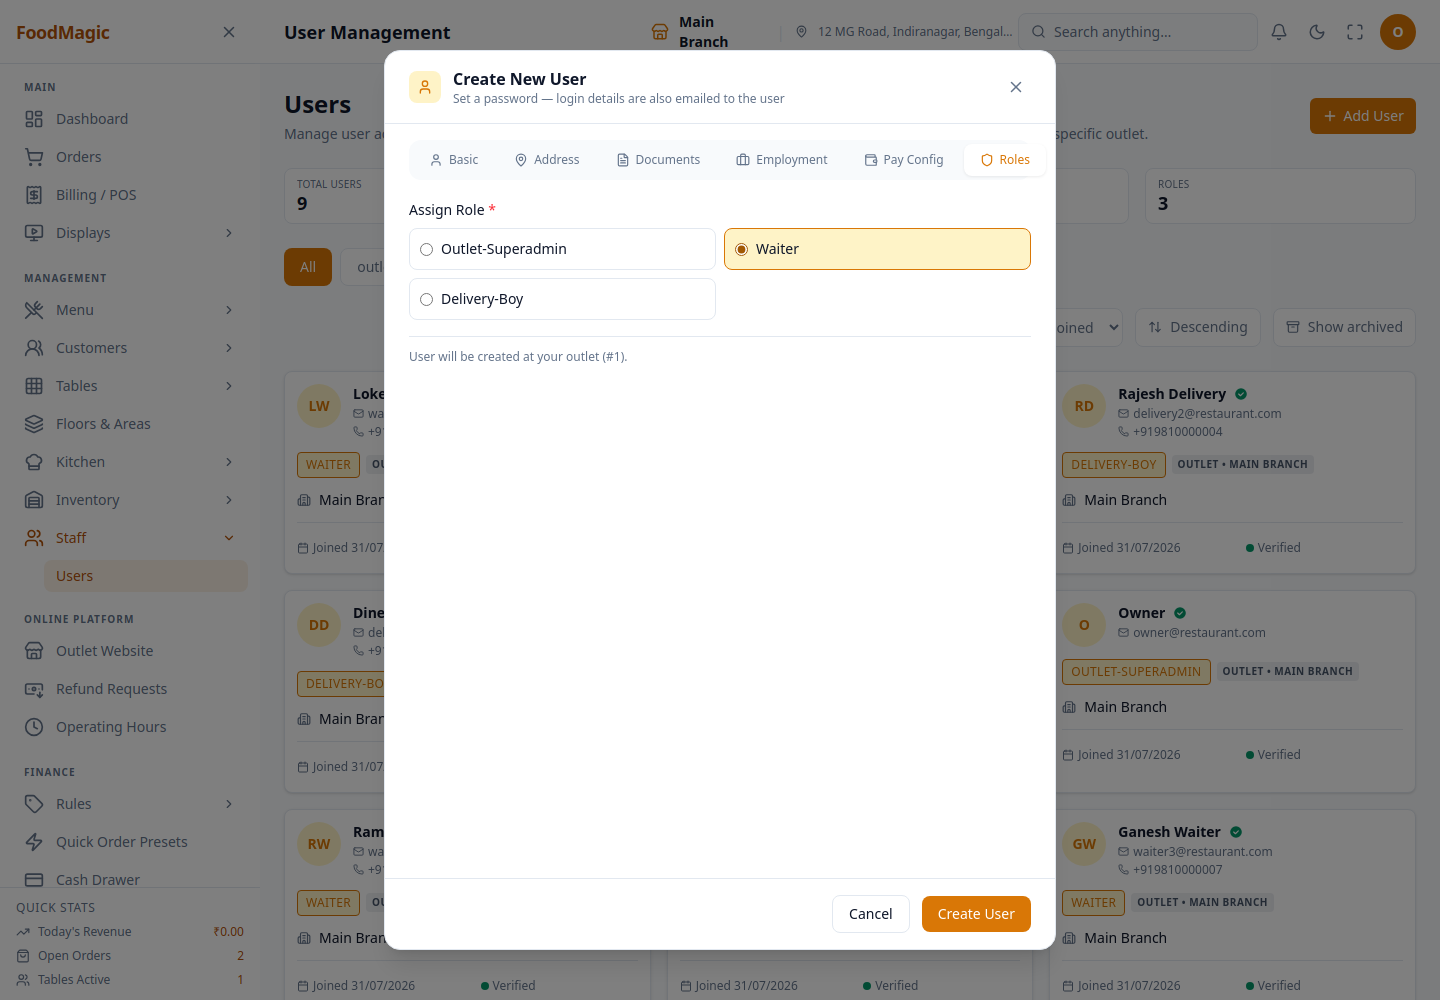
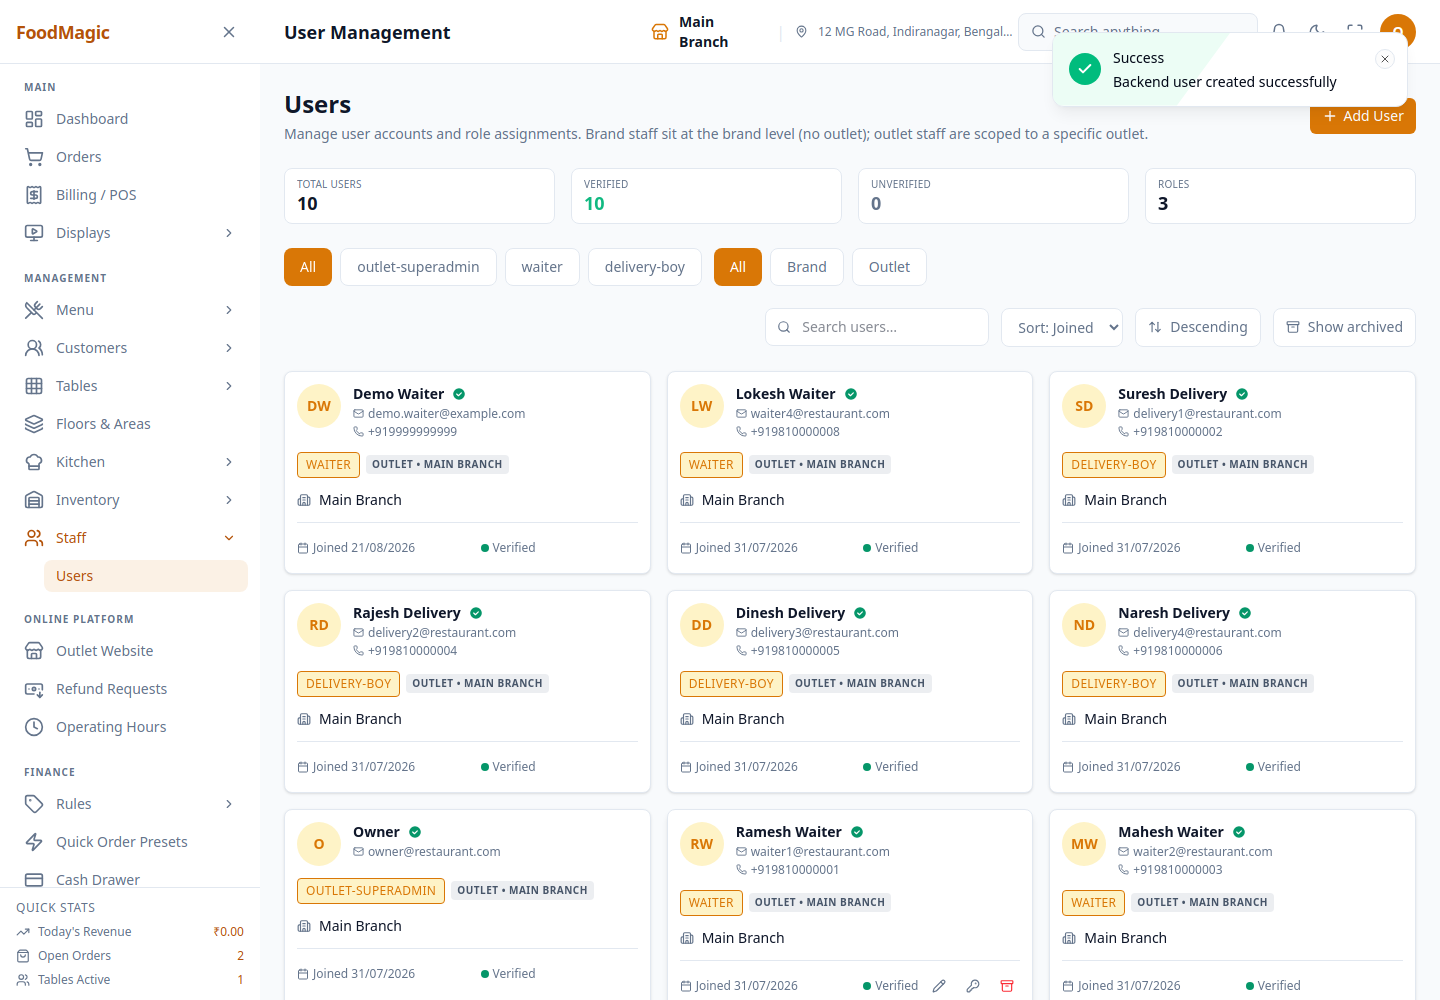
The password set here is final, not temporary. When an admin sets a password this way, the staff member is not forced to change it on first login. That only happens in a rare, behind-the-scenes case where a user is created without a password and a random one is assigned instead.
The password has to clear six checks
Every password set anywhere in the system, including here, has to follow
the same rules: at least 8 characters, a mix of upper and lower case
letters, at least one number, at least one special character, no
character repeated 4 times in a row, and no 4-character run like 1234
or abcd. Passwords are also checked against a list of common passwords
— even something like password123! is rejected, because stripping the
numbers off the end still leaves the common password password.
The role decides whether the Outlet field appears at all
The outlet picker on the Roles tab doesn't always appear, and even when it does, filling it in isn't always required. It depends on who is creating the user, and which role is picked:
| Who is creating | Role picked | Outlet field |
|---|---|---|
| Super Admin (no outlet of their own) | An outlet-level role (Outlet Manager, Waiter, Delivery Rider) | Required — must belong to the Super Admin's own brand |
| Super Admin | A brand-level role | Must be absent — rejected with a validation error if sent |
| Outlet Manager | Any role they're allowed to assign | Ignored — the new user always lands at the manager's own outlet, even if a value is sent |
Only outlet-level roles can be assigned from this form at all. Creating a second brand-level Super Admin account is blocked outright — both by the form's own list of roles, and, as a backup check, by the system itself. A brand can only ever have one Super Admin.
This matters as soon as a brand runs more than one outlet. Picking the wrong outlet here is how a new waiter can end up unable to see their own till. This rule is checked twice — once when the form is submitted, and again when the account is actually created — so it can't be skipped through any other route into the system.
Pay Config is a second, separate step — and it does not roll back if it fails. Filling in Base Amount on the Pay Config tab is not part of the same submission as the rest of the wizard. The user is created first, and only after that does a second step set up their pay. If that second step fails, the user still exists — fully created, with roles assigned — but with no pay setup, and the only warning you'll see is a message reading "User created but pay config failed — set it manually." Check Payroll → Pay Config for that person if a newly created hourly/daily-rate/fixed employee earns nothing on their first payroll run.
How it is secured
Every one of the four staff processes, plus the staff list itself, has its own named switch on the Roles & Permissions screen. A role either has that switch turned on or off — having one permission never automatically grants another.
| Control (as shown on Roles & Permissions) | What it lets someone do |
|---|---|
| View users | See the staff list |
| Create users | Add a new staff member |
| Update users | Edit a staff member's details |
| Change user passwords | Set a new password for someone else |
| Delete users | Archive a staff member |
| Manage roles | Create, edit and delete roles, and change what each role can do |
| Manage user permissions | Override an individual person's access on top of their role, from the Access tab |
That covers the staff list itself. Each of the four day-to-day processes has its own separate switches:
| Control | What it lets someone do |
|---|---|
| View attendance | See the daily attendance sheet, history and summaries for the outlet |
| Mark attendance | Mark, edit and remove a staff member's attendance for a day |
| Apply for leave | Apply for your own leave, see your own history, cancel your own pending request |
| Manage leave requests | Create a leave request on behalf of anyone, and approve/reject/change any leave request in the outlet |
| View payroll | See the Payroll admin page |
| Generate payroll | Generate monthly payroll for staff |
| Approve payroll | Approve generated payroll before payment |
| Pay salaries | Mark salaries as paid and trigger disbursement |
| Manage salary advances | Issue and track salary advances against future pay |
Manage roles and Manage user permissions are reserved for the brand Super Admin. An Outlet Manager can hire, edit and archive staff at their own outlet, but cannot open the role editor or grant a one-off exception to a single person — that stays with the Super Admin.
Who holds what, by default
The system comes with four roles: Super Admin (one per brand), Outlet Manager, Waiter, and Delivery Rider. Here's what each one can do by default:
| Role | Attendance, Leave, Payroll, Advances |
|---|---|
| Super Admin | None of it, by default. All four processes are outlet-level controls. The Super Admin role is automatically given brand-wide controls, plus a short extra list for oversight — staff records, tax rates, pricing rules, and reports. Attendance/leave/payroll/advances are not on that list. |
| Outlet Manager | All of it. This role automatically holds every outlet-level control that exists, including any new ones added later. |
| Waiter | None of the four, out of the box. My Attendance and My Payslips still work for them (see below), but My Leave Requests won't appear until an admin turns on Apply for leave for this role. |
| Delivery Rider | Same as Waiter — none of the four are on by default. |
As the system ships, the brand Super Admin cannot see or touch payroll, attendance, leave or advances at all — and there's no button anywhere on the Roles & Permissions screen to fix that. The Super Admin's own role can't even be opened in the role editor, because it's a protected role, not an editable one. So there is no way, inside the product, for a Super Admin to give themselves these controls. Only the Outlet Manager role has them by default. If a brand's Super Admin wants to review payroll, they currently have to either log in through an Outlet Manager account, or have someone with direct system access add that permission for them — neither of which is a screen inside the product itself. This is a confirmed gap in the current setup, not a guess.
My Attendance and My Payslips need no permission at all — every signed-in staff member can see their own, no matter their role. My Leave Requests is the one self-service screen that does need a permission (Apply for leave). Whether a Waiter or Delivery Rider sees it depends entirely on whether an admin has turned that on for their role.
Tenancy — one outlet at a time
A staff member's attendance, leave requests, payroll records, and salary advances all belong to a single outlet. None of these records separately track which brand that outlet belongs to — the system only knows the brand through the outlet itself. In practice, this means all four screens are reviewed and approved one outlet at a time. There is no single combined view covering every outlet a brand owns.
Related pages
Marking who worked each day.
Applying for and approving time off.
Turning attendance into pay.
Paying staff ahead of payday.
The role editor, and who can grant what.
Every settings screen, and which kind of user can open it.